


8
Brocade Network Advisor SAN User Manual
53-1003154-01
Management server and client
1
•
Options dialog box (does not display all IP addresses)
•
Firmware import and download dialog box
•
Firmware import for Fabric OS and Network OS products
•
FTP button in Technical Support Repository dialog box
•
Technical supportSave of Fabric OS, Network OS, and Host products through FTP
a. Select an address from the Server IP Configuration list.
b. Select an address from the Switch - Server IP Configuration Preferred Address list.
NOTE
If the “hostname” contains invalid characters, the host name does not display in the list.
Valid characters include alphanumeric and dash (-) characters. The IP address is selected
by default. If an IPv6 address is selected, server start up will fail.
If DNS is not configured for your network, do not select the ‘hostname’ option from either
the Server IP Configuration or Switch - Server IP Configuration Preferred Address list.
Selecting the ‘hostname’ option prevents clients and devices from communicating with
the Server.
If you select a specific IP address from the Server IP Configuration screen and the selected
IP address changes, you will not be able to connect to the server. To change the IP
address, refer to
“Configuring an explicit server IP address”
on page 118.
c. Click Next.
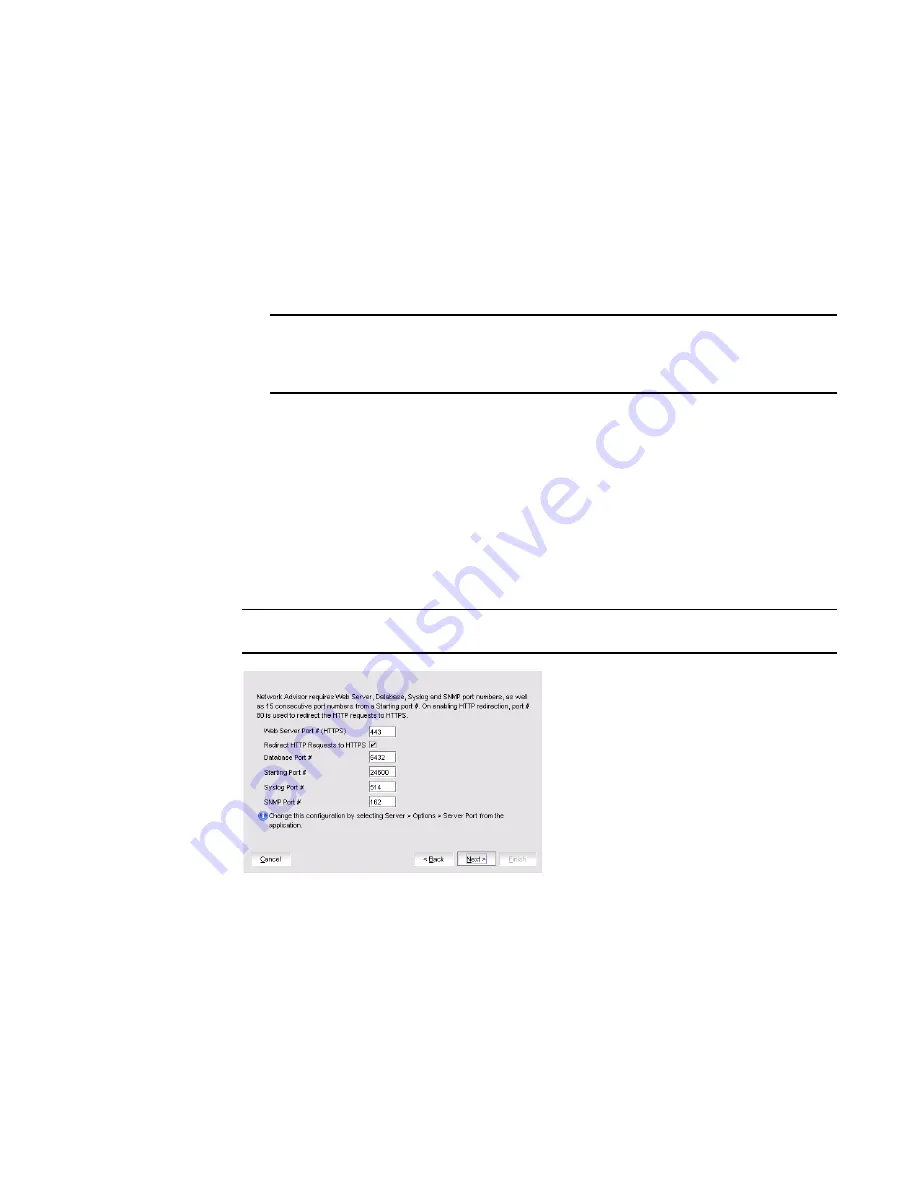
6. Complete the following steps on the Server Configuration screen.
NOTE
Do not use port 2638 for any of these port numbers. Port 2638 is used internally by the server.
FIGURE 4
Server Configuration screen
a. Enter a port number in the Web Server Port # (HTTPS) field (default is 443).
b. Enable HTTP redirection to HTTPS by selecting the Redirect HTTP Requests to HTTPS
check box.
When you enable HTTP redirection, the server uses port 80 to redirect HTTP requests to
HTTPS. You can configure the server port settings from the Options dialog box (Server Port
pane). For instructions, refer to
“Configuring the server port”
on page 130.
c. Enter a port number in the Database Port # field (default is 5432).
Summary of Contents for Network Advisor 12.3.0
Page 4: ...iv Brocade Network Advisor SAN User Manual 53 1003154 01...
Page 86: ...34 Brocade Network Advisor SAN User Manual 53 1003154 01 Uninstalling a patch 2...
Page 190: ...138 Brocade Network Advisor SAN User Manual 53 1003154 01 Fabric tracking 4...
Page 216: ...164 Brocade Network Advisor SAN User Manual 53 1003154 01 User profiles 5...
Page 612: ...560 Brocade Network Advisor SAN User Manual 53 1003154 01 Exporting Host port mapping 13...
Page 620: ...568 Brocade Network Advisor SAN User Manual 53 1003154 01 Exporting storage port mapping 14...
Page 720: ...668 Brocade Network Advisor SAN User Manual 53 1003154 01 Security configuration deployment 17...
Page 744: ...692 Brocade Network Advisor SAN User Manual 53 1003154 01 Configuring Virtual Fabrics 19...
Page 1068: ...1016 Brocade Network Advisor SAN User Manual 53 1003154 01 Removing thresholds 24...
Page 1098: ...1046 Brocade Network Advisor SAN User Manual 53 1003154 01 Swapping blades 25...
Page 1176: ...1124 Brocade Network Advisor SAN User Manual 53 1003154 01 SAN connection utilization 28...
Page 1378: ...1326 Brocade Network Advisor SAN User Manual 53 1003154 01 Event logs 32...
Page 1448: ...1396 Brocade Network Advisor SAN User Manual 53 1003154 01 Upload failure data capture 34...
Page 1490: ...1438 Brocade Network Advisor SAN User Manual 53 1003154 01 SAN shortcut menus A...
Page 1494: ...1442 Brocade Network Advisor SAN User Manual 53 1003154 01 Call Home Event Tables B...
Page 1524: ...1472 Brocade Network Advisor SAN User Manual 53 1003154 01 About Roles and Access Levels D...
Page 1552: ...1500 Brocade Network Advisor SAN User Manual 53 1003154 01 Regular Expressions F...
Page 1920: ...1868 Brocade Network Advisor SAN User Manual 53 1003154 01 Views H...


