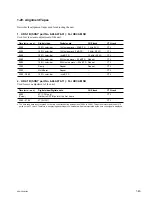

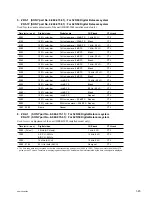


1-57
SRW-5000/5500
1-25-30. SE-606A Board
After replacing and repairing this board, adjust the Tele-
File system (Section 8-9).
1-25-31. SS-95 Board
After repairing this board
(except for NV-RAM replacement)
Perform the servo/DT system adjustment (Section 8-3).
After replacing the NV-RAM
1.
Turn on the unit of the power while pressing the
[0]
,
[SET]
, and
[CLR]
keys simultaneously.
n
Keep pressing the keys until the confirmation sound is
beeped. This operation initializes the NV-RAM
without a system error caused by its data loss. (The
setting is reset to the value fixed in the ROM).
2.
Take the following service actions, referring to
“Section 1-18. NV-RAM”.
.
Setting data of setup menu
.
Setting data of VTR bank
.
Headroom of audio level meter
.
Calendar/clock
.
50-pin remote setting data
.
Network information
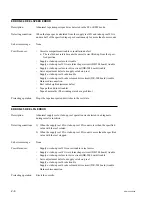
Board Replacement
Before replacing this board, perform the following.
1.
Check that the setup menus (basic and extended
menus) functions normally.
2.
Save the settings of the setup menus into a Memory
Stick. (Refer to “Section 1-26. Memory Stick”.)
When the Memory Stick cannot be used, take notes of
the settings of the setup menus.
3.
Take notes of the following settings:
.
Setting data of VTR bank
.
Headroom of audio level meter
.
50-pin remote setting data
.
Network information
4.
Check that each DIP switch on the new board is the
factory setting. (Refer to Section 1-14.)
5.
Remove the backup battery from IC116 on the new
board, and install it again after a while. (Refer to
Section 1-17.)
After the board replacement, perform the following.
1.
Turn on the power of the unit while pressing the
[0]
,
[SET]
, and
[CLR]
keys simultaneously.
n
Keep pressing the keys until the confirmation sound is
beeped.
2.
Perform the servo/DT system adjustment
(Section 8-3).
3.
Set the setting values of the setup menus (basic and
extended menus) saved in step 2 of “Board Replace-
ment” again.
4.
Take the following service actions, referring to
“Section 1-18. NV-RAM”.
.
Setting data of VTR bank
.
Headroom of audio level meter
.
Calendar/clock
.
50-pin remote setting data
.
Network information
1-25-32. SWC-43 Board
After replacing and repairing this board, check that the
switches and indicators function normally.
1-25-33. TC-104 Board
After replacing and repairing this board, adjust the LTC
system and full-erase current (Section 8-8).
1-25-34. TR-119 Board
n
As the mounted TR-119 board is not a specified service
part, it must be replaced together with the whole S tension
regulator assembly.
After replacing the S tension regulator assembly, check
and adjust tape running (Section 6-12).
Содержание SRW-5000
Страница 4: ......
Страница 12: ......
Страница 16: ......
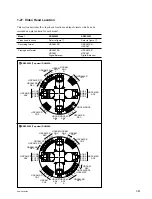
Страница 58: ...1 42 SRW 5000 5500 d l l S G L 6 6 d d 4 8 3 7 2 6 0 1 5 9 ...
Страница 78: ......
Страница 194: ......
Страница 376: ......
Страница 398: ......
Страница 438: ...Printed in Japan Sony Corporation 2005 2 08 B P Company 2004 SRW 5000 SY SRW 5500 SY E 9 968 022 03 ...