


3-52
SRW-5000/5500
SAVE/
EXIT
[SYS CONTACT]
[SYS NAME]
[SYS LOCATION]
SNMP SYS INFO SETUP
SPACE
BACK
SPACE
CANCEL
SET
LETTER
SYS CONTACT
[||||||||||||||||||||||||||||||||||]
ABCDEFGHIJKLMNOPQRSTUVWXYZ
a b c d e f g h i j k l m n o p q r s t u v w x y z
0 1 2 3 4 5 6 7 8 9 [ ] ( ) < > @
+ _ *
= ! ? : ; |
$ # % & , . " \ ^ _ ' / ~ ` { } HD1D2CAM
_
DIAG
F1
F2
F3
F4
ALT
F5
F6
F7
F8
F9
F10
EXIT
[SYS CONTACT]
[SYS NAME]
[SYS LOCATION]
SNMP SYS INFO SETUP
SYS
CONTCT
SYS
NAME
SYS
LOCATE
DIAG
F1
F2
F3
F4
ALT
F6
F7
F8
F9
F10
F5
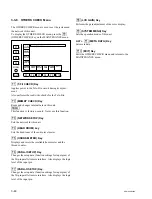
Setting SNMP SYS INFORMATION
1.
On the NETWORK SETUP menu, press the
[F5]
(SNMP SYS) key to display the SNMP INFORMA-
TION menu.
2.
Press the function key corresponding to an item to be
set.
[F1]
(SYS CONTCT) Key: Setting of administrator’s
information
[F2]
(SYS NAME) Key:
Setting of SNMP system
name.
[F3]
(SYS LOCATE) Key: Setting of installation
location
.
The TEXT EDIT window is displayed.
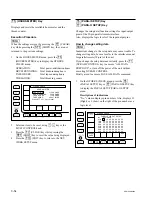
3.
Enter a text.
(For details on how to enter the text, refer to Section 4-
1-6 in the operation manual.)
4.
Press the
[F10]
(SAVE/EXIT) key to confirm the
entry.
.
The confirmed text is displayed.
5.
Press the
[F10]
(SAVE/EXIT) key again to return to
the NETWORK SETUP menu.
SAVE/
EXIT
[READ ONLY COMUNITY NAME]
[READ/WRITE COMUNITY NAME]
[TRAP ONLY COMUNITY NAME]
SNMP COMMUNITY NAME INFO SETUP
SPACE
BACK
SPACE
CANCEL
SET
LETTER
READ ONLY COMUNITY NAME
[||||||||||||||||||||||||||||||||||]
ABCDEFGHIJKLMNOPQRSTUVWXYZ
a b c d e f g h i j k l m n o p q r s t u v w x y z
0 1 2 3 4 5 6 7 8 9 [ ] ( ) < > @
+ _ *
= ! ? : ; |
$ # % & , . " \ ^ _ ' / ~ ` { } HD1D2CAM
_
DIAG
F1
F2
F3
F4
ALT
F5
F6
F7
F8
F9
F10
EXIT
[READ ONLY COMUNITY NAME]
[READ/WRITE COMUNITY NAME]
[TRAP ONLY COMUNITY NAME]
SNMP COMMUNITY NAME INFO SETUP
READ
ONLY
READ
WRITE
TRAP
ONLY
DIAG
F1
F2
F3
ALT
F5
F6
F7
F8
F9
F10
F4
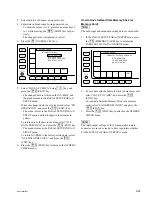
Setting SNMP COMMUNITY NAME INFORMATION
1.
On the NETWORK SETUP menu, press the
[F4]
(SNMP COMM) key to display the SNMP MANE
menu.
2.
Press the function key corresponding to an item to be
set.
[F1]
(READ ONLY) Key:
Sets a read-only host
community name.
[F2]
(READ WRITE) Key: Sets a read/write host
community name.
[F3]
(TRAP ONLY) Key:
Sets Trap1 to Trap4
community names to
receive an SNMP trap.
.
The TEXT EDIT window is displayed.
3.
Enter a text.
(For details on how to enter the text, refer to Section 4-
1-6 in the operation manual.)
4.
Press the
[F10]
(SAVE/EXIT) key to confirm the
entry.
.
The confirmed text is displayed.
5.
Press the
[F10]
(SAVE/EXIT) key again to return to
the NETWORK SETUP menu.
Содержание SRW-5000
Страница 4: ......
Страница 12: ......
Страница 16: ......
Страница 58: ...1 42 SRW 5000 5500 d l l S G L 6 6 d d 4 8 3 7 2 6 0 1 5 9 ...
Страница 78: ......
Страница 194: ......
Страница 376: ......
Страница 398: ......
Страница 438: ...Printed in Japan Sony Corporation 2005 2 08 B P Company 2004 SRW 5000 SY SRW 5500 SY E 9 968 022 03 ...