


5-70
SRW-5000/5500
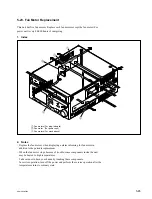
5-20. T Tension Regulator Assembly Replacement
Outline
Replacement
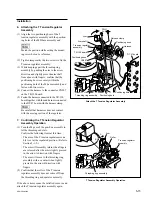
1.
Shifting the TG-6
2.
Disconnecting the Flexible Board (CN220/DT-47 Board)
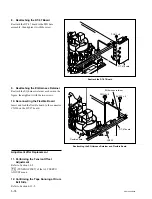
3.
Removing the EQ Harness Retainer
4.
Removing the DT-47 Board
5.
Removing the T Tension Regulator Assembly
6.
Attaching the T Tension Regulator Assembly
7.
Confirming the T Tension Regulator Assembly Operation
8.
Reattaching the DT-47 Board
9.
Reattaching the EQ Harness Retainer
10. Reconnecting the Flexible Board (CN220/DT-47 Board)
Adjustment after Replacement
11. Performing the Tension Offset Adjustment (Refer to Section 3-4-2.)
[F4]
(TENSN OFFSET) of the ALT SERVO ADJUST menu
12. Confirming the Tape Running at Drum Exit Side (Refer to Section 6-12-2.)
Note
The T tension regulator assembly comprises of precision components and is adjusted
strictly. When removing/installing, use extreme care to turn only screws specified.
Tools
.
Cleaning cloth:
3-184-527-01
.
Cleaning fluid:
9-919-573-01
Preparation
1.
Set the unit into the unthreading end mode. (Refer to step 2 in Section 5-1-2.)
2.
Turn the power off and disconnect the power cord.
3.
Remove the upper lid (front) assembly. (Refer to Section 1-3-1.)
4.
Remove the cassette compartment. (Refer to Section 1-5.)
5.
Open the AE-31H board. (Refer to the figure in Section 5-1-2.)
Содержание SRW-5000
Страница 4: ......
Страница 12: ......
Страница 16: ......
Страница 58: ...1 42 SRW 5000 5500 d l l S G L 6 6 d d 4 8 3 7 2 6 0 1 5 9 ...
Страница 78: ......
Страница 194: ......
Страница 376: ......
Страница 398: ......
Страница 438: ...Printed in Japan Sony Corporation 2005 2 08 B P Company 2004 SRW 5000 SY SRW 5500 SY E 9 968 022 03 ...