


1-8
SRW-5000/5500
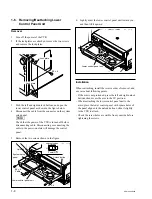
Lower control panel unit
6.
Lightly draw the lower control panel unit toward you,
and then lift it upward.
Installation
When reattaching, install the reverse order of removal, and
use care about following points.
.
If the arm is not protruded, press the left and right unlock
buttons, then secure the arm to the 90
d
position.
.
When reattaching the lower control panel unit to the
arms, place the lower control panel with square holes of
the panel aligned to the unlock buttons, slide it slightly
to the VTR to attach.
.
Check the screw holes are visible from your side before
tightening the screws.
1-6. Removing/Reattaching Lower
Control Panel Unit
Removal
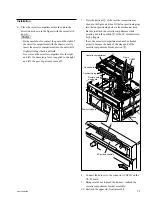
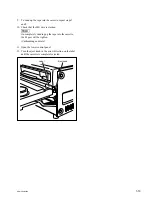
1.
Turn off the power of the VTR.
2.
If the lock plates are attached, remove the two screws
and remove the lock plates.
3.
Push the left and right unlock buttons, and open the
lower control panel as shown in the figure below.
4.
Disconnect the cable from the connector on the system
setup panel.
n
Check that the power of the VTR is turned off before
disconnecting cable. Disconnecting or connecting the
cable in the power-on state will damage the control
panel.
5.
Remove the two screws shown in the figure.
B3
x
6
Cable
B3
x
6
Lower control panel unit
Unlock button
System setup
panel
Unlock button
POWER
Power OFF
O
I
B3
x
6
Lock plate
Lock plate
Содержание SRW-5000
Страница 4: ......
Страница 12: ......
Страница 16: ......
Страница 58: ...1 42 SRW 5000 5500 d l l S G L 6 6 d d 4 8 3 7 2 6 0 1 5 9 ...
Страница 78: ......
Страница 194: ......
Страница 376: ......
Страница 398: ......
Страница 438: ...Printed in Japan Sony Corporation 2005 2 08 B P Company 2004 SRW 5000 SY SRW 5500 SY E 9 968 022 03 ...