


STARTUP AND INITIALIZATION
4-56
Edition One
XC1000 Service
Select
1
for all switch types except the DMS-100/SL-100 with 1X67 I/O
card, Revision BC or BD, which uses XON/XOFF.
10. In the
Carrier Detect:
field, enter one of the following:
0
– Carrier Detect Used
1
– Carrier Detect Not Used
11. In the
Extension to Check SMDI Message Waiting:
field, enter an
extension to check link status when SMDI integration is used. For
example, enter a invalid, 7-digit telephone number such as
999–9999
.
An error message is then returned from the switch, indicating that the
link is functioning.
Add as many links as are connected to the ACP I/O distribution board or
RS-232 ports by repeating menu 6.5.1 for additional link numbers.
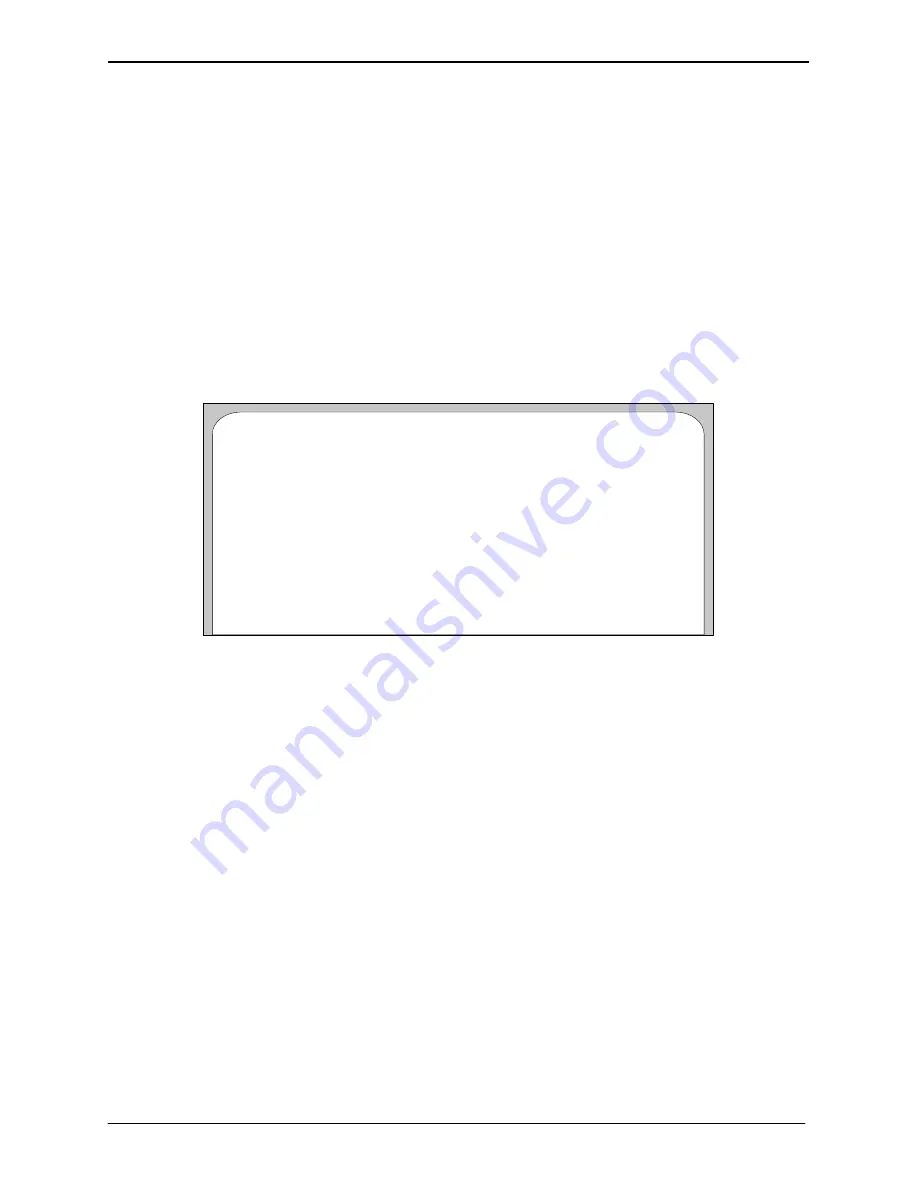
Figure 4-34 shows an example of a complete screen for menu 6.5.1.
Link Number: 1
Link Name: Milpitas link 1
Type of Switch to which the System is Integrated: 3 – CENTREX 1AESS/SMDI
Baud Rate: 0 – 1200 Baud
Number of Data Bits: 0 – 7 Data Bits
Number of Stop Bits: 0 – 7 Stop Bits
Parity (None/Odd/Even): 0 – No Parity
XON/XOFF: 1 – Ignore XON/XOFF
Carrier Detect: 1 – Carrier Detect Not Used
Extension to Check SMDI Message Waiting: 5999
Menu 6 – Dialing and Serial Channel Parameters
– Add Integration Link –
Figure 4-34. Example of a Completed Screen for Menu 6.5.1.
4.8.5.2
Integration-Link Changes.
Select option
2
from menu 6.5 to change an
integration link. Changing an integration link is similar to adding a link, as
detailed in section 4.8.5.1. The same fields appear in menu 6.5.2 as in menu
6.5.1, except that there are already entries in the fields. Changes can be
made in the fields, as applicable.
4.8.5.3
Integration-Link Reviews.
Select option
3
from menu 6.5 to review all the
integration links configured on XC1000 and their corresponding fields.
This menu is for information only and the fields cannot be changed.
4.8.5.4
Integration-Link Deletions.
To delete an integration link, perform the
following steps:
1. Select option
4
from menu 6.5
.
Menu 6.5.4 appears, with only the
Enter Integration Link to delete:
field displayed.
2. Enter the link number of the link to be deleted. The link number and
link name appear under the
Link Number
column and the
Link Name
column, respectively. A prompt,
Do you really want to delete? (Y/N):
appears at the bottom of the screen.
3. Select
Y
to delete the link or
N
to leave it as is.
SECTION 4.8
Содержание XC1000
Страница 1: ...EDITION ONE XC1000 P N 101 1345 000 SERVICE MANUAL ...
Страница 8: ...CONTENTS ...
Страница 19: ...1 INTRODUCTION ...
Страница 30: ...2 SITE PREPARATION ...
Страница 60: ...3 PLATFORM INSTALLATION ...
Страница 112: ...4 STARTUP AND INITIALIZATION ...
Страница 177: ...5 ROUTINE MAINTENANCE ...
Страница 195: ...6 TROUBLESHOOTING ...
Страница 237: ...7 STATUS LOG ...
Страница 297: ...STATUS LOG 7 54 Edition One XC1000 Service ...
Страница 302: ...8 REPAIR AND REPLACEMENT ...
Страница 380: ...9 SYSTEM UTILITIES ...
Страница 424: ...10 COMPONENT DESCRIPTIONS ...
Страница 465: ...11 OPTIONAL FEATURES ...
Страница 485: ...12 RELEASE 1 55 UPGRADE INSTRUCTIONS ...
Страница 516: ...13 RELEASE 2 X UPGRADE INSTRUCTIONS ...
Страница 559: ...14 RELEASE 3 02 FCP CONVERSION INSTRUCTIONS ...
Страница 603: ...15 RELEASE 3 02 ONLINE UPGRADE INSTRUCTIONS ...
Страница 631: ...16 RELEASE 3 0 SYSTEM UTILITIES ...
Страница 683: ...17 RELEASE 4 X FCP CONVERSION INSTRUCTIONS r P N 281 0023 002 1 of 3 ...
Страница 725: ...18 RELEASE 4 X ONLINE UPGRADE INSTRUCTIONS r P N 281 0023 002 2 of 3 ...
Страница 760: ...19 RELEASE 4 0 SYSTEM UTILITIES P N 281 0023 002 Part 3 of 3 r ...
Страница 776: ...20 RELEASE 4 1 SYSTEM UTILITIES P N 281 0033 000 ...
Страница 787: ...APPENDIXES ...


