


MiVoice Office 250 Installation and Administration Guide
190
Installing a Four-Port Loop Start Module (LSM-4)
The LSM-4 provides four trunk interface ports. For additional technical data about the LSM-4, see
chapter. See page 154 for information on how this module is cabled to the MDF.
To install an LSM-4:
1.
Using a properly terminated, anti-static wrist strap, remove the module from the protective
anti-static bag. For an example of an LSM-4 module that you can see for the remaining steps
in this procedure, see
.
2.
Insert the module carefully so that it aligns with the rails inside the chassis, then gently slide the
module into the chassis until it stops. Do not use force.
3.
Tighten the fastener at the top of the module, securing the module to the chassis. Do not over
tighten this fastener.
4.
Continue to “Verifying and Securing Cable Connections” on page 165.
To remove an LSM-4:
1.
Using a properly terminated, anti-static wrist strap, loosen the fastener at the top of the module
(this fastener secures the module to the chassis).
2.
Push down and hold the module release lever.
3.
When the
REMOVE
LED turns green, grasp the module handle and carefully remove the module
from the chassis.
IMPORTANT
The LSM-4 can be removed with power on; however, you must wait for the REMOVE
LED indicator to change to green before removing the module. Pressing and holding
the release lever until the LED indicator turns green allows the software to “disconnect”
from the module. Failure to wait until the LED turns green, could result in pending
information getting lost or unexpected system behavior.
LSM-4 modules can reside in any bay. However, DB Programming will need to change,
if you move a module (that was previously programmed) into a different bay location.
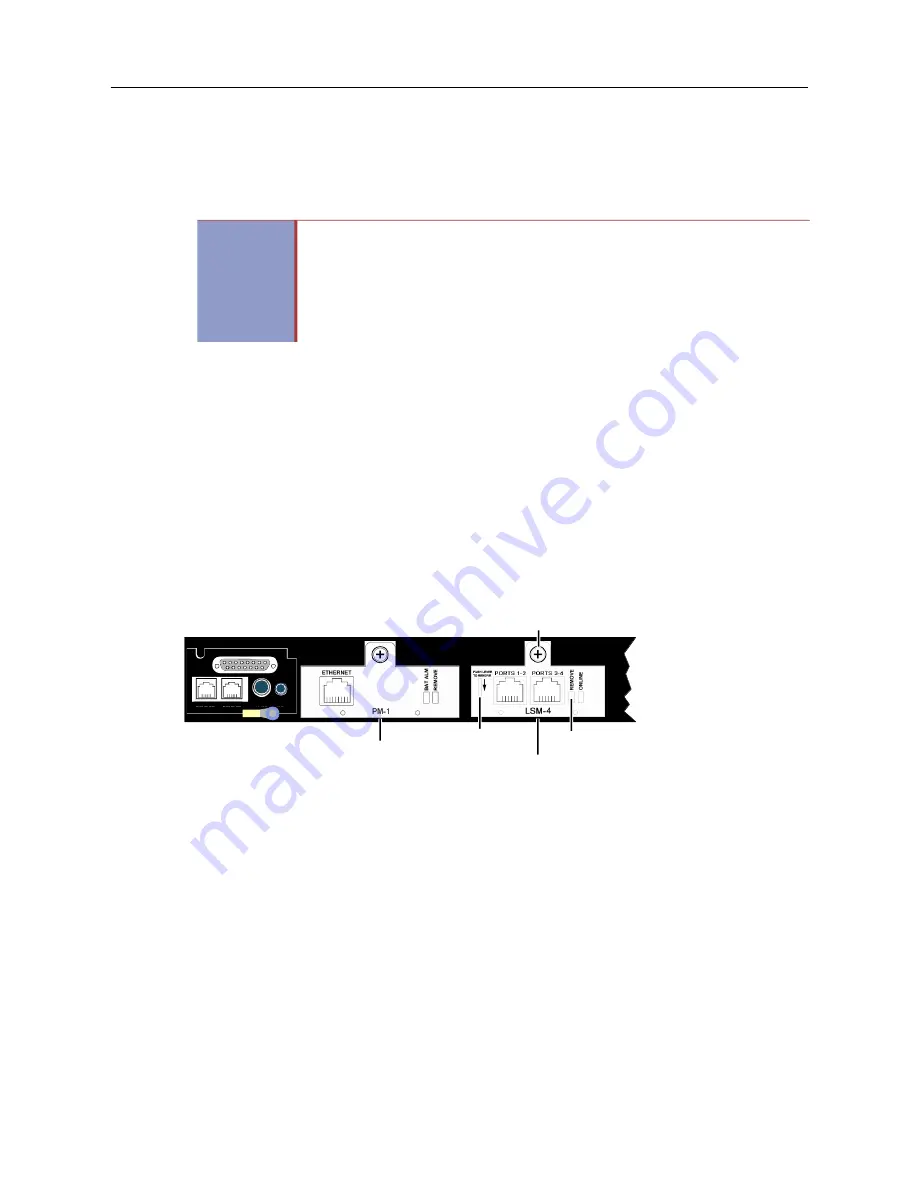
Figure 5: LSM-4 Module
LSM-4
Processor Module
Base Server Back (CS Controller in this example)
Module
Release
Lever
Module-to-Chassis Fastener
Remove Module LED
DUAL LS DUAL SL
EXP
PAGE MOH
Содержание MIVOICE OFFICE 250
Страница 1: ...MiVoice Office 250 INSTALLATION AND ADMINISTRATION GUIDE RELEASE 6 3 SP3 ...
Страница 24: ...MiVoice Office 250 Installation and Administration Guide xxiv ...
Страница 29: ...Chapter 1 MiVoice Office 250 New Features ...
Страница 41: ...MiVoice Office 250 New Features 13 Other Enhancements MiVoice Office 250 Release 6 2 supports Exchange 2016 ...
Страница 54: ...MiVoice Office 250 Installation and Administration Guide 26 ...
Страница 55: ...Chapter 2 Document Overview ...
Страница 62: ...MiVoice Office 250 Installation and Administration Guide 34 ...
Страница 63: ...Chapter 3 Product Description ...
Страница 86: ...MiVoice Office 250 Installation and Administration Guide 58 ...
Страница 87: ...Chapter 4 Specifications ...
Страница 157: ...Chapter 5 Installation ...
Страница 251: ...Installation 223 ...
Страница 274: ...MiVoice Office 250 Installation and Administration Guide 246 4 Test for quality ...
Страница 396: ...MiVoice Office 250 Installation and Administration Guide 368 ...
Страница 397: ...Chapter 6 Reference ...
Страница 416: ...MiVoice Office 250 Installation and Administration Guide 388 ...
Страница 417: ...Appendix A Private Networking ...
Страница 445: ...Appendix B Network IP Topology ...
Страница 486: ...MiVoice Office 250 Installation and Administration Guide 458 ...
Страница 487: ...Appendix C Open Source License Agreements ...
Страница 506: ...MiVoice Office 250 Installation and Administration Guide 478 ...
Страница 507: ...Appendix D Phones ...


