0
Quick Parameter Reference, Faults and Alarms
0-18 | CFW700
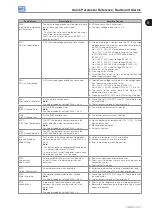
Fault/Alarm
Description
Possible Causes
F078:
Motor Overtemperature
Fault related to the PTC temperature sensor
installed in the motor.
Note:
- It can be disabled by setting P0351 = 0 or 3.
- An analog input and an analog output must be
set for the PTC function.
Excessive load at the motor shaft.
Severe duty cycle (too many starts / stops per minute).
Too high surrounding air temperature.
Loose connection or short-circuit (resistance < 100 Ω) in
the wiring connected to the motor thermistors.
Not installed motor thermistors.
Blocked motor shaft.
F079:
Encoder Signal Fault
Incorrect encoder signals.
Broken wiring between the motor encoder and the
encoder interface accessory.
Defective encoder.
F080:
CPU Watchdog
Microcontroller watchdog fault.
Electrical noise.
F084:
Auto-Diagnosis Fault
Auto-Diagnosis Fault.
Defect in the inverter internal circuitry.
Firmware incompatible with an accessory.
A090:
External Alarm
External alarm monitored through a digital input.
Note:
It is necessary to program a digital input for “No
external alarm”.
A digital input (DI1 to DI8) programmed for “No external
alarm” is open.
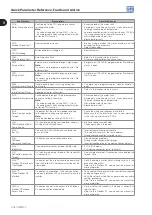
F091:
External Fault
External fault monitored through a digital input.
Note:
It is necessary to program a digital input for “No
external fault”.
A digital input (DI1 to DI8) programmed for “No external
fault” is open.
A098:
Activate General Enable
General enable signal is missing during the
self-tuning.
The digital input programmed for “General Enable” is
open.
F099:
Invalid Current Offset
The current measurement circuit is presenting an
abnormal value for null current.
Defect in the inverter internal circuitry.
A110:
High Motor Temperature
Fault detected through PTC type temperature
sensors installed in the motor.
Note:
- It can be disabled by setting P0351 = 0 or 2.
- An analog input and an analog output must be
set for the PTC function.
Excessive load at the motor shaft.
Severe duty cycle (too many starts / stops per minute).
Too high surrounding air temperature.
Not installed motor thermistors.
Blocked motor shaft.
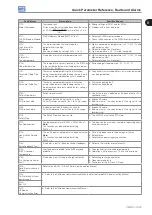
A128:
Serial Communication
Timeout
It indicates that the inverter stopped receiving
valid telegrams during a certain period.
Note:
It can be disabled by setting P0314 = 0.0 s
Check the wiring and the ground installation.
Make sure that the inverter has sent a new message
within the time interval set at P0314.
A133:
CAN Interface without
Power Supply
It is the alarm indicating that the power supply is
missing at the CAN controller.
Broken or disconnected cable.
The power supply is turned off.
A134:
Bus Off
The inverter CAN interface has entered the
buss off state.
Incorrect communication baud rate.
Two network slaves with the same address.
Wrong cable connection (inverted signals).
A135:
CANopen
Communication Error
It indicates a communication error alarm.
Communication problems.
Wrong master configuration/settings.
Incorrect configuration of the communication objects.
A136:
Idle Master
The network master has entered the idle state.
PLC in IDLE mode.
PLC command register bit set to zero (0).
A137:
DeviceNet Connection
Timeout
It is the alarm indicating timeout of the DeviceNet
I/O connections.
One or more allocated I/O connections have entered the
timeout state.
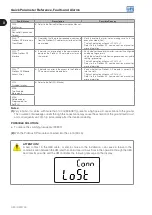
A138:
(2)
Profibus DP Interface in
Clear Mode
It indicates that the inverter received a command
from the Profibus DP network master to enter the
clear mode.
Verify the network master status, making sure it is in the
execution mode (Run).
Refer to the Profibus DP communication manual for
more information.
A139:
(2)
Offline Profibus DP
Interface
It indicates an interruption in the communication
between the Profibus DP network master and the
inverter.
Verify whether the network master is correctly configured
and operating normally.
Verify the network installation in a general manner - cable
routing, grounding.
Refer to the Profibus DP communication manual for
more information.
A140:
(2)
Profibus DP Module
Access Error
It indicates an error in the access to the Profibus
DP communication module data.
Verify whether the Profibus DP module is correctly fit
into the slot 3.
Refer to the Profibus DP communication manual for
more information.
Summary of Contents for CFW700
Page 2: ......
Page 4: ......
Page 8: ...Summary...
Page 34: ...2 General Information 2 4 CFW700...
Page 38: ...3 About the CFW700 3 4 CFW700...
Page 56: ...7 Starting up and Settings 7 4 CFW700...
Page 58: ...8 Available Control Types 8 2 CFW700...
Page 78: ...10 VVW Control 10 8 CFW700...
Page 158: ...13 Digital and Analog Inputs and Outputs 13 28 CFW700...


