3. Use the up/down arrow keys to move the blinking cursor to
8. Start-up display.
Press the ENTER
key.
4. From the START-UP DISPLAY menu, use the up/down arrow keys to move the blinking cursor to
1.
HMI Default
or
2. User Defined.
5. Press the ENTER key to save the change and go back to the HMI SETUP menu. Press the ESC key to
cancel any changes.
6. Now when power is cycled/applied to the OIT, the Herald Screen will display.
Writing the Screen Number to a PLC Register
There may be occasions in which a particular screen is displayed using a Function Key on the BLU300 and you wish the
PLC to know that the screen has been displayed. Or, you may configure the PLC to display a screen on the BLU300 using
the "Jump To Screen" feature, and would like confirmation that the screen has been displayed. This feature allows
configuration of the BLU300 to write the screen number of the screen displayed to a PLC register.
4
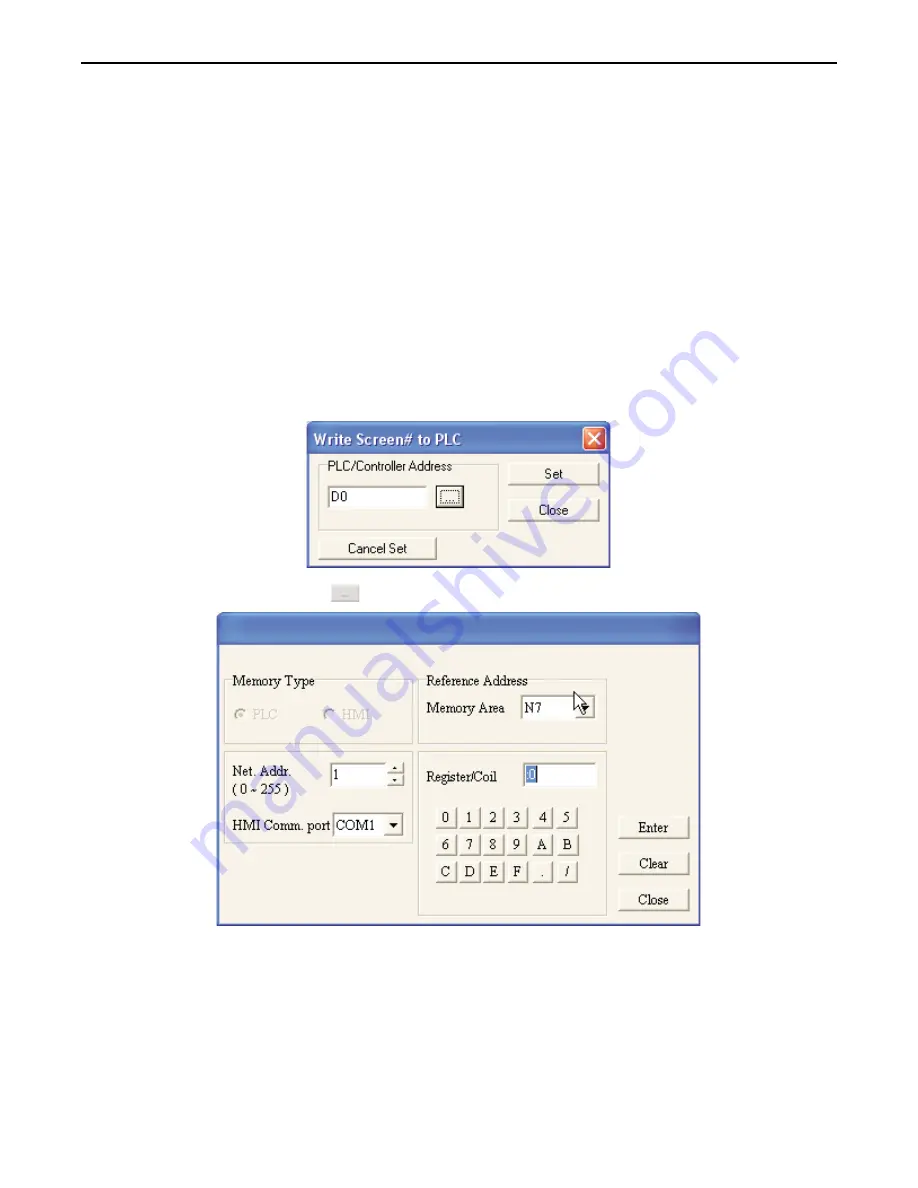
To Write a screen number to a PLC using the Local Screen Settings
1. Open the screen whose number is to be written to the PLC.
2. From the Local Screen Settings menu, select
Write Screen# to PLC
. The Write Screen# to PLC
dialog is displayed.
3. In the PLC/Controller Address frame, enter the
PLC/register address
, or click he PLC/Controller
Address button
to display the address dialog.
4. Click the pull-down box to select the
target PLC memory area.
Use the numeric keypad to enter the
specific
PLC memory address.
Select the
PLC Network Address
(if applicable) and
HMI
communications port.
Click
Enter
to go back to prior dialog box.
5. Click
Set
to accept changes,
Close
to cancel any changes made, or
Cancel Set
to cancel a previously
set Write Screen# to PLC Setting.
The OIT will now write the value of the screen number that is being displayed to the corresponding PLC/Controller address
specified above.
1010-0300, Rev 02
68
Blue Series Installation & Operation Manual


