11-8
ALPS Advanced Line Protection System
GE Power Management
11.3 SETTING UP YOUR HOST MACHINE
11 ALPS-LINK USER GUIDE
11
4.
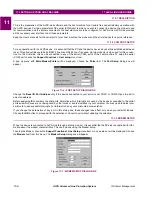
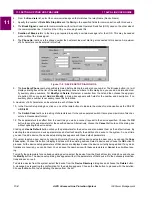
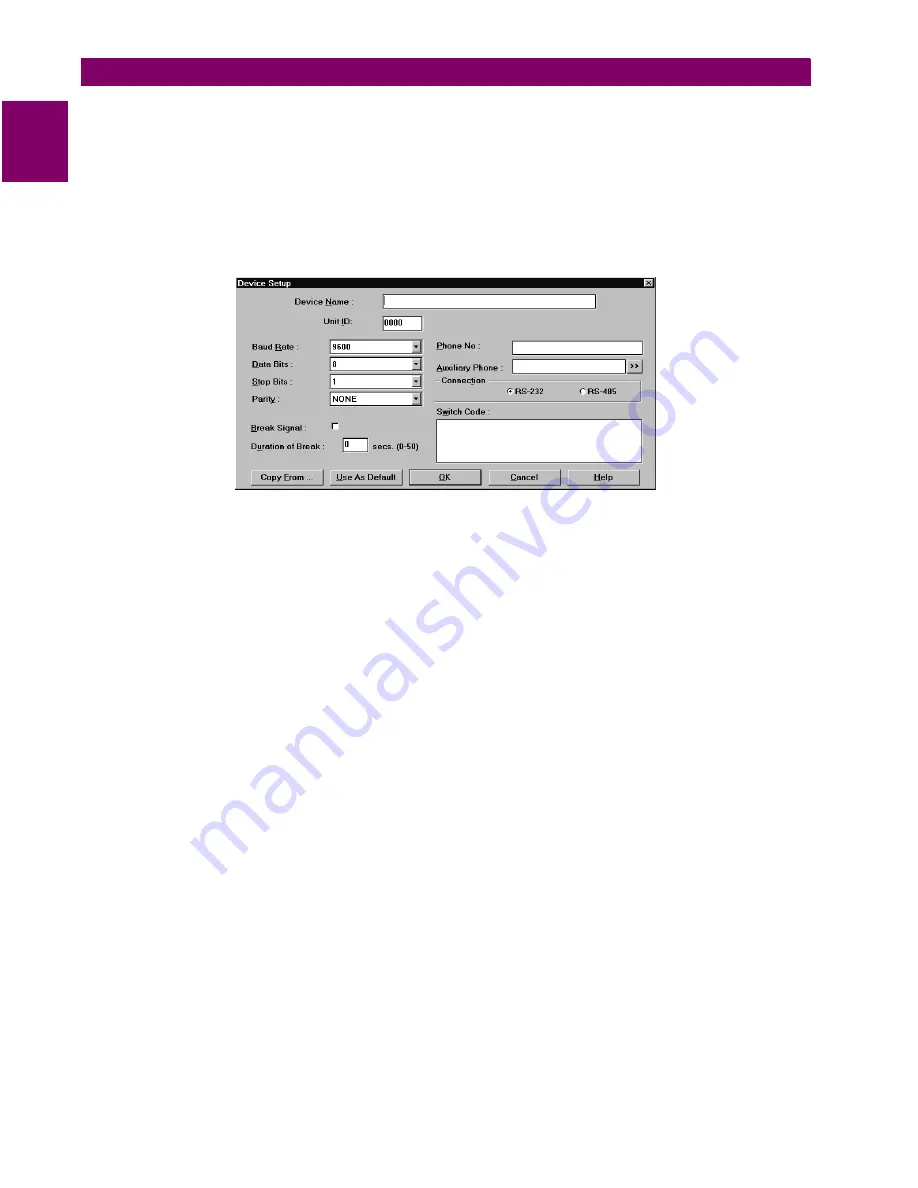
From the Baud rate list, select the communication speed that matches the relay Name (Device Name).
5.
Specify the number of Data Bits, Stop Bits and the Parity in the specified fields for communication with this device.
6.
The Break Signal is needed for communication with certain Code Operated Switches (COS) used on the other side of
the communication line. Click this if the COS you are using needs this.
7.
Duration of Break refers to the time gap required to specify a certain message is for the COS. This may be needed
with or without the break signal.
8.
The Phone No. text box is the phone number the host machine must dial to get connected to this device. A maximum
of 60 characters can be entered in this field.
Figure 11–9: DEVICE SETUP DIALOG BOX
9.
The Auxiliary Phone number specified is dialed before dialing the actual phone number. The Browse button (>>) will
display a dialog box with a list of the existing auxiliary phone numbers. In this dialog box, you can add, delete and mod-
ify auxiliary phone numbers. For Modify and Delete, first select a number from the list and then choose the appropri-
ate button. When you select Add and Modify, a dialog box appears with fields for the number and description. If no
auxiliary phone number is necessary, leave this field blank.
A maximum of 60 characters can be entered in each of these fields.
10. In the Device Setup dialog box, click on one of the radio buttons to indicate the mode of communication as the RS-232
or RS-485.
11. The Switch Code text box is a string of characters sent to the code operated switch. It accepts a maximum of six char-
acters in Hexadecimal format.
12. These parameters take effect from the next time you make a connect request to the device specified. Choose the OK
button to save these parameters for the specified device. Alternatively, choose the Cancel button to quit the dialog box
without updating the device setup.
Clicking on Use As Default button will save the parameters for the device and also makes them as the default values. By
selecting the most common device parameters as default will simplify the addition of a device to the system. So, next time
you want to add a device, the device setup dialog box appears with these default parameters.
If you want to setup a new device by copying information from an existing device setup to a new one, you can use the Copy
From option. Choose this button to display a list box with the existing devices. Select a device and choose the OK button to
proceed. All the device setup parameters of that device are displayed under the device currently being edited. If any modi-
fications are required, you can do them. You can save the new device with these parameters or Cancel to quit without sav-
ing.
To modify the parameters for an already existing device, select the device from the Device Directory dialog box and choose
the Modify button. The device setup dialog box appears with all the parameters of that device. Do the necessary modifica-
tions and save or quit.
To delete a device from the system, select the device from the Device Directory dialog box and choose the Delete button.
A message box requesting the confirmation for the deletion appears. Choose the Yes button to proceed with the deletion.
Choose the No button to quit deleting the device from the list.


