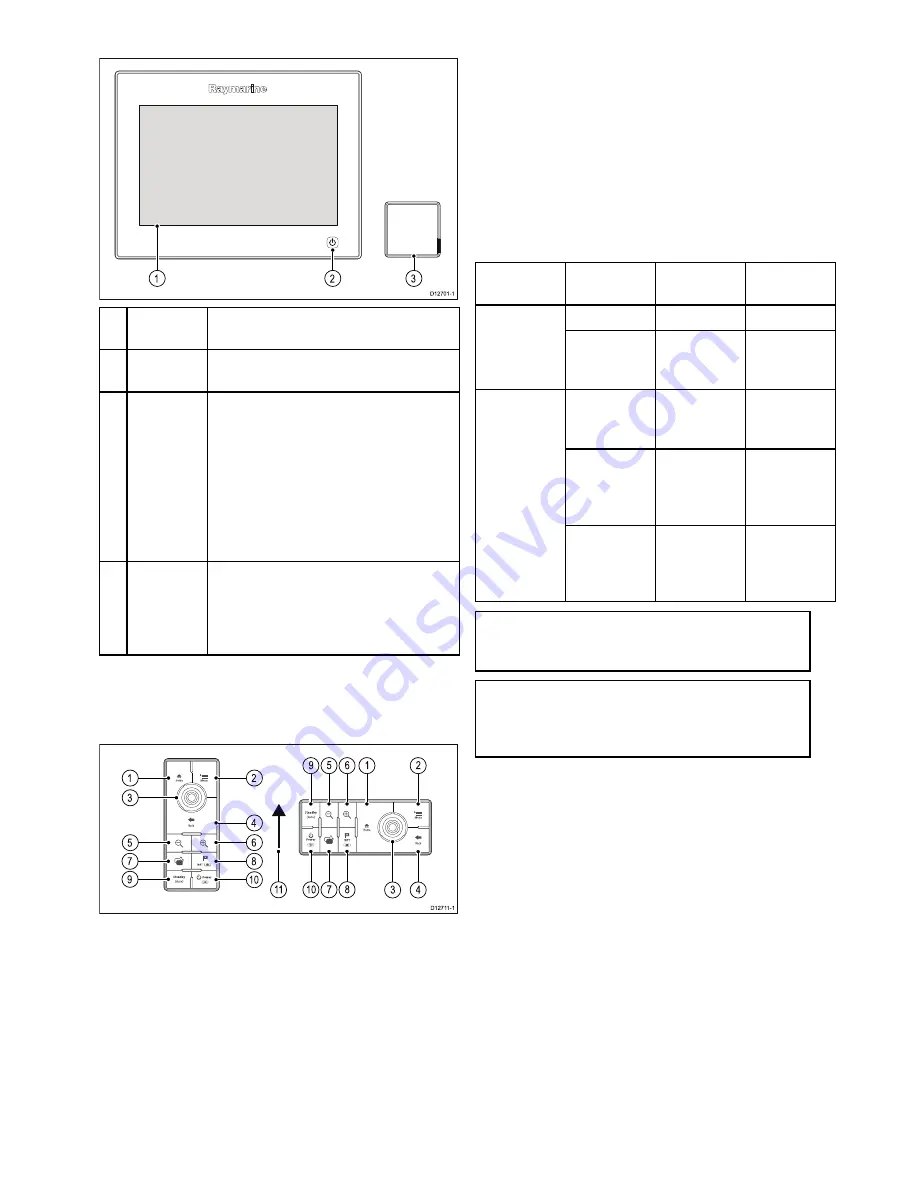
6.2 Controls
D12701-1
1
2
3
Descrip-
tion
Functions
1
Touch-
screen
Touch the screen to operate functions,
including all menu operations.
2
Power
• Press once to switch the unit on.
• When powered on, press the
Power
button again open the Shortcuts page.
• When powered on, press and hold to
put the display into Standby mode.
• If an integrated pilot is engaged, press
and hold to put the autopilot into
STANDBY mode.
3
Card
reader
Open the card door to insert or remove
a MicroSD card. There are 2 card slots
(labelled 1 and 2), used for electronic
charts and archiving waypoint, route, track
and settings data.
Keypad controls
Connecting the keypad allows you to control your
multifunction display remotely.
D1271 1-1
1
3
5
7
9
2
4
6
8
1
0
1
0
1
1
7
8
3
4
9
5
6
1
2
1.
Home
— press to return to the Homescreen.
2.
Menu
— accesses menus. Press again to close
menus.
3.
UniControl
— provides a rotary control and a
joystick with an OK push button for using menus
and applications.
4.
Back
— press to return to a previous menu or
dialog level.
5.
Range Out
— press to range out.
6.
Range In
— press to range in.
7.
Switch Active
— press to switch the active
pane, or to switch the active multifunction display
(in multiple display systems).
8.
WPT / MOB
— press and release to access
the waypoint options. Press again to place
a waypoint. Press and hold to place a Man
Overboard (MOB) marker at your current
position.
9.
Standby (Auto)
— press to disengage
integrated autopilot, press and hold to activate
Auto mode on integrated autopilot.
10.
Power
— see table below:
Configura-
tion
Display
State
Momentary
press
Press and
hold
Off / Standby
* Power on
—
1
Multifunction
display
On
Open
shortcuts
page
Power off
/ put into
Standby
All displays
Off or in
Standby
* Power on
all displays
—
All displays
On
Open
shortcuts
page on
active display
Power down
all displays
Multiple
multifunction
displays
1 Display
On and 1
display Off
or in Standby
Open
shortcuts
page on
active display
Power down
active display
Note:
* Only applicable to gS Series displays.
a Series, c Series and e Series displays cannot
be powered on using the keypad.
Note:
In a multiple display configuration,
where displays are in different states, displays
that are turned off can only be turned on using
the
Power
button on the display.
11. Joystick Up direction.
Getting started
83
Содержание Raymarine gS 195
Страница 2: ......
Страница 26: ...26 gS Series...
Страница 43: ...D 36 mm 1 4 in E 39 2 mm 1 5 in F 90 mm 3 5 in Planning the installation 43...
Страница 44: ...44 gS Series...
Страница 110: ...110 gS Series...
Страница 146: ...146 gS Series...
Страница 174: ...174 gS Series...
Страница 175: ...Chapter 13 Man Overboard MOB Chapter contents 13 1 Man overboard on page 176 Man Overboard MOB 175...
Страница 178: ...178 gS Series...
Страница 181: ...Chapter 15 Fuel manager Chapter contents 15 1 Fuel manager overview on page 182 Fuel manager 181...
Страница 196: ...196 gS Series...
Страница 218: ...218 gS Series...
Страница 328: ...328 gS Series...
Страница 362: ...362 gS Series...
Страница 411: ...Chapter 31 Technical specification Chapter contents 31 1 Technical specification on page 412 Technical specification 411...
Страница 418: ...418 gS Series...
Страница 438: ...438 gS Series...
Страница 439: ......
Страница 440: ...www raymarine com...


