Placing a waypoint at your vessel's position
In addition to positional information, a waypoint
placed at the vessel position will capture temperature
and sounded depth information (if you have the
appropriate sensors connected to your system).
From the chart, radar or fishfinder application:
1. Select
WPT
.
The waypoint menu is displayed.
2. Select
WPT
again or select
Place Waypoint At
Vessel
from the menu.
The Waypoint Saved dialog is displayed.
3. Select the
Symbol field
to change the symbol
that will be used to display the waypoint in the
Chart or Radar application.
4. Select the
Name field
to change the name of
the waypoint.
5. Select the
Group field
to change the group that
the waypoint is assigned to.
6. Select
OK
to confirm the waypoint details.
Note:
If there is no user interaction with
the Waypoint saved dialog for approximately 5
seconds then the waypoint is saved with the default
settings and the dialog is closed automatically.
Placing a waypoint at a known position
You can place a waypoint at a specified location
using latitude and longitude coordinates:
1. Select
WPT
.
2. Select
Place Waypoint At Lat/Lon
.
The waypoint details dialog is displayed.
3. Select the
Position
field.
4. Enter the Latitude/Longitude position.
5. Select
SAVE
.
6. You can also edit the waypoint symbol, name and
group by selecting the relevant fields.
7. Select
Close
or
Back
to close the dialog.
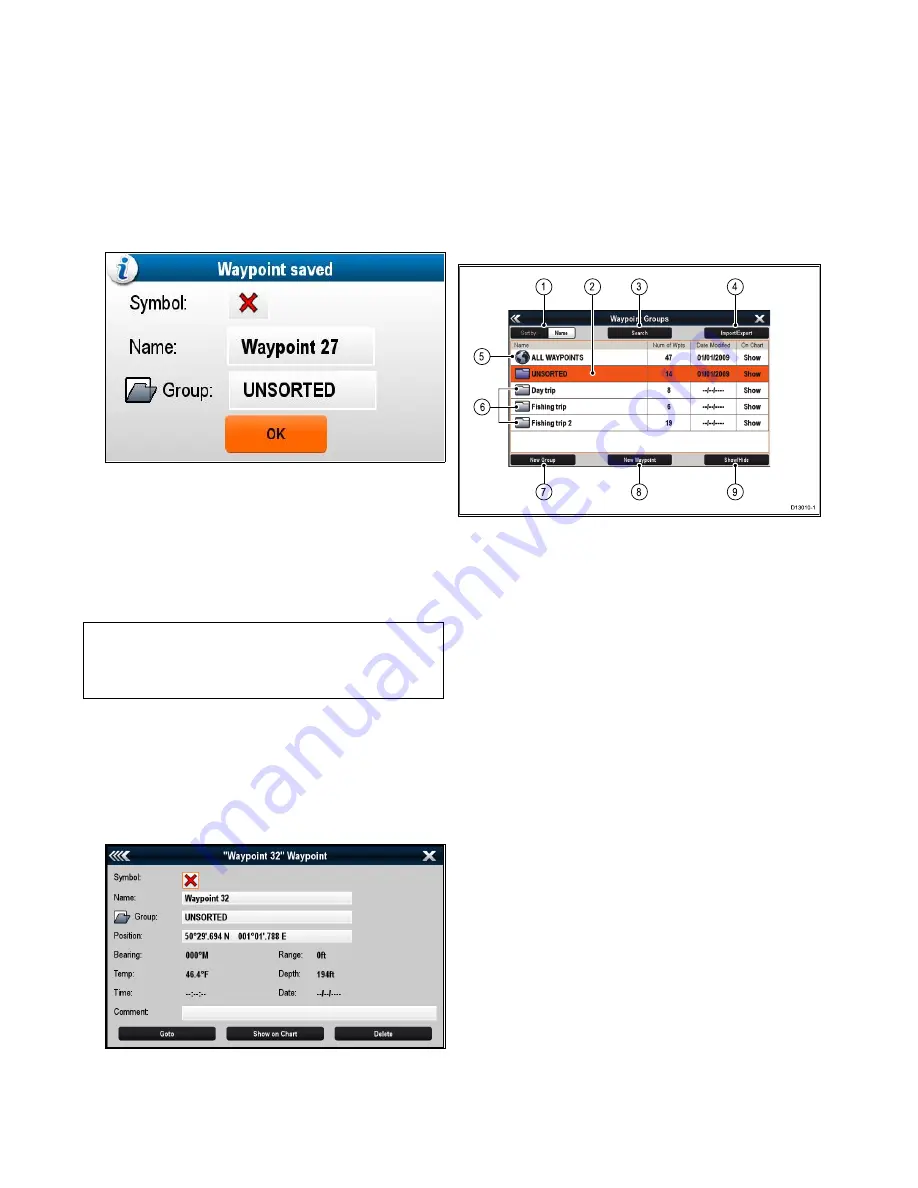
Waypoint groups
Waypoints are organized into groups. By default all
waypoints are placed in the “UNSORTED” group.
New waypoint groups can be created and each
waypoint can be assigned to a waypoint group. For
example; you could create a waypoint group called
“Fishing” and place all of your waypoints where you
caught fish into that group.
Waypoint groups can be managed from the Waypoint
groups list.
7
8
9
5
1
2
3
4
6
D13010-1
1.
Sort By:
— Waypoint groups can be sorted by
name or by date by selecting the
Sort By:
field.
2.
Unsorted
— By default new waypoints are
added to the
UNSORTED
waypoint group.
Selecting the group will display a list of all
waypoints that have not been assigned to a
specific group.
3.
Search
— You can search for waypoints using
keywords by selecting
Search
.
4.
Import/Export
— Waypoints can be exported to
or imported from a microSD card by selecting
Import/Export
. Refer to
8.4 Saving user data
and user settings
for details.
5.
All waypoints
— Selecting
ALL WAYPOINTS
displays a list of all waypoints saved on your
system.
6.
Waypoint Groups
— All waypoint groups are
displayed in the list.
7.
New Group
— A new waypoint group can be
added by selecting
New Group
.
8.
New Waypoint
— New waypoints can be added
manually by selecting
New Waypoint
.
9.
Show/Hide
— You can choose which waypoint
groups are displayed and which groups are
hidden by selecting the relevant group from the
list and then selecting
Show/Hide
.
Selecting a waypoints group from the list displays a
list of all waypoints in that group. Additional functions
are available to help manage your waypoints.
200
gS Series
Содержание Raymarine gS 195
Страница 2: ......
Страница 26: ...26 gS Series...
Страница 43: ...D 36 mm 1 4 in E 39 2 mm 1 5 in F 90 mm 3 5 in Planning the installation 43...
Страница 44: ...44 gS Series...
Страница 110: ...110 gS Series...
Страница 146: ...146 gS Series...
Страница 174: ...174 gS Series...
Страница 175: ...Chapter 13 Man Overboard MOB Chapter contents 13 1 Man overboard on page 176 Man Overboard MOB 175...
Страница 178: ...178 gS Series...
Страница 181: ...Chapter 15 Fuel manager Chapter contents 15 1 Fuel manager overview on page 182 Fuel manager 181...
Страница 196: ...196 gS Series...
Страница 218: ...218 gS Series...
Страница 328: ...328 gS Series...
Страница 362: ...362 gS Series...
Страница 411: ...Chapter 31 Technical specification Chapter contents 31 1 Technical specification on page 412 Technical specification 411...
Страница 418: ...418 gS Series...
Страница 438: ...438 gS Series...
Страница 439: ......
Страница 440: ...www raymarine com...


