5. Select an appropriate time period.
The distance that your vessel travels in the time
period you specify here determines the length
of the vector lines.
6. Select
Target History
.
7. Select an appropriate time period.
The target's previous position will be plotted on
the radar display as a target icon with lighter
shading than the actual target.
Note:
MARPA and AIS functions share
Safe Zone
and
Vector Length
settings.
Setting up the Safe Zone Ring
You can adjust the Safe Zone Ring radius, the time
to Safe Zone and choose whether AIS targets trigger
the Safe Zone alarm from the Safe Zone Ring Set-up
menu.
The Safe Zone Set-up menu can be accessed as
follows:
• From the Radar application:
Menu > Zones >
Safe Zone Set-up
.
• From the Chart application with only the AIS
overlay enabled:
Menu > AIS Options > Safe
Zone > Safe Zone Set-up
.
• From the Chart application with only the Radar
overlay enabled:
Menu > Radar Options > Safe
Zone > Safe Zone Set-up
.
• From the Chart application with the AIS and Radar
overlays enabled:
Menu > Radar & AIS Options
> Safe Zone > Safe Zone Set-up
.
From the Safe Zone Set-up menu:
1. Select
Safe Zone Radius
.
i.
Select the required radius for the safe zone.
2. Select
Time to Safe Zone
.
i.
Select the required time period.
3. Select
Safezone (AIS targets)
so that On is
highlighted.
Selecting Safezone (AIS targets) will switch the
dangerous target alarm between On and Off.
Using MARPA
Acquiring a MARPA target to track
From the radar application:
1. Select the target to be acquired.
The MARPA context menu is displayed.
2. Select
Acquire Target
.
The “target being acquired” symbol is displayed. If
the target is present for several scans, the radar
locks-on to the target, and the symbol changes to
“safe target” status.
Cancelling a MARPA target using the MARPA
context menu
From the radar application:
1. Select the relevant target.
The MARPA context menu is displayed.
2. Select
Cancel Target
or
Cancel All Targets
.
Cancelling a MARPA target using the menu
1. Select
Menu
.
2. Select
Targets
.
3. Select
View Target Lists
.
4. Select
View MARPA List
.
5. Select the relevant MARPA target from the list.
6. Select
Cancel Target
or
Cancel All Targets
.
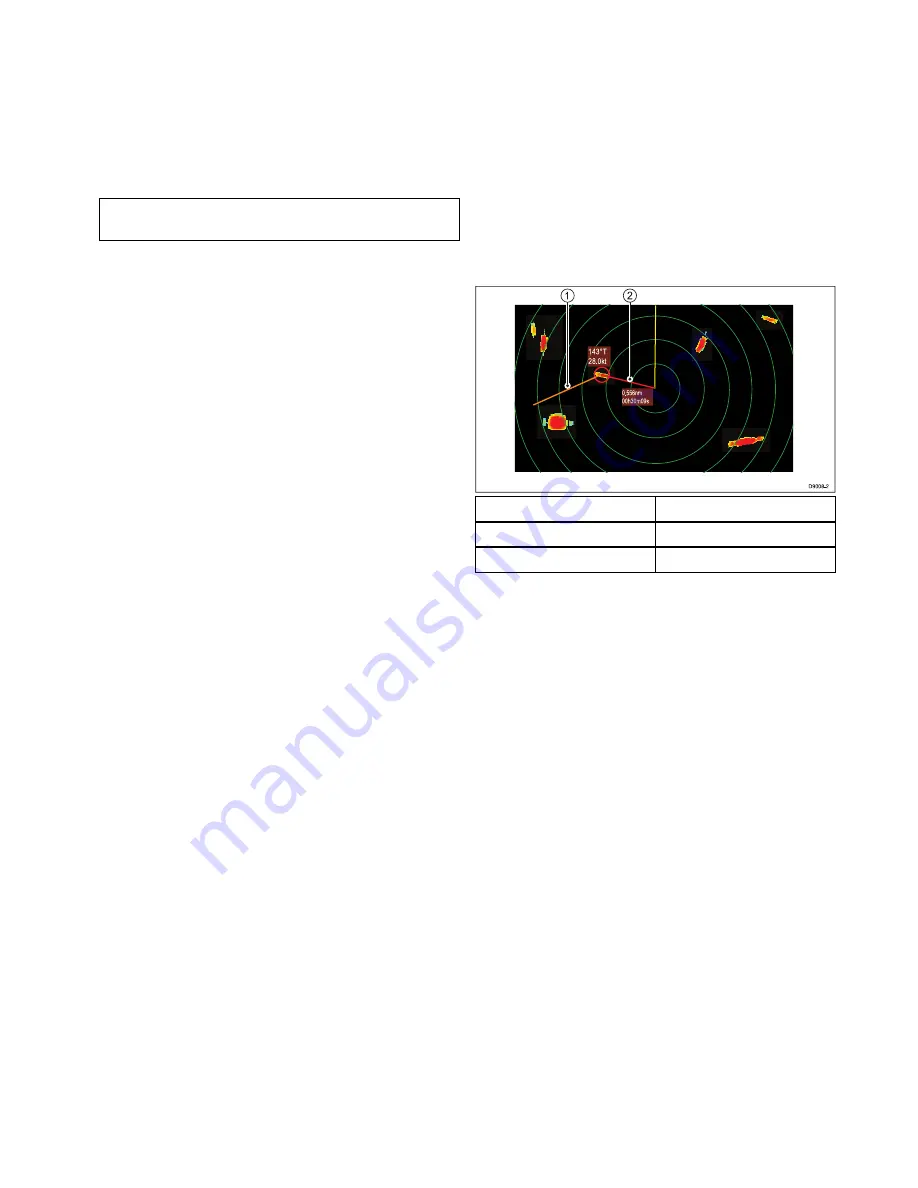
Vessel vectors (CPA graphics) overview
CPA graphics show vectors for your vessel and a
selected target.
A vector is a line on-screen showing the predicted
courses of your vessel and the selected target if you
both remain on your present course. These vectors
vary in length due to vessel speed and vector length
set in the MARPA Set-up menu.
0
.556nm
00h30m09s
1
43°T
28.0kt
1
2
D
9008-2
Item
Description
1
Target vector
2
CPA graphic
True motion
With the display set in true motion mode, the vectors
of your vessel and the target are shown extended
to their intersection point. The CPA is shown as
a line that is placed on your vessel’s vector at the
point of the CPA. The length and direction of the line
indicates the distance and bearing of the target at
CPA. The text indicates CPA and TCPA. The text
next to the target symbol indicates its true course
and speed.
Relative motion
With the display set in relative motion mode, no
vector extension of your vessel is shown. The CPA
line emerges from your own vessel, with the target
vector extension being shown as relative, not true.
The text next to the target indicates its course and
speed.
Displaying MARPA target data
1. Select the target.
The MARPA context menu is displayed which
provides the following data:
• Closest Point of Approach (CPA).
• Time to Closest Point of Approach (TCPA).
• COG (if available).
• SOG (if available).
2. To display CPA graphics select
CPA Graphic
from the context menu:
i.
Select
Auto
to display the CPA graphic when
the target is selected.
Radar application
309
Содержание Raymarine gS 195
Страница 2: ......
Страница 26: ...26 gS Series...
Страница 43: ...D 36 mm 1 4 in E 39 2 mm 1 5 in F 90 mm 3 5 in Planning the installation 43...
Страница 44: ...44 gS Series...
Страница 110: ...110 gS Series...
Страница 146: ...146 gS Series...
Страница 174: ...174 gS Series...
Страница 175: ...Chapter 13 Man Overboard MOB Chapter contents 13 1 Man overboard on page 176 Man Overboard MOB 175...
Страница 178: ...178 gS Series...
Страница 181: ...Chapter 15 Fuel manager Chapter contents 15 1 Fuel manager overview on page 182 Fuel manager 181...
Страница 196: ...196 gS Series...
Страница 218: ...218 gS Series...
Страница 328: ...328 gS Series...
Страница 362: ...362 gS Series...
Страница 411: ...Chapter 31 Technical specification Chapter contents 31 1 Technical specification on page 412 Technical specification 411...
Страница 418: ...418 gS Series...
Страница 438: ...438 gS Series...
Страница 439: ......
Страница 440: ...www raymarine com...


