


Chapter 6: Using the Web Interface
161
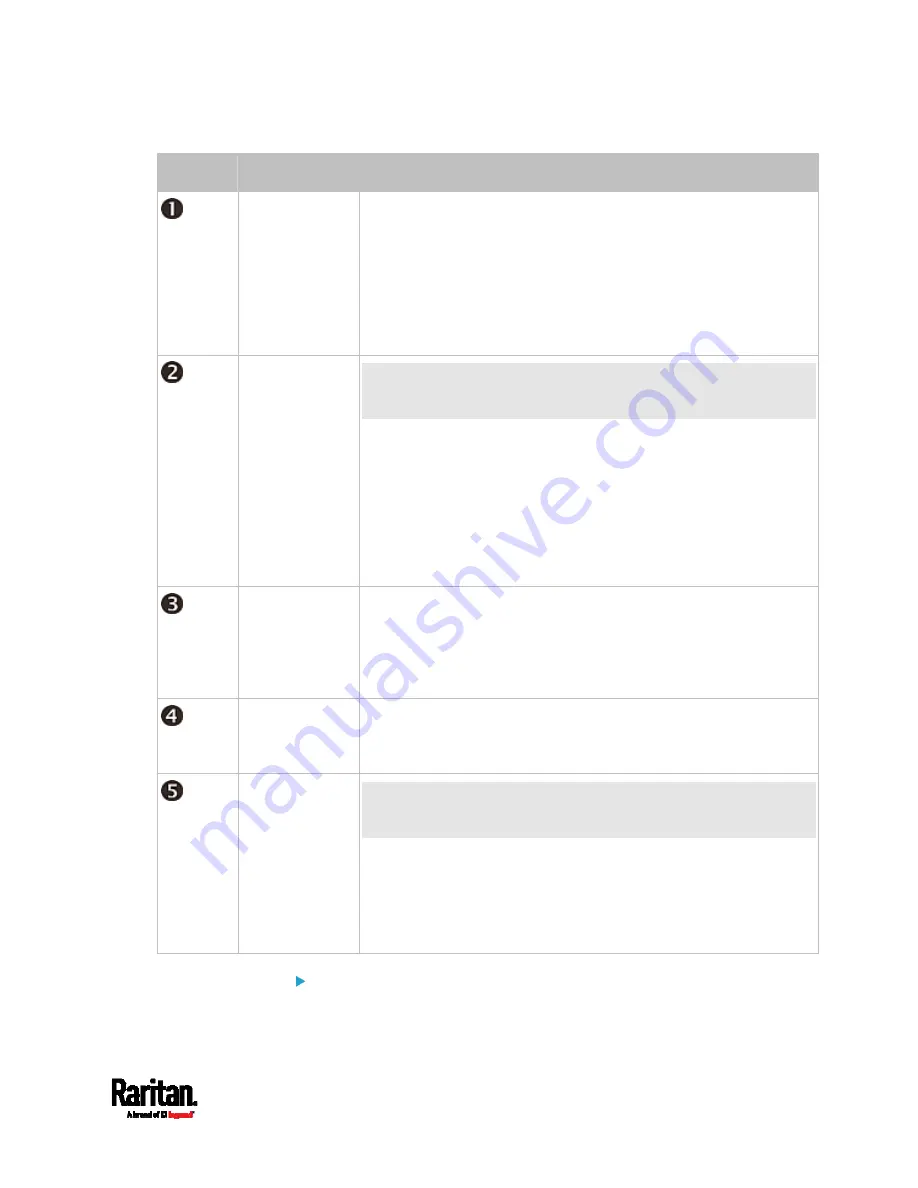
Number
Section
Information shown
Inlet I1
Overview of inlet power data
A current bar per phase, which changes colors to indicate the
RMS current state
- green: normal
- yellow: warning
- red: critical
See
Dashboard - Inlet I1
(on page 162).
Overcurrent
Protectors
This section is available only when your PX3 contains
overcurrent protectors (OCPs).
Overview of each OCP's status
A current bar per OCP, which changes colors to indicate the
RMS current state
- green: normal
- yellow: warning
- red: critical
See
Dashboard - OCP
(on page 164).
Alerted
Sensors
When no sensors enter the alarmed state, this section shows
the message "No Alerted Sensors."
When any sensor enters the alarmed state, this section lists all
of them.
See
Dashboard - Alerted Sensors
(on page 166).
Inlet History
The chart of the inlet's active power history is displayed by default.
You can make it show a different data type.
See
Dashboard - Inlet History
(on page 168).
Alarms
This section can show data only after you have set event rules
requiring users to take the acknowledgment action.
When there are no unacknowledged events, this section shows
the message "No Alarms."
When there are unacknowledged events, this section lists all of
them.
See
Dashboard - Alarms
(on page 171).
The Hardware Failures section:
Содержание Raritan PX3-3000 Series
Страница 5: ......
Страница 62: ...Chapter 3 Initial Installation and Configuration 41 Number Device role Master device Slave 1 Slave 2 Slave 3 ...
Страница 90: ...Chapter 4 Connecting External Equipment Optional 69 ...
Страница 423: ...Chapter 6 Using the Web Interface 402 If wanted you can customize the subject and content of this email in this action ...
Страница 424: ...Chapter 6 Using the Web Interface 403 ...
Страница 447: ...Chapter 6 Using the Web Interface 426 ...
Страница 448: ...Chapter 6 Using the Web Interface 427 Continued ...
Страница 885: ...Appendix K RADIUS Configuration Illustration 864 Note If your PX3 uses PAP then select PAP ...
Страница 886: ...Appendix K RADIUS Configuration Illustration 865 10 Select Standard to the left of the dialog and then click Add ...
Страница 887: ...Appendix K RADIUS Configuration Illustration 866 11 Select Filter Id from the list of attributes and click Add ...
Страница 890: ...Appendix K RADIUS Configuration Illustration 869 14 The new attribute is added Click OK ...
Страница 891: ...Appendix K RADIUS Configuration Illustration 870 15 Click Next to continue ...
Страница 921: ...Appendix L Additional PX3 Information 900 ...
Страница 954: ...Appendix M Integration 933 3 Click OK ...


