


250
Air System
5. To remove the thermostat, refer to that section later in this manual. Remove the thermostat only
if the serviceability checks indicate the need for replacement.
6. Remove the exhaust piston and spring from the top side of the end cover.
7. Remove and discard the O-ring from the exhaust piston.
8. Remove the four 1/4" cap screws and lockwashers that secure the sealing plate to the desiccant
cartridge. Separate the sealing plate from the desiccant cartridge and discard the sealing ring
found at the base of the cartridge.
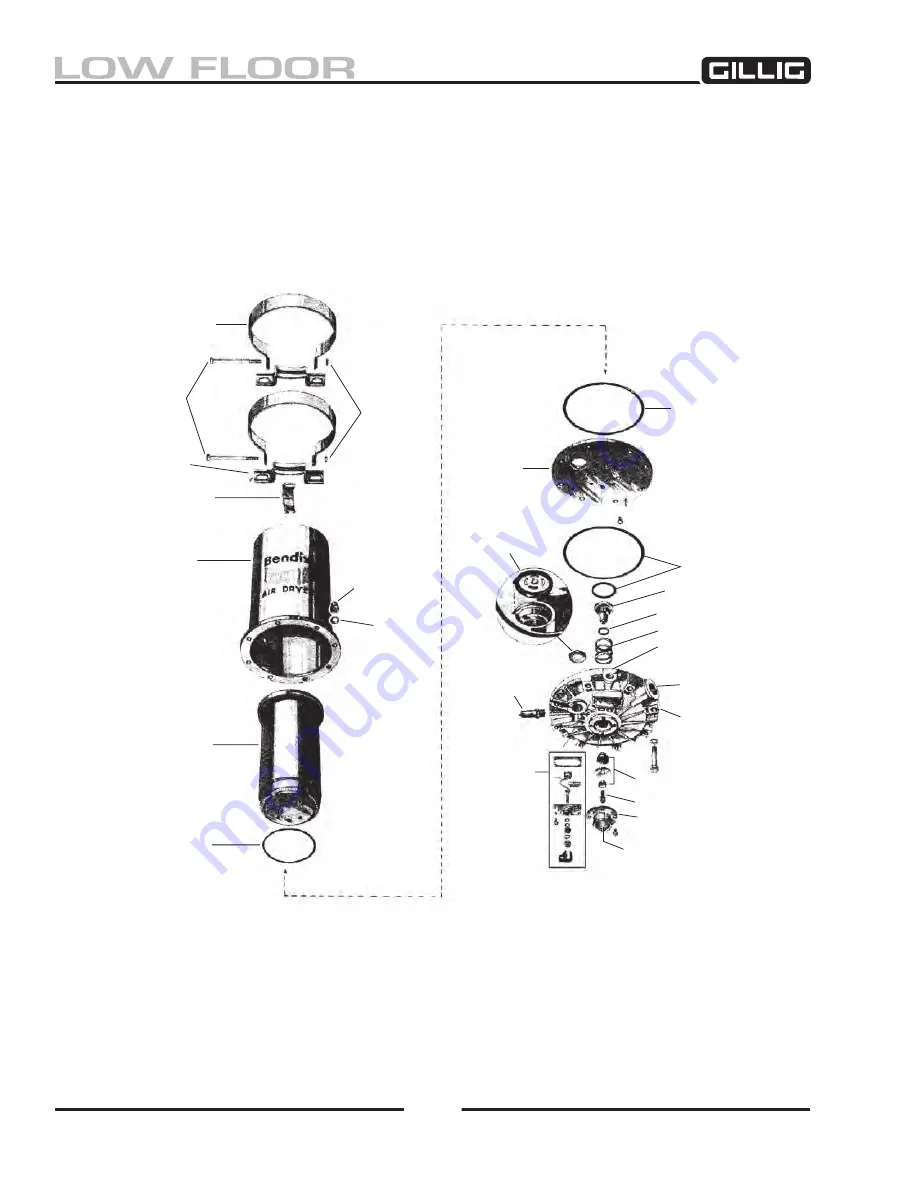
Figure 6-47, Air Dryer Components
Cleaning and Inspection
1. Prior to assembly, wash all metal parts thoroughly using a quality commercial solvent, such as
mineral spirits.
2. Inspect all parts for wear or damage and replace any parts which fail the visual inspection.
(8)
Spring
Washer
Sealing Ring
Sealing Rings
Delivery Port
Thermostat
Assy
Bracket
Cap Screw
5/6 x 4-/2"
Mounting Bracket
Hook
Air Dryer Housing
Nylock
Nut
(8)
Crown Nut
Desiccant Cartridge
Sealing
Plate
Check Valve
Assy
O-Ring
Supply Port
Heater Voltage
Purge Valve
Exhaust Cover
SEMS Screw
Capscrew & Lockwasher
Mounting Strap
Control Port
Spring
Purge Piston
Sealing Ring
Содержание LOW FLOOR
Страница 18: ...Specifications 18...
Страница 58: ...Preventive Maintenance 58...
Страница 110: ...Engine 110...
Страница 138: ...Transmission Driveline Rear Axle 138...
Страница 182: ...Suspension 182...
Страница 260: ...Air System 260...
Страница 420: ...Electrical System 420 Deutsch DT Series Connectors...
Страница 421: ...Electrical System 421...
Страница 422: ...Electrical System 422 Deutsch HD 10 Series Connectors...
Страница 423: ...Electrical System 423...
Страница 424: ...Electrical System 424 Deutsch HD 30 Series Connectors...
Страница 425: ...Electrical System 425...
Страница 442: ...Heating Air Conditioning 442...
Страница 486: ...Body and Interior 486 Driver s Seat Troubleshooting Use the following chart to troubleshoot the USSC seat...
Страница 492: ...Body and Interior 492 Figure 11 33 USSC Seat Assembly...
Страница 493: ...Body and Interior 493 Figure 11 34 USSC Seat Suspension Assembly...
Страница 495: ...Body and Interior 495 Figure 11 37 Seat Air Connections...
Страница 506: ...GILLIG CORPORATION 25800 Clawiter Road Hayward CA 94545 Phone 510 785 1500 Fax 510 785 6819 Printed November 2006...


