background image

GE
D

IRECTION

 FQ091019, R

EVISION

 2 


V

IVID Q

N S

ERVICE

M

ANUAL

3-20

Section 3-7 - Completing the Hardware Installation

Section 3-7
Completing the Hardware Installation

The hardware installation procedures described in this section provide instructions and information for 
the possible scenarios, as follows:

Vivid q N scanner but no SafeLock Cart - connections direct to the system

Vivid q N scanner with SafeLock Cart

Vivid q N scanner but no SafeLock Cart - connections via USB hub

NOTE:

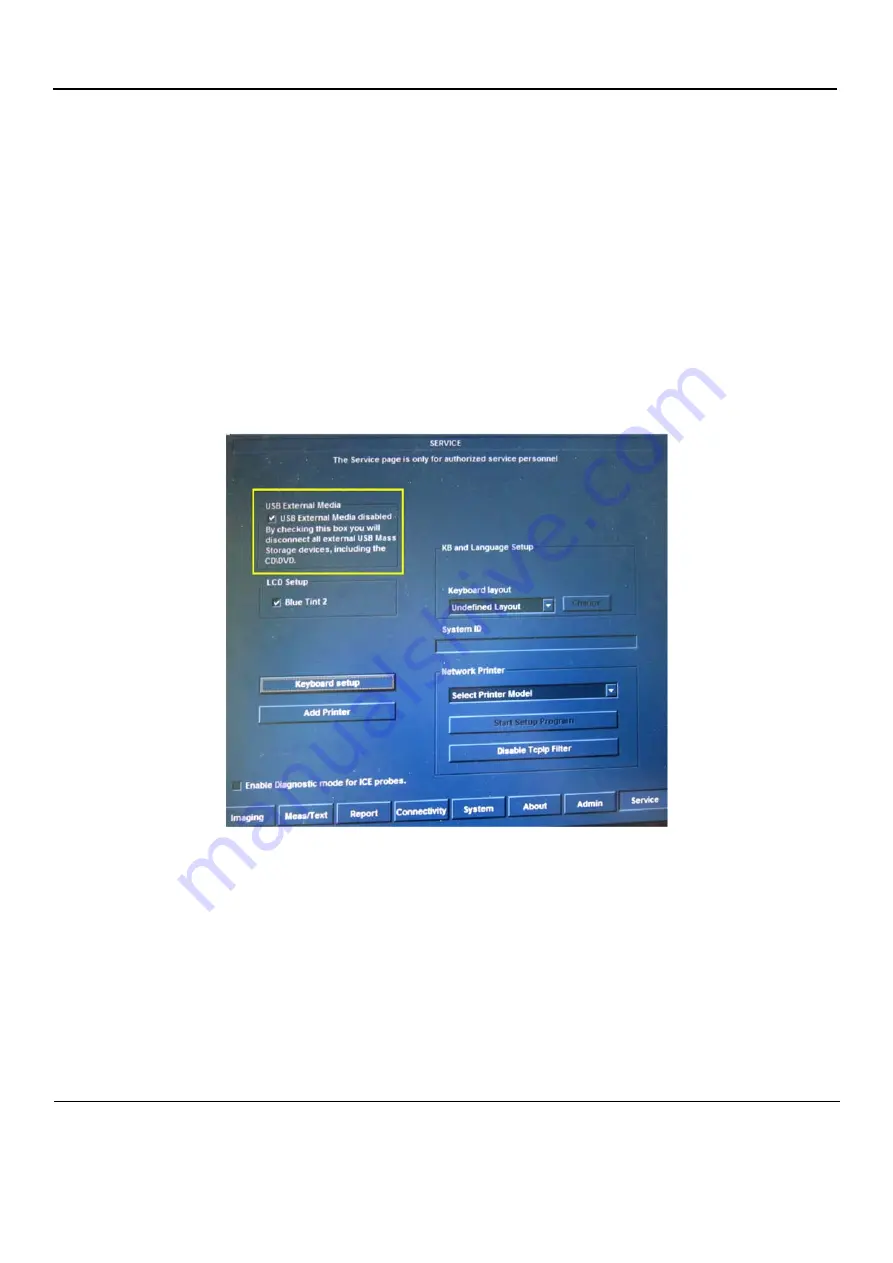
If required, it is possible to disable access to all Vivid q N scanner USB ports (including the 
CD/DVD drive) in order to limit system vulnerability. This is implemented from the System 
Configuration window, via the Service tab.

Activate the 

USB External Media disabled checkbox

 (as shown in XREF Figure 3-22 below), then 

press the 

F2

 or 

Esc

 key to save the changes.

NOTE:

After disabling all Vivid q N scanner USB ports, all peripherals that are used by connecting to 
a USB port (and also the CD/DVD drive) will not be accessible until such time as access to USB 
External Media is re-enabled - i.e., the USB External Media disabled checkbox (shown above) 
is unchecked.

Figure 3-12   Disabling USB External Media

Содержание FQ000040

Страница 1: ...T GENERAL ELECTRIC COMPANY 2013 and 2015 General Electric Company All Rights Reserved 3 SEP 2015 VQN_SVC_FRNT_CVR P R E L I M I N A R Y Vivid q N Service Manual Vivid q N with software version SW 12 x x BT 12 Part Number FQ091019 Revision 2 ...

Страница 2: ......

Страница 3: ...GE DIRECTION FQ091019 REVISION 2 VIVID Q N SERVICE MANUAL i 3 SEP 2015 FRONTMATTER FM P R E L I M I N A R Y Important Precautions TRANSLATION POLICY ...

Страница 4: ...GE DIRECTION FQ091019 REVISION 2 VIVID Q N SERVICE MANUAL ii 3 SEP 2015 FRONTMATTER FM P R E L I M I N A R Y ...

Страница 5: ...GE DIRECTION FQ091019 REVISION 2 VIVID Q N SERVICE MANUAL iii 3 SEP 2015 FRONTMATTER FM P R E L I M I N A R Y ...

Страница 6: ...GE DIRECTION FQ091019 REVISION 2 VIVID Q N SERVICE MANUAL iv 3 SEP 2015 FRONTMATTER FM P R E L I M I N A R Y ...

Страница 7: ...GE DIRECTION FQ091019 REVISION 2 VIVID Q N SERVICE MANUAL v 3 SEP 2015 FRONTMATTER FM P R E L I M I N A R Y ...

Страница 8: ...GE DIRECTION FQ091019 REVISION 2 VIVID Q N SERVICE MANUAL vi 3 SEP 2015 FRONTMATTER FM P R E L I M I N A R Y ...

Страница 9: ...GE DIRECTION FQ091019 REVISION 2 VIVID Q N SERVICE MANUAL vii 3 SEP 2015 FRONTMATTER FM P R E L I M I N A R Y ...

Страница 10: ...GE DIRECTION FQ091019 REVISION 2 VIVID Q N SERVICE MANUAL viii 3 SEP 2015 FRONTMATTER FM P R E L I M I N A R Y ...

Страница 11: ...GE DIRECTION FQ091019 REVISION 2 VIVID Q N SERVICE MANUAL ix 3 SEP 2015 FRONTMATTER FM P R E L I M I N A R Y ...

Страница 12: ...GE DIRECTION FQ091019 REVISION 2 VIVID Q N SERVICE MANUAL x 3 SEP 2015 FRONTMATTER FM P R E L I M I N A R Y ...

Страница 13: ...GE DIRECTION FQ091019 REVISION 2 VIVID Q N SERVICE MANUAL xi 3 SEP 2015 FRONTMATTER FM P R E L I M I N A R Y ...

Страница 14: ...GE DIRECTION FQ091019 REVISION 2 VIVID Q N SERVICE MANUAL xii 3 SEP 2015 FRONTMATTER FM P R E L I M I N A R Y ...

Страница 15: ...lly trained field engineers All of GE s electrical work on these products will comply with the requirements of the applicable electrical codes The purchaser of GE equipment shall only utilize qualified personnel i e GE s field engineers personnel of third party service companies with equivalent training or licensed electricians to perform electrical servicing on the equipment OMISSIONS ERRORS If t...

Страница 16: ...ication may not be copied or duplicated in any form in whole or in part without prior written permission of GE GE may revise this publication from time to time without written notice TRADEMARKS All products and their name brands are trademarks of their respective holders COPYRIGHTS 2013 and 2015 by General Electric Company Inc All Rights Reserved ...

Страница 17: ...VISION DATE REASON FOR CHANGE 1 2013 AUG 12 Initial release of manual 2 2015 SEP 03 Updated and corrected content Pages Revision Pages Revision Pages Revision Title Page 2 1 1 to 1 28 2 7 1 to 7 148 2 Warnings i to xvi 2 2 1 to 2 12 2 8 1 to 8 140 2 TOC 2 3 1 to 3 182 2 9 1 to 9 18 2 4 1 to 4 42 2 10 1 to 10 32 2 5 1 to 5 48 2 Back Cover N A 6 1 to 6 14 2 ...

Страница 18: ...GE DIRECTION FQ091019 REVISION 2 VIVID Q N SERVICE MANUAL xvi 3 SEP 2015 FRONTMATTER FM P R E L I M I N A R Y This page was intentionally left blank ...

Страница 19: ... Conventions Used in this Manual 1 5 Standard Hazard Icons 1 6 Safety Considerations 1 7 Introduction 1 7 Human Safety 1 7 Mechanical Safety 1 9 Electrical Safety 1 11 Vivid q N Battery Safety 1 15 Patient Data Safety 1 16 Dangerous Procedure Warnings 1 17 Lockout Tagout LOTO requirements 1 18 Product Labels and Icons 1 19 Universal Product Labels 1 19 Label Descriptions 1 20 Returning Shipping Pr...

Страница 20: ...GE DIRECTION FQ091019 REVISION 2 VIVID Q N SERVICE MANUAL xviii Customer Assistance 1 26 Contact Information 1 26 System manufacturer 1 27 ...

Страница 21: ...s 2 2 Cooling Requirements 2 2 Lighting Requirements 2 2 Time and Manpower Requirements 2 2 Electrical Requirements 2 3 EMI Limitations 2 4 Probe Environmental Requirements 2 5 Facility Needs 2 6 Purchaser Responsibilities 2 6 Mandatory Site Requirements 2 7 Site Recommendations 2 7 Networking Pre Installation Requirements 2 9 Connectivity Installation Worksheet 2 10 Check List 2 12 ...

Страница 22: ...ox Contents 3 11 Physical Inspection 3 11 EMI Protection 3 11 Preparing for Installation 3 12 Confirming Customer Order 3 12 Verifying the Transportation Box Contents 3 12 Component Inspection 3 13 Confirming SafeLock Cart Voltage Configuration 3 18 System Voltage Confirmation 3 18 Ensuring Protection from EMI 3 19 Completing the Hardware Installation 3 20 Connecting Printers 3 21 Connecting Perip...

Страница 23: ...ction to a DICOM Server in a Network 3 110 Setup Connection to HL7 Server in a Network 3 117 Query Retrieve Q R Setup 3 120 MPEGVue Export Configuration 3 127 eVue Dataflow Configuration 3 132 Using MPEGVue eVue on a Remote PC 3 136 Storing and Transporting the Unit 3 179 Safety Precautions for Moving the Vivid q N Unit 3 179 Transportation Box and Packaging Materials 3 179 Completing the Installa...

Страница 24: ... Labeling Removable Media 4 15 Formatting Removable Media 4 15 Verifying Removable Media 4 16 Archiving and Loading Presets 4 16 Functional Checks 4 19 Basic Controls 4 19 Peripherals 4 24 SafeLock Cart Functional Tests 4 28 Back End Processor Tests 4 29 Image Testing 4 32 2D Mode B Mode Checks 4 32 M Mode Checks 4 33 Color Mode Checks 4 34 PW CW Doppler Mode Checks 4 36 Tissue Velocity Imaging TV...

Страница 25: ...nd MUX P M Board 5 18 Back End Processor 5 21 Introduction 5 21 ETX SBC Central Processing Unit CPU 5 23 ETX Base Board 5 23 Hard Disk 5 25 Fan Control 5 25 RTC BIOS Battery 5 25 Back End Processor Location of Components 5 26 Left Right Speakers 5 28 External Input Output I O 5 29 Power Supply System 5 30 Electrical Power 5 30 Introduction 5 30 Power Supply Unit Components 5 31 DC Source Selector ...

Страница 26: ...MANUAL xxiv ECG Patient I O Module Specifications 5 40 Isolation 5 40 ECG Respiratory Module 5 41 Internal ECG Respiratory Board 5 41 External ECG Respiratory Interface 5 43 Peripherals 5 46 Introduction 5 46 Cooling System 5 48 General Information 5 48 ...

Страница 27: ...L xxv CHAPTER 6 Service Adjustments Overview 6 1 Purpose of Chapter 6 6 1 LCD Display Adjustments and Calibration 6 1 Keyboard Adjustments 6 9 Configuring Print Orientation 6 9 Video System Adjustments 6 9 Beamformer Calibration 6 9 Battery Calibration 6 10 ...

Страница 28: ... Accessing the Full System Diagnostic Options 7 20 Performing Front End FE Diagnostics 7 24 Accessing the Front End Diagnostic Options 7 25 Calibration Tests 7 25 Radio Frequency Interface RFI Diagnostic Tests 7 31 TR 32 Diagnostic Tests 7 46 Probe and MUX Diagnostic Tests 7 61 Monitoring Tests 7 86 Accessing the Monitoring Diagnostic Test Options 7 86 Performing Back End Diagnostics on the System...

Страница 29: ...Battery Replacement 8 47 DC to DC Power Supply Replacement Procedure 8 48 Fan Replacement Procedure 8 51 Speaker Assembly Replacement Procedure 8 54 AUO LCD Display Replacement Procedure 8 55 AUO LCD Flex Cable Replacement Procedure 8 59 SafeLock Cart Components Replacement 8 64 Overview of SafeLock Cart Replaceable Components 8 65 Upper Cover Rear Replacement Procedure 8 66 AC Cable Hook Replacem...

Страница 30: ...dure 8 95 Rear Wheel Replacement Procedure 8 97 Software Loading 8 99 Software Upgrade Procedure Overview 8 99 Setting the BIOS 8 114 Formatting and Partitioning the Hard Disk Automatic Procedure BT 12 8 124 Performing a Complete System Back up 8 126 Database Merge 8 126 How to Restore User defined Presets 8 132 Peripherals 8 133 Connecting and Removing Peripherals 8 133 External USB Hard Disk Rep...

Страница 31: ...s Overview 9 1 Purpose of Chapter 9 9 1 List of Abbreviations 9 2 Mechanical Hardware Parts 9 3 Electronic Parts 9 4 Cables 9 6 Software 9 7 Probes 9 8 Peripherals 9 10 SafeLock Cart Parts 9 11 Optional Modo Cart 9 13 Spare Part Kits 9 14 Product Manuals 9 18 Product Manuals BT 12 9 18 ...

Страница 32: ...Optional Diagnostic Checks 10 14 Probe Maintenance 10 15 Probe Checks 10 15 Probe Handling 10 15 Basic Probe Care 10 16 Probe Cleaning 10 16 Returning and Shipping of Defective Probes 10 18 Electrical Safety Tests 10 19 Safety Test Overview 10 19 GE Current Leakage Limits 10 21 Outlet Test Wiring Arrangement USA Canada 10 22 SafeLock Cart Grounding Continuity 10 22 SafeLock Cart Chassis Current Le...

Страница 33: ...ust read and understand all the information presented here before installing or servicing a unit Table 1 1 Contents in Chapter 1 Section Description Page Number 1 1 Overview 1 1 1 2 Service Manual Overview 1 2 1 3 Important Conventions 1 5 1 4 Safety Considerations 1 7 1 5 Dangerous Procedure Warnings 1 17 1 6 Lockout Tagout LOTO requirements 1 18 1 7 Product Labels and Icons 1 19 1 8 Returning Sh...

Страница 34: ...l checks that are recommended as part of the installation procedure or as required during servicing and periodic maintenance Chapter 5 Components and Function Theory Contains block diagrams and functional explanations of the electronic circuits Chapter 6 Service Adjustments Contains instructions on how to make any available service adjustments to the Vivid q N portable ultrasound scanner Chapter 7...

Страница 35: ...ON 2 VIVID Q N SERVICE MANUAL Chapter 1 Introduction 1 3 1 2 3 Vivid q N Models Covered in this Manual Table 1 2 Vivid q N Model Model H Cat No Part Number Description Comments Vivid q N H45571ZC FQ000040 Laptop style system BT 12 ...

Страница 36: ... a variety of applications The Vivid q N ultrasound imaging scanner is similar to the Vivid i n however designed to offer additional features including the ability to support use of M4S RS probes Also weighing only 5 Kgs 11 lbs this laptop style system is extremely versatile and depending upon the installed software can be used for a variety of applications NOTE Upgrade options may be available wi...

Страница 37: ...in one of three ways DANGER WARNING CAUTION When a hazard is present that can cause property damage but has absolutely no personal injury risk a NOTICE is used Example Disk drive may crash NOTE Notes are used to provide important information about an item or a procedure NOTE Be sure to read the notes the information contained in a note can often save you time or effort DANGER DANGER IS USED TO IND...

Страница 38: ...e included for your reference Others icons make you aware of specific procedures that should be followed NOTE The Vivid q N scanner and SafeLock Cart has no unintended or motorized moving parts that could cause pinching all moving parts are mechanically operated by the user Pay attention to move such parts carefully e g when raising lowering the SafeLock Cart main shelf Table 1 3 Standard hazard i...

Страница 39: ...l laws may restrict this device for sale or use by or on the order of a physician DANGER DANGEROUS VOLTAGES CAPABLE OF CAUSING DEATH ARE PRESENT IN THIS EQUIPMENT USE EXTREME CAUTION WHEN HANDLING TESTING AND ADJUSTING WARNING WARNING IF THE COVERS ARE REMOVED FROM AN OPERATING VIVID Q N SOME METAL SURFACES MAY BE WARM ENOUGH TO POSE A POTENTIAL HEAT HAZARD IF TOUCHED EVEN WHILE IN SHUT DOWN MODE ...

Страница 40: ...HERE OPERATION OF ANY ELECTRICAL EQUIPMENT IN SUCH AN ENVIRONMENT CONSTITUTES A DEFINITE SAFETY HAZARD WARNING WARNING DO NOT SUBSTITUTE PARTS OR MODIFY EQUIPMENT BECAUSE OF THE DANGER OF INTRODUCING ADDITIONAL HAZARDS ONLY INSTALL GE APPROVED PARTS DO NOT PERFORM ANY UNAUTHORIZED MODIFICATION OF THE EQUIPMENT CAUTION USE PROTECTIVE GLASSES DURING DRILLING FILING AND DURING ALL OTHER WORK WHERE EY...

Страница 41: ...O FOLLOW THESE PRECAUTIONS CAN RESULT IN SERIOUS INJURY AND EQUIPMENT DAMAGE DANGER NEVER USE A PROBE THAT HAS BEEN SUBJECTED TO MECHANICAL SHOCK OR IMPACT EVEN IF THE PROBE APPEARS TO BE UNBROKEN IT MAY IN FACT BE DAMAGED CAUTION THE Vivid q N portable ultrasound scanner WEIGHS 5KG 11 LBS OR MORE DEPENDING ON CARRY ON PERIPHERALS WHEN READY FOR USE IN ADDITION THE SAFELOCK CART WEIGHS APPROXIMATE...

Страница 42: ...d in its original packaging before transporting Special care must be taken to correctly position the packing material For further information refer to Chapter 3 System Setup Place the probes in their carrying case Secure the SafeLock cart in an upright position and lock the wheels brake Ensure that the Vivid q N system and SafeLock cart if applicable is firmly secured while inside the vehicle Secu...

Страница 43: ...r housing Do not use a cracked or damaged probe In this event call your field service representative immediately to obtain a replacement Avoid pulling pinching or kinking the probe cable since a damaged cable may compromise the electrical safety of the probe To avoid the risk of a probe accidentally falling do not allow the probe cables to become entangled or to be caught in the SafeLock Cart whee...

Страница 44: ...n and extending vertically 2 29 m 7 5 ft above the floor WARNING WARNING ENVIRONMENTAL DANGERS ALL DEVICES MEETING IEC60950 MUST BE KEPT OUTSIDE THE PATIENT ENVIRONMENT AS DEFINED IN IEC60601 1 1 UNLESS THE DEVICES ACCORDING TO IEC60601 1 1 ARE EQUIPPED WITH THE FOLLOWING A ADDITIONAL EARTH PROTECTION OR B AN EXTRA ISOLATING TRANSFORMER WARNING WARNING COMMERCIAL DEVICES SUCH AS LASER CAMERAS PRIN...

Страница 45: ...nd and a horizontal distance of 1 5 m 4 9 ft have justified themselves as indicative of the dimensions of the Patient Environment The patient environment vicinity is depicted as a dashed line in this procedure see the example in Figure 1 1 Patient Environment EN 60601 1 Sub clause 3 79 Patient Environment It is difficult for this standard to define dimensions for the volume in which diagnosis moni...

Страница 46: ...owered from a non isolated power source is connected to the Vivid q N system using a network cable RJ45 the cable shielding should NOT be soldered to the LAN connector Refer to Figure 1 3 below 1 Do NOT use a soldered LAN connector when connecting the scanner directly to a peripheral device Figure 1 3 Example of Soldered LAN Connector 1 ...

Страница 47: ...WARNING WARNING THE VIVID Q N BATTERY HAS A SAFETY DEVICE DO NOT ATTEMPT TO DIS ASSEMBLE OR ALTER THE BATTERY ALWAYS OBSERVE THE FOLLOWING PRECAUTIONS Charge batteries only when the ambient temperature is between 0 C and 65 C 32 F and 149 F and discharge the batteries between 10 C and 55 C 14 F and 131 F Do not short circuit the battery by directly connecting the negative terminals with metal obje...

Страница 48: ...tanding unbalanced For this reason the dummy battery should be kept so it may be inserted in position to provide stability to the scanner while the lithium ion battery is being charged In addition use of the dummy battery is recommended during transportation or long term storage of the Vivid q N portable ultrasound scanner 1 4 6 Patient Data Safety CAUTION TO PREVENT THE BATTERY BURSTING IGNITING ...

Страница 49: ... FROM AN OPERATING VIVID Q N SOME METAL SURFACES MAY BE WARM ENOUGH TO POSE A POTENTIAL HEAT HAZARD IF TOUCHED EVEN WHILE IN SHUT DOWN MODE WARNING WARNING EXPLOSION WARNING DO NOT OPERATE THE EQUIPMENT IN AN EXPLOSIVE ATMOSPHERE OPERATION OF ANY ELECTRICAL EQUIPMENT IN SUCH AN ENVIRONMENT CONSTITUTES A DEFINITE SAFETY HAZARD EQUIPMENT IS NOT SUITABLE FOR USE IN THE PRESENCE OF A FLAMMABLE ANAESTH...

Страница 50: ...ion All potentially hazardous stored or residual energy is relieved WARNING WARNING ENERGY CONTROL AND POWER LOCKOUT FOR VIVID Q N WHEN SERVICING PARTS OF THE SYSTEM WHERE THERE IS EXPOSURE TO VOLTAGE GREATER THAN 30 VOLTS 1 FOLLOW LOCK OUT TAG OUT PROCEDURES 2 TURN OFF THE BREAKER 3 UNPLUG THE Vivid q N 4 MAINTAIN CONTROL OF THE POWER PLUG 5 WAIT FOR AT LEAST 20 SECONDS FOR CAPACITORS TO DISCHARG...

Страница 51: ...ed with product labels and icons These represent pertinent information regarding the operation of the unit 1 7 1 Universal Product Labels The following diagrams illustrate the labels found on the Vivid q N ultrasound units For an explanation of label icons and symbols refer to Table 1 6 on page 1 20 Table 1 5 Main Label for Vivid q N DESCRIPTION ILLUSTRATION Rating Plate BT12 ...

Страница 52: ...ing documents is intended to alert the user to refer to the User Manual or other instructions when complete information cannot be provided on the label Various CAUTION Dangerous voltage the lightning flash with arrowhead in equilateral triangle is used to indicate electric shock hazards Various Device Listing Certification Labels Laboratory logos or labels that denote conformity with industry safe...

Страница 53: ...may be caused by the weight of the machine if one person attempts to move it considerable distances or on an incline Used in the Service and User Manual which should be adjacent to equipment at all times for quick reference DANGER Risk of explosion used in The system is not designed for use with flammable anesthetic gases See EXPLOSION WARNING on page 1 8 Protective Earth Indicates the protective ...

Страница 54: ...EVISION 2 VIVID Q N SERVICE MANUAL 1 22 Section 1 7 Product Labels and Icons Date of manufacture On the base of the unit Table 1 6 Label Icons and Symbols Description and Location cont d 3 of 3 Label Name Description Location ...

Страница 55: ...use in patient care are regulated medical waste for transportation purposes and must be transported as a hazardous material NOTE The USER SERVICE staff should dispose of all the waste properly per federal state and local waste disposal regulations The Ultrasound system is not meant to be used for long term storage of patient data or images The user is responsible for the data on the system and a r...

Страница 56: ... applicable conducted and radiated emission limits and to immunity from electrostatic discharge radiated and conducted RF fields magnetic fields and power line transient requirements For applicable standards refer to the Safety Chapter in the Vivid q N User Manual NOTE For CE Compliance it is critical that all covers screws shielding gaskets mesh and clamps are in good condition and installed tigh...

Страница 57: ...ps are in good condition and installed tightly without skew or stress Proper installation following all comments noted in this service manual is required in order to achieve full EMC performance CAUTION Any changes to accessories peripheral units or any other part of the system must be approved by the manufacturer Ignoring this advice may compromise the regulatory approvals obtained for the produc...

Страница 58: ...low Prepare the following information before you call System ID and or serial number Software version Date and time of occurrence Sequence of events leading to issue Is the issue reproduceable Imaging mode probe preset application Media brand speed capacity type Detailed description of any problem encountered Save secondary image capture cine loop Where applicable save the appropriate log files by...

Страница 59: ... 1 Introduction 1 27 1 10 1 1 Phone numbers for Customer Assistance 1 10 2 System manufacturer Table 1 7 System manufacturer MANUFACTURER PHONE NUMBER FAX NUMBER GE VINGMED ULTRASOUND A S STRANDPROMENADEN 45 P O BOX 141 NO 3191 HORTEN NORWAY 47 3302 1100 47 3302 1350 ...

Страница 60: ...GE DIRECTION FQ091019 REVISION 2 VIVID Q N SERVICE MANUAL 1 28 Section 1 10 Customer Assistance This page left blank to facilitate double sided printing ...

Страница 61: ... ultrasound unit Included are descriptions of the electrical and facility requirements that must be met by the purchaser A worksheet is provided at the end of this chapter see Figure 2 2 on page 2 10 to help ensure that all the required network information is available prior to installation Table 2 1 Contents in Chapter 2 Section Description Page Number 2 1 Overview 2 1 2 2 Console Requirements 2 ...

Страница 62: ... mind that lighting controls and dimmers can be a source of EMI which could degrade image quality These controls should be selected to minimize possible interference 2 2 4 Time and Manpower Requirements Site preparation takes time Begin pre installation checks as soon as possible to allow sufficient time to make any required changes If possible begin these checks as many as six weeks before system...

Страница 63: ...specifications for the Vivid q N system are as follows 2 2 5 2 Inrush Current Inrush current is not a factor for consideration due to the inrush current limiting properties of the power supplies 2 2 5 3 Site Power Outlets A dedicated AC power outlet must be within reach of the unit without requiring the use of extension cords Other outlets adequate for the external peripherals medical and test equ...

Страница 64: ...ies magnetic fields and transients in the air or wiring They also generate EMI The Vivid q N ultrasound units comply with limits as stated on the EMC label However there is no guarantee that interference will not occur in a particular installation NOTE Possible EMI sources should be identified before the unit is installed and should not be on the same line as the ultrasound system A dedicated line...

Страница 65: ...nection requires a magnet wrap at each end Install the shield over the front of the card cage Loose or missing covers or RF gaskets allow radio frequencies to interfere with the ultrasound signals Replace broken RF gaskets If more than 20 or a pair of the fingers on an RF gasket are broken replace the gasket Do not turn ON the unit until any loose metallic part is removed and replaced if required ...

Страница 66: ...on and testing must also be performed by qualified personnel The products involved and the accompanying electrical installations are highly sophisticated and special engineering competence is required All electrical work on these products must comply with the requirements of applicable electrical codes The purchaser of GE equipment must utilize only qualified personnel to perform electrical servic...

Страница 67: ... a rack Material to safely clean probes performed using a plastic container never metal In the case of a network option An active network outlet in the vicinity of the ultrasound unit A network cable of appropriate length regular Pin to Pin network cable An IT administrator who will assist in configuring the unit to work with your local network A fixed IP address is required Refer to the form prov...

Страница 68: ...hows a floor plan illustrating the recommended layout of the Ultrasound Room and depicting the minimal room layout requirements Figure 2 1 Recommended Floor Plan 4 3m x 5 2m 14 ft x 17 ft 36 IN 92 CM Dedicated Power Outlets Hospital Network Dedicated Analog Telephone Line for Connection to InSite GE Cabinet for Software and Manuals optional Vivid q N ...

Страница 69: ... done while scanning continues With DICOM images can be archived stored and retrieved faster easier and at a lower cost 2 3 4 4 DICOM Option Pre Installation Requirements To configure the Vivid q N ultrasound unit to work with other network connections the network administrator must provide the required information which should include the following Vivid q N Details DICOM network details for the ...

Страница 70: ...nation Devices TCP IP Settings Device Type Manufacturer Name IP Address Port AE Title 1 2 3 4 5 6 7 8 9 10 11 12 Dept Vivid q N Type Floor Room REV Comments CONTACT INFORMATION Name Title Phone E Mail Address Site Scanner IP Settings IP Address Subnet Mask Default Gateway Echo Server GEMNet Server EchoPac PC Server Name Remote DB User Name Name AE Title Remote Archive Setup IP Address Subnet Mask ...

Страница 71: ...formation Vivid i n or Vivid q N Host Name AE Title Local Port IP Address Net Mask ROUTING INFORMATION ROUTER2 ROUTER3 ROUTER1 Destination IP Addresses GATEWAY IP Addresses Default DICOM APPLICATION INFORMATION NAME Store 2 Store 3 Store 1 MAKE REVISION IP ADDRESSES PORT AE TITLE Store 5 Store 6 Store 4 Storage Commit MPPS Work list ...

Страница 72: ...ances from the basic installation Make sure system and probes have been subject to acclimation period Environmental cooling is sufficient Lighting is adjustable to adapt to varying operational conditions of the scanner Electrical facilities meet system requirements EMI precautions have been taken and all possible sources of interference have been removed Mandatory site requirements have been met I...

Страница 73: ...n Installation Acceptance Test Criteria on page 3 180 a Vivid q N ultrasound scanner is ready for use after the system has been configured successfully in accordance with the information provided in System Setup this chapter NOTE Depending on the customer s specific requirements the Vivid q N portable ultrasound scanner may have been supplied with or without the SafeLock Cart optional Where applic...

Страница 74: ... qualified service personnel should carry out servicing and troubleshooting 3 2 2 1 System Acclimation Time Following transport the Vivid q N system may be very cold or hot Allow time for the system to acclimate before being switched ON Acclimation requires 1 hour for each 2 5o C increment when the temperature of the system is below 10o C or above 35o C Table 3 2 Average Installation Time Descript...

Страница 75: ...al shock connect the unit to a properly grounded power outlet Do NOT use a three prong to two prong adapter as this defeats safety grounding CAUTION To ensure proper grounding connect this equipment to a receptacle marked HOSPITAL ONLY OR HOSPITAL GRADE CAUTION Do NOT wear the ESD wrist strap when you work on live circuits where more than 30 V peak is present CAUTION Do NOT operate the unit unless...

Страница 76: ...if the package itself is undamaged To make it easier to detection if the handling during transportation has been unproper a set of Tilt Shock indicators have been attached to the transportation box 3 2 4 2 Position of the Tilt Shock Indicators The Tilt Shock indicators have been attached to the right side of the transportation box as illustrated in the figure below Figure 3 1 Tiltwatch and Shockwa...

Страница 77: ...Tilt Indicator has been triggered Make a remark on the Post Delivery Checklist about the triggered indicator and then follow the rest of the instructions in subsection 3 3 2 Damage in Transportation If no Continue with the instructions in Section 3 3 Receiving the Vivid q N WARNING WARNING For Vivid q N portable ultrasound scanners supplied from the factory with a dummy battery when unpacking the ...

Страница 78: ...r signed for by a GE representative or hospital receiving agent 2 Report the damage to the carrier Whether noted or concealed damage MUST be reported to the carrier immediately upon discovery or in any event within 14 days after receipt and the contents and containers held for inspection by the carrier A transportation company will not pay a claim for damage if an inspection is not requested withi...

Страница 79: ...vid q N Transportation Box Label details Figure 3 2 Transportation Box Label Figure 3 3 Vivid q N Transportation Box Label details HANDLE WITH CARE FRAGILE HANDLE WITH CARE KEEP DRY PROTECT FROM MOISTURE TOP UPRIGHT TRANSPORTATION STORAGE RECYCLING RECYCLABLE WOOD RELATIVE HUMIDITY BETWEEN 30 and 95 KEEP TRANSPORTATION TEMPERATURE BETWEEN 10 C and 60 C KEEP AIR PRESSURE BETWEEN 70 kPa and 106 kPa ...

Страница 80: ...on 3 4 Unpacking the Equipment Section 3 4 Unpacking the Equipment CAUTION Please read this section fully before unpacking the Vivid q N ultrasound unit Figure 3 4 Shipping Box for the Vivid q N only Figure 3 5 To remove the Lid of the Box Break the seal Open the Lock ...

Страница 81: ...portation box closely at time of delivery as described in the procedure that follow Figure 3 6 Transportation box lid removed Table 3 6 Shipping Carton Dimensions and Weights Description Height Width Depth Weighta a Weight is approximate and will vary depending on supplied peripherals Ultrasound system with probes peripherals and accessories 85 cm 87 cm 66cm 35 kgs Empty ...

Страница 82: ...hand and be ready to mark the check list 3 Remove the surface packing material paper pad silica gel etc Continue to remove additional packing material as applicable during the following procedure steps 4 Carefully remove the box containing the probes 5 Take out the package containing the following accessories cables AD DC ECG Network Isolation Box and software CD 6 Verify the content against the D...

Страница 83: ...ttings are 220 240V AC 3 4 5 EMI Protection The Vivid q N Ultrasound Unit has been designed to minimize the effects of Electro Magnetic Interference EMI Many of the covers shields and screws are provided primarily to protect the system from image artifacts caused by this interference For this reason it is imperative that all covers and hardware are installed and secured before the unit is put into...

Страница 84: ... list the contents of the shipping carton that are additional to the Vivid q N These include external accessories and probes as well as a regional language support kit and optional peripherals as ordered Ensure that all relevant components are present before completing the installation NOTE The transportation box contains an External Accessory Kit and Optional Peripherals Check List When checking ...

Страница 85: ...llumination of all the control panel buttons 3 Probes Check all probes for wear and tear on the lens cable and connector Look for bent or damaged pins on the connector and in the connector socket on the unit Verify that the EMI fingers around the probe connector socket housing are intact Check the probe locking mechanism and probe switch 4 LCD Display Clean the LCD display by gently wiping with a ...

Страница 86: ...n the peripherals in accordance with the manufacturer s directions To prevent EMI or system overheating dress the peripheral cables inside the peripheral cover 5 AC System Check the AC board connectors and the associated cabling for good connection and proper insulation Verify that the connections are secured 6 Power Cord Check the power cord for cuts loose hardware tire marks exposed insulation o...

Страница 87: ...d side of the ultrasound unit 1 Display Monitor tilts up and down 2 Speakers Two loudspeakers for Doppler sound 3 Control Panel Contains the alphanumeric keyboard and the buttons used to operate the ultrasound unit 4 Rear Handle 5 Air Vents 6 Probe Ports Two active probe connectors one for a pencil probe 7 ECG Connector 8 ON OFF Switch 9 Alphanumeric Keyboard and Operation Button 10 Release Latch ...

Страница 88: ... unit rear panel and external peripheral accessory connectors 1 Two interchangeable USB ports digital printer CD RW and other peripherals 2 Docking connector currently not in use 3 Port for DC IN AC Adapter 4 SVGA Output VCR option or CRT monitor option 5 LAN 10 100 Base TX Ethernet network connector 6 PCMCIA port for PC card 7 Ejection lever for PCMCIA device Figure 3 9 View of the Vivid q N Rear...

Страница 89: ...k Cart Components Label Item Label Item 1 Top Shelf Assembly with handle 7 Bottom Cover Rear AC Assembly Cover 2 Probe Shelf with probe holders 8 Rear Lower Cover 3 Peripheral Power Outlet 9 SafeLock Cart Bottom Assembly 4 Rear Upper Cover 10 Front Wheels with locking lever 5 AC Distribution Assembly behind cover 11 Rear Wheels 6 Bottom Cover Front 12 AC Cable Hook 1 9 2 4 5 6 7 8 10 11 3 12 ...

Страница 90: ... that the jumper is set to either 100 to 120 V AC or to 220 240 V AC in accordance with the voltage rating shown on the safety rating plate step 1 3 5 5 System Voltage Confirmation 3 5 5 1 System Voltage Settings Verify that the Vivid q N is set to the correct voltage The Vivid q N voltage settings are found on the base underside of the system For illustrations of the label with the voltage settin...

Страница 91: ...Check the grounding of the power cord and power outlet Be aware of RF sources Keep the unit at least 5m 16 4 ft away from other EMI sources Special shielding may be required to eliminate interference problems caused by high frequency high powered radio or video broadcast signals Replace and or reassemble all screws RF gaskets covers and cores After you finish repairing or updating the system repla...

Страница 92: ...uired it is possible to disable access to all Vivid q N scanner USB ports including the CD DVD drive in order to limit system vulnerability This is implemented from the System Configuration window via the Service tab Activate the USB External Media disabled checkbox as shown in XREF Figure 3 22 below then press the F2 or Esc key to save the changes NOTE After disabling all Vivid q N scanner USB po...

Страница 93: ... of Procedure Instructions NOTE The printers approved for use with the Vivid q N system are categorized in Table 3 11 below Refer to the appropriate instructions for connecting a specific printer as applicable WARNING WARNING WHEN CONNECTING PRINTERS TO THE SYSTEM OR SAFELOCK CART ONLY MULTIPLE SOCKET OUTLETS PROVIDED WITH THE SYSTEM ARE TO BE USED FOR SUPPLYING POWER TO EQUIPMENT INTENDED TO FORM...

Страница 94: ...her the Print button or Alt Print to activate a variety of outputs 5 Use the left or right arrows below to add any of the available options listed on the left as Outputs listed on right 6 From the listed Outputs select highlight the required output right click and select Properties to configure the output device accordingly Printing may now be activated direct from the Vivid q N Control Panel usin...

Страница 95: ...ses the system at the Applications level from the Additional Outputs screen By selecting the Advanced option under Selected Devices the user accesses the Printer Properties dialog box and proceeds with the configuration procedure as explained below An additional procedure is required to configure the Sony UP D897 Printer This is described in Configuring the Sony UP D897 Printer on page 3 30 1 On t...

Страница 96: ...ardware Installation 3 Click Configure in the Printer Properties dialog to enter Print Setup 4 In the Orientation area select Portrait or Landscape as needed 5 From the Paper Size drop down list select the required paper size Figure 3 15 Printer Properties Dialog Box Figure 3 16 Printer Setup ...

Страница 97: ...perties The printer properties screen opens Figure 3 17 7 Verify that the selected orientation and paper size are correct 8 Click OK twice and then once more to return to the Advanced Outputs tab Figure 3 17 Printing Properties Selecting Orientation Orientation From scroll down list select Portrait ...

Страница 98: ...per or lower on the rear connectors panel When connecting directly to the system it is necessary to use an additional power source As a safety precaution this must be done via an isolation transformer The DeskJet Color Printer can be connected once the system is powered ON or after shutdown NOTICE IMPORTANT Do not connect the DeskJet Color Printer to the Vivid q N system while scanning is in progr...

Страница 99: ... Printer may be connected to any of the USB outlets provided on the SafeLock Cart One must use the additional power source to activate the DeskJet Color Printer However this must be powered from the SafeLock Cart itself via one of the isolated peripheral power outlets provided on the cart WARNING WARNING Do not attempt to use a different type of DeskJet Color Printer brand or model other than the ...

Страница 100: ...ng the Vivid i q system on the SafeLock cart as described in Mounting the Vivid q N on the SafeLock Cart optional on page 3 65 NOTE When using the Vivid i q system mounted on the SafeLock cart the HP Officejet Pro 8000 printer must be connected to the AC outlet at the rear of the SafeLock cart see Figure 3 20 1 Connect the printer to the AC power outlet located at the rear of the SafeLock cart 2 P...

Страница 101: ...er are pre configured and installed designated to be used with the specific B W Printer supplied by GE No SafeLock Cart connection via USB hub As stated above Safety considerations must be taken into account The B W Printer must be powered via an isolation transformer Either USB port may be used to communicate with the device Vivid q N mounted on SafeLock Cart The B W Printer may be connected to a...

Страница 102: ...ony UP D897 Printer the following steps are required 1 Click the Tcpip tab on the Connectivity screen see Figure 3 14 on page 3 23 2 Select Advanced Settings see Figure 3 22 3 The Network Connection screen opens Figure 3 23 Click the Up button to open the Windows Control Panel 4 Navigate to Printers and Faxes and double click Sony UP D897 to open the Sony UP D897 Printer Configuration dialog Figur...

Страница 103: ...E MANUAL Chapter 3 System Setup 3 31 5 From the menu select Printer Properties 6 The Sony UP D897 Properties screen opens Select Printing Preferences Figure 3 24 Sony UP D897 printer configuration dialog box Figure 3 25 Sony UP D897 Properties Screen ...

Страница 104: ...e Installation 7 From the Printing Preferences dialog under Orientation A Under Paper click the scroll down arrow and select the required paper size B Under Orientation choose the required printing orientation 8 Click OK and return to the Connectivity screen Figure 3 26 Printing Preferences screen ...

Страница 105: ...nated to be used with the specific Digital Color Printer supplied by GE No SafeLock Cart connection via USB hub As stated above Safety considerations must be taken into account The Digital Color Printer must be powered via an isolation transformer Either USB port may be used to communicate with the device Vivid q N mounted on SafeLock Cart The Digital Color Printer may be connected to any of the U...

Страница 106: ... there is no preference as to which cable to connect first One end of the telephone cable can be connected to the wall outlet and the other side to the modem followed by connecting one end of the USB cable to the modem and the other side to the lower USB port on the rear connectors panel All software drivers for the modem are pre installed for the specific modem type One must follow the i Linq con...

Страница 107: ...uration on page 3 90 CAUTION For network security reasons when configuring the wireless USB network adaptor on the Vivid q N system do not use the USB ports on the SafeLock cart CAUTION For network security reasons both USB ports on the Vivid q N system must be configured separately when installing the wireless USB network adaptor WARNING WARNING Do not use any other type of wireless adaptor other...

Страница 108: ... 3 1 Samsung DVD SE TO84M RSBN Kit P N S2423870 Part No Part Description RS2423870 Samsung DVD SE TO84M RSBN R2423877 DVD Patch CD 2418071INS Pocket DVD with USB Installation Guide Table 3 2 Samsung Cable Kit S2423956 Part No Country RS2423951 2 Port USB cable Vivid i n SafeLock Cart R2423953 5V Medical Grade AC Adaptor R24123781 DVD to Distribution USB Cable NOTICE IMPORTANT the following steps m...

Страница 109: ...rom media to the Vivid q N system To perform the Database Backup procedure in order to store back up copies of patient Exams data Archive and also to create free space on the local hard disk To export Exams in MPEGVue mode whereby the media can be viewed on any external PC To load or upgrade system software and for the use of GE Healthcare Field Engineers when performing various other functions NO...

Страница 110: ...RW drive rear panel b Disconnect the 5V power supply output cable from the power port on the Samsung DVD R RW drive rear panel 2 Remove the Samsung DVD CD RW drive from the system Installation Procedure 1 Unpack the contents of the Samsung Cable Kit P N S2423956 2 Connect the mini USB connector Figure 3 29 into the mini USB port located at the rear of the replacement Samsung DVD CD RW Drive Figure...

Страница 111: ... Insert a CD R disk in the DVD CD RW Drive b Eject and remove the CD R disk to check the eject mechanism functions properly NOTE In the event that problems are experienced when exporting to DVD media the error message Failed to finalize media is displayed It is therefore recommended to use the Medical Grade 5V Power Supply for DVD Samsung Universal P N 2421169 and connect it to the peripheral outl...

Страница 112: ...Disconnect both ends of the 5V power outlet one end from the SafeLock Cart main column power and the other from the Samsung DVD R RW drive rear panel 5 Release the locking arm retaining clamp lever located beneath the specially designed shelf DVD R RW drive compartment beneath the upper shelf of the SafeLock Cart see Figure 3 33 6 Slide the Samsung DVD R RW drive out of the compartment and remove ...

Страница 113: ... the USB ports located below the upper shelf of the SafeLock Cart see Figure 3 35 and Figure 3 36 Figure 3 34 Cable for Installation on Vivid q N Cart Figure 3 35 USB Cable Plugged Into the DVD CD Drive and the Cart s USB Connectors Figure 3 36 USB ports Located Below the Support Tray of the Vivid q N Cart USB connectors to be plugged into the USB ports on the cart Mini USB connector that plugs in...

Страница 114: ...to the USB port located at the rear of the Vivid q N system Figure 3 31 on page 3 39 6 Re connect power to the SafeLock Cart and to the Vivid q N system 7 Switch on the circuit breaker and turn ON power to the Vivid q N system 8 Perform the following test a Insert a CD R disk in the DVD CD RW Drive b Eject and remove the CD R disk to check the eject mechanism functions properly ...

Страница 115: ...ON or after shutdown All software drivers for the MOD Drive are pre configured and installed designated to be used with the specific MOD drive supplied by GE No SafeLock Cart connection via USB hub As stated above Safety considerations must be taken into account The MOD Drive must be powered via an isolation transformer Either USB port may be used to communicate with the MOD device NOTICE IMPORTAN...

Страница 116: ...SB Hard Disk Refer to the External USB Hard Disk Installation Procedure section page 8 136 for instructions on initial configuration and connecting the External USB Hard Disk to the Vivid q N portable ultrasound scanner NOTICE IMPORTANT Do not connect the External USB Hard Disk to the Vivid q N system while scanning is in progress This will avoid the risk of causing image artifacts NOTICE IMPORTAN...

Страница 117: ...ck Cart connection via USB hub As above If applicable the USB hub must be powered via the isolation transformer Vivid q N mounted on SafeLock Cart As above 3 7 2 7 Footswitch The Footswitch USB connection in the different scenarios is explained below No SafeLock Cart connection directly to the Vivid q N system The Footswitch may be connected to either of the USB ports upper or lower on the rear co...

Страница 118: ...tallation Vivid q N mounted on SafeLock Cart As above NOTE After connecting the Footswitch to the system define the required functionality settings as follows 1 Press Config to access the Configuration screen 2 Select Imaging then activate the Application tab see Figure 3 41 Figure 3 41 Application Tab ...

Страница 119: ...VICE MANUAL Chapter 3 System Setup 3 47 3 Using the Footswitch Functionality drop down menus select the required functionality for the Left Middle and or Right Footswitch see the example in Figure 3 42 Figure 3 42 Footswitch Functionality Settings ...

Страница 120: ...see note below NOTE When performing step 1 it may be necessary to use the VGA adaptor P N 2420728 see Figure 3 44 to connect the end of the VGA cable to the Vivid q N rear connector panel Since some VGA plugs have thicker housing they do not fit properly into the Vivid q N VGA connector socket on the rear panel because the plug is not centrally aligned within the frame In this event use of the VGA...

Страница 121: ... all power and signal cables are connected to the system VCR and video converter proceed as follows in the order stated a Press the power ON switch on the VCR b Press the power ON switch on the video converter c Turn ON power to the Vivid q N system 7 Press the Input Select button see Figure 3 45 on page 3 48 on the video converter three times in order to select VGA Input as your signal source The...

Страница 122: ...taneously The following screen will appear Figure 3 48 Intel Dual Display Clone 9 Select the Intel Dual Display Clone icon and press OK see Figure 3 48 NOTE If the VGA cable is not properly connected to the rear panel or in the event that the scan converter device is not switched ON you may see a single icon displayed as shown in Figure 3 49 Figure 3 49 Single Icon ...

Страница 123: ...he cart It is possible to use a different type of VCR brand and model However it is highly recommended to use a medical graded VCR as this will ensure that both safety and image quality levels meet universal medical standards 1 Connect one end of the VGA cable to the VGA OUTPUT located on the Vivid q N unit refer to Figure 3 9 on page 3 16 2 Connect the other end of the VGA cable to the VGA input ...

Страница 124: ...SION 2 VIVID Q N SERVICE MANUAL 3 52 Section 3 7 Completing the Hardware Installation 3 7 2 9 Connecting the VGA Splitter Figure 3 51 VGA Splitter Figure 3 52 Cables and Bracket for Wall Mounting Power Cable VGA Cable DVI Cables ...

Страница 125: ...vid q N system and the GE Video Splitter Isolation box 1 Connect the VGA cable Figure 3 52 to the VGA input port at the rear of the VGA splitter see Figure 3 53 and Figure 3 54 Connect the other end of the cable into the Vivid q N system s VGA output port 2 Plug the VGA Splitter power cable Figure 3 52 into the power socket on the rear of the VGA Splitter see Figure 3 53 and Figure 3 54 WARNING WA...

Страница 126: ...or further connection to other DVI devices Refer to Figure 3 54 above 4 When connecting the DVI output cable to an external monitor press V Out on the Vivid q N system console The screen shown in Figure 3 55 is displayed 5 Under Multiple Display activate the Intel R Dual Display Clone radio button Monitor is now selected as the Secondary Device as shown in Figure 3 55 Figure 3 54 Connections to VG...

Страница 127: ... water or conductive liquids this is not a sealed case Do not open the charger or power supply case There are no user serviceable parts inside Do not cover the fan exhaust or obstruct the airflow as this will cause overheating Use only the manufacturer s 24V 2 5A power supply Place the charger in a cool location away from external heat sources During recalibration the battery connector and base of...

Страница 128: ...r if the battery is fully discharged to begin with The recalibration time is approximately 9 hours for an empty battery and approximately 14 hours for a fully charged battery NOTE Calibration is initiated each time the button is pressed so it is not recommended to press the recalibration button part way through the recalibration cycle During the charging procedure the green LED will be seen flashi...

Страница 129: ...ttery charger unit No action is required if only a recharge is required as the charger will automatically begin to charge the battery The blue calibration LED will flash to indicate that the battery is undergoing the recalibration cycle There may be a short delay before the calibration begins During calibration the discharge resistors will heat up and the fan will operate to maintain temperature w...

Страница 130: ...s can be connected or changed any time as described below regardless of whether the system is powered ON or OFF 1 Place the probe s carrying case on a stable surface and open the case 2 Inspect the probe socket to verify that it is free of debris 3 Carefully remove the probe and unwrap the probe cord DO NOT allow the probe head to hang freely Impact to the probe head could result in irreparable da...

Страница 131: ...o that it is free to move and is not resting on the floor When the probe is connected it is automatically activated NOTE It is not necessary to turn OFF power to connect or disconnect a probe Figure 3 58 Connecting Probe to the Vivid q N Figure 3 59 Securing Probe with Locking Lever CAUTION Do not bend the probe cable acutely Fault conditions can result in electric shock hazard Do not touch the su...

Страница 132: ...ECTION FQ091019 REVISION 2 VIVID Q N SERVICE MANUAL 3 60 Section 3 7 Completing the Hardware Installation 3 7 4 1 Available Probes For a list of the available probes please see Section 9 7 Probes on page 9 8 ...

Страница 133: ...e of the External Respiratory option is enabled by removal of the ECG Board and installation of the Internal ECG Respiratory Board For instructions refer to the ECG Respiratory Module Assembly Installation Procedure on page 8 18 NOTE An External ECG Respiratory cable should be available This is provided by GE Part 2413451 see Section 9 5 Cables on page 9 6 Alternatively the adaptor supplied with t...

Страница 134: ...rify compliance with all electrical and safety requirements and check the power cord to verify that it is intact and of hospital grade before connecting the unit to the power source Products equipped with a power source wall outlet plug should be connected to the fixed power socket that has a protective grounding conductor Never use an adapter or converter to connect with a power source plug for e...

Страница 135: ...r cable connector from the AC input socket on the SafeLock Cart or the AC DC converter of the system 3 Unplug the mains power cable from the AC wall outlet socket 4 Unplug the AC DC power connector from the Vivid q N rear panel CAUTION Make sure the system is powered OFF or in standby mode before disconnecting the Vivid q N unit from the electrical outlet and proceed as described in the steps belo...

Страница 136: ...wn If the probe has been removed since the system was last used the currently connected probes and their available applications are displayed and selected by default 3 7 7 2 Switching the System OFF NOTE After turning OFF the system wait at least 10 seconds before turning it on again The system may not be able to boot up if power is recycled too quickly The system can be switched OFF in one of thr...

Страница 137: ...ards between the sliding guides on either side of the shelf as shown below NOTICE Only the SafeLock Cart supplied by GE and or any medical grade cart which has been approved as suitable for use with the system by GE should be used with the Vivid q N portable ultrasound scanner NOTICE The Vivid q N system and the SafeLock Cart should be operated at a distance of more than 15 feet from any magnetic ...

Страница 138: ... one finger between the SafeLock Cart arm rest and the front of the scanner 3 If necessary perform the alignment procedure as described in 3 8 2 Adjusting the SafeLock Cart Locking Mechanism on page 3 68 4 Connect the LAN Cable from the cart to the LAN connector on the Vivid q N rear panel 5 Connect the Docking Connector to the rear of the scanner as shown below Figure 3 63 Vivid q N Scanner Mount...

Страница 139: ...the Vivid q N on the SafeLock Cart cont d 6 Connect the USB Cable from the cart to the USB port on the Vivid q N rear panel Figure 3 64 Vivid q N Rear Panel on page 3 66 Use the lower port the upper port is dedicated for the Bluetooth connector 7 If necessary connect the DVD to the USB hub on the cart ...

Страница 140: ...see Figure 3 67 on page 3 68 2 Working from the underneath the main shelf use a Phillips screwdriver to loosen the two screws half turn counter clockwise holding the middle locking tooth in position on both the left and right sides of the main shelf as shown below 3 Check that the Vivid q N portable ultrasound scanner is locked correctly onto the two rear locking teeth if not push the scanner full...

Страница 141: ...view Table 3 5 below outlines the Vivid q N Configuration procedures described in the relevant sub sections Table 3 5 Configuration Procedures SUB SECTION DESCRIPTION PAGE NUMBER 3 9 2 Vivid q N Configuration 3 69 3 9 3 Service Screen Set up 3 75 3 9 4 Configuring Peripherals 3 81 3 9 5 Software Options Configuration 3 84 ...

Страница 142: ...parations If needed select SYSTEM The System Settings Window is displayed 2 Select the Hospital field see a in Figure 3 68 and type the name of the hospital max 64 characters The 24 first characters of this name are displayed on the scanning screen s title bar after restart All 64 characters are displayed on the image properties on saved images after restart 3 Select the Department field see b in ...

Страница 143: ...displayed 4 Select the preferred Time Format see c in Figure 3 69 24 the 24 hour format is used 12 the 12 AM PM hour format is used 5 Select the preferred Date Format see d in Figure 3 69 DD Date two digits MM Month two digits YYYY Year four digits EU the European DD MM YYYY format is used US the American MM DD YYYY format is used 6 Select Default Century 1900 2000 or None see e in Figure 3 69 190...

Страница 144: ...Select SYSTEM if needed The System Settings Window is displayed 2 Use the Language drop down dialog see Figure 3 70 to select your preferred language for the on screen interface The following languages are available ENG English NOR Norwegian DEU German ITA Italian FRA French ESP Spanish RUS Russian after selection continue to step 3 GRE Greek after selection continue to step 3 DAN Danish SWE Swedi...

Страница 145: ...ngs The Regional and Language Options dialog box opens 4 Under Standards and formats in the language field scroll down to the desired language e g Russian and click OK Reboot the system The interface and keyboard input will be in Russian Note For the Greek language only the user interface is supported It is not possible to input Greek from the keyboard Table 3 8 Language Adjustments cont d STEP TA...

Страница 146: ...LT S 1 Open the Configuration Window see Log On to the System as ADM on page 4 10 Select SYSTEM if needed The System Settings Window is displayed 2 Use the drop down Units dialog see Figure 3 71 to select Metric or US Units The selected units Metric or US will be used for measurements as soon as the unit has been restarted 3 Restart the scanner All the changed settings will be used after the resta...

Страница 147: ...Backlight Intensity Keyboard Setups Printer Setup Disable TCPIP filtering NOTE The Disable TCPIP Filtering option should only be used for Troubleshooting procedures after which it it is recommended to return immediately to the TCPIP Filtering enabled state 3 9 3 2 Open Service Screen 1 Press CONFIG F2 and log on as Adm see Log On to the System as ADM on page 4 10 2 Select SERVICE to view the Servi...

Страница 148: ...ed For instructions see LCD Display Adjustments and Calibration on page 6 1 3 9 3 5 Keyboard Setup 1 Press F2 select Service Tab The Select Keyboard Setup dialog is displayed 2 Click Keyboard Setup The Regional and Language Options dialog box is displayed which has controls for the following described below Regional Options affects regional formatting of numbers dates times etc Languages enables s...

Страница 149: ...GE DIRECTION FQ091019 REVISION 2 VIVID Q N SERVICE MANUAL Chapter 3 System Setup 3 77 3 9 3 5 1 Regional Options Select appropriate Format and Location then click Apply Figure 3 75 Regional Options ...

Страница 150: ...VICE MANUAL 3 78 Section 3 9 Configuration 3 9 3 5 2 Languages 1 Under the Languages tab click Details to select appropriate Language 2 If necessary activate applicable Supplemental Language Support check box then click Apply Figure 3 76 Languages ...

Страница 151: ...019 REVISION 2 VIVID Q N SERVICE MANUAL Chapter 3 System Setup 3 79 3 9 3 5 3 Advanced 1 Under the Advanced tab select a language version of the non unicode programs you want to use then click Apply Figure 3 77 Advanced ...

Страница 152: ...e is a need follow the instructions provided by GE Medical Systems or the instructions in the respective printer installation manual 1 Select ADD PRINTER to start the Add Printer Installation Wizard 2 Follow the instructions in the Wizard to install a new printer 3 When done perform a full system shutdown then boot up the system into Normal Scannng mode Restarting the system allows the changes to ...

Страница 153: ...efer to the External USB Hard Disk Installation Procedure on page 8 136 DVD CD R Drive via USB Printer Deskjet HP 450 via USB Virtual printer any of the DeskJet printers can be used as virtual printers when the user is in a remote location 3 9 4 2 Network Peripherals Optional The printers detailed below are connected via Ethernet TCP IP Network Lexmark Color LaserWriter Network Printer The printer...

Страница 154: ...int jobs will be printed out automatically Sometimes this feature is device dependent Therefore in order to initiate the manual print of all spooled jobs process proceed as described below 1 Press ALT P The Printers and Faxes window is displayed 2 Right click on the destination virtual printer see Figure 3 80 and select Open The Virtual Printer Job Queue window is displayed 3 From the queued Print...

Страница 155: ...asound scanner is mounted on the SafeLock Cart always use the lower USB port for the Hub 5 The Vivid q N ultrasound scanner and all connected devices working with scanner should be powered and connected to the SafeLock Cart only For the SafeLock Cart there are two basic peripheral configurations that are recommended Configuration Recommendation 1 DVD always plugged into port 1 of the USB Hub MOD a...

Страница 156: ...t ADMIN lower part of window 3 Select the SYSTEM ADMIN tab 4 Select NEW to open the New Key dialog where you type the Software Option Key Serial String 5 Type the Password Software Option Key 6 Press OK to save the new setting 7 Close the Config window 3 9 5 3 Remote Check and Configuration Contact the OnLine Center for InSite Checkout Figure 3 83 System Admin screen Figure 3 84 Type Software Opti...

Страница 157: ...red for eVue Images or loops may be transmitted to a designated PC e Vue PC on the network in compact MPEG format and will appear at the review PC in almost real time 3 10 1 1 The Dataflow Concept Communication between the Vivid q N ultrasound unit and other information providers on the network takes the form of dataflows Each dataflow defines the transfer of patient information from either an inp...

Страница 158: ...The local database is used for patient archiving Images are stored to internal hard drive LocalArchive MOD dataflow The local database is used for patient archiving Images are stored to a MOD Worklist Local Archive DICOMServer Int HD dataflow Search in the DICOM Modality Worklist the patient found is copied into local database The patient information and the examination results are stored to the l...

Страница 159: ...d q N to an EchoPAC PC Workstation In this configuration the data is transferred from the Vivid q N to a dedicated EchoPAC PC Workstation over an Ethernet connection The connection may be done in one of three ways with a crossover cable as a Peer to Peer Network connection via a Local Area Network LAN set up for this special use only connection via the hospital network Local Area Network LAN or Wi...

Страница 160: ...tation Figure 3 87 Local Network Connection Figure 3 86 Ethernet Switch Identifications Position Label Function X To PC To connect an end station or a Server to the Port To HUB To connect a HUB or another Switch to the Port Table 3 10 MDI Button Position Descriptions MDI Button Controls the fifth connector making it crossed or non crossed Informative LEDS Ethernet Cable connectors EchoPAC PC Vivid...

Страница 161: ...n to EchoPAC PC Workstation Figure 3 88 Hospital Network Connections See the EchoPAC PC Service Manual Part Number EP091298 for details about the EchoPAC PC and the required set up procedures Using standard non crossed cables and MDI switch set to position HUB connect like this Wall connection EchoPAC PC or Vivid7 Vivid3 ...

Страница 162: ...l in the DVD drive 3 Boot up the system in maintenance mode and navigate to Windows Explorer 4 Create a new folder on the system s D drive and name it WIFI DRIVER 5 Copy the contents of the disk to the WIFI DRIVER folder 6 Disconnect the DVD drive from the system 7 Plug the wireless USB device connected to the R adaptor into the USB port at the rear of the Vivid q Nsystem Refer to Figure 3 28 on p...

Страница 163: ... list or specific location Advanced see Figure 3 90 and click Next 10 Select Include this location in search Figure 3 91 and browse to D WIFI DRIVER Figure 3 92 11 Click Next The following screen opens Figure 3 92 Figure 3 90 Install from a List or Specific Location Figure 3 91 Include this Location in Search ...

Страница 164: ...2 Select the WIFI DRIVER folder then click OK The following screen opens 13 Click Next The installation process continues displaying wizard screens until installation is complete 14 Click Finish The installation process is complete Figure 3 92 WIFI DRIVER Folder Figure 3 93 Hardware Update Wizard ...

Страница 165: ...en press Config Select the Connectivity tab and from the Connectivity screen click TCP IP 2 Click Advanced Settings to open the Network Connections screen see Figure 3 94 3 From the Wireless Network Connection screen navigate to Wireless Network Connection 8 and double click to open the Wireless Network Connection 8 screen see Figure 3 95 Figure 3 94 Network Connections ...

Страница 166: ...ork and click Connect In this example Figure 3 95 the wireless network connection is Vivid_S Testing The Wireless Network Connection dialog box opens see Figure 3 96 5 Type the required network key in the Network key field then click Connect Figure 3 95 Wireless Network Connection 8 Figure 3 96 Wireless Network Connection Dialog Box ...

Страница 167: ...ating that the wireless adaptor is connected see Figure 3 98 6 Return to the instructions for Installing the Compact Wireless G Adaptor Software on page 3 90 and repeat the entire procedure in order to configure the second USB port 7 When done proceed to perform the following functionality tests Wireless USB Network Test on page 4 25 Figure 3 97 Wireless Detection Process Figure 3 98 Confirmation ...

Страница 168: ...GE DIRECTION FQ091019 REVISION 2 VIVID Q N SERVICE MANUAL 3 96 Section 3 10 Connectivity Setup Figure 3 99 CISCO_350 Sub directory ...

Страница 169: ...ork connector to the EchoPAC PC Workstation see Chapter 3 in the EchoPAC PC Workstation Service Manual Connection via a Peer to Peer Network You will need a network hub and one network cable for each unit connected to the hub See 3 10 2 1 Ethernet Switch Connections on page 3 88 Connection via Hospital Network You will need one network cable to connect the Vivid q N to a wall outlet on the hospita...

Страница 170: ...ge 2 10 Typically the source for this information is the network administrator Follow the steps below to prepare the scanner for use on the network 3 10 3 2 Select TCP IP Set up Screen 1 Press CONFIG F2 and log on as Adm as described in Log On to the System as ADM on page 4 10 2 If not already selected select CONNECTIVITY from the bottom of the screen 3 Select the TCP IP TAB it is named Tcpip Figu...

Страница 171: ...P address 0 0 0 0 4 In addition the scanner s AE Title must be entered in the DICOM server s setup 3 10 3 4 Set the Remote Archive s Network Information In the Remote Archive Setup area of the screen see example in Figure 3 102 enter the following 1 Remote Archive IP address Default IP Address from factory 10 0 0 4 2 Remote Archive Name Default Remote Archive Name from factory ECHOPAC7 000001 Figu...

Страница 172: ...for exporting error logs with Alt D 1 From the system keyboard press Config and log on as an ADM user with the appropriate password 2 Click Connectivity from the bottom row of buttons on the screen and select the Tools tab The Tools screen opens see Figure 3 103 3 Under Save As PDF Network Path in the Remote Path field type the remote path For example in Figure 3 103 type IP ADDRESS DIRECTORY wher...

Страница 173: ... the default user and password Under Configurable Remote Path User refer to Figure 3 103 type the desired user name and password as configured on the destination PC This is the password usually assigned by the local IT person 3 10 3 7 Save the New Settings 1 Press SAVE SETTINGS to save the new settings The new settings are saved to a common settings file After a restart the settings are also inclu...

Страница 174: ...tton on the control panel 1 On the Vivid q N control panel press the Config button 2 From the System Configuration window click the Connectivity tab at the bottom of the window The Connectivity dialog box opens 3 Select the TCPIP Tab 4 Trackball to the Advanced tab and press the Set button on the control panel 5 Select the Local Area Connection as shown in Figure 3 105 6 Press the Menu button on t...

Страница 175: ...10 0 0 1 NOTE The IP must be different from the IP address used for network computer 12 Type in the Subnet mask 255 255 255 0 NOTE The Subnet mask should be the same for both the network computer and the Vivid q N 13 Click OK 14 Press the Config button on the control panel to close all windows and return to the regular scanning mode NOTE The following steps are performed on the Network Computer 1 ...

Страница 176: ... 3 Double click on Local Area Connection icon The Local Area Connection Properties dialog box opens 4 Select Internet Protocol TCP IP 5 Click the Properties button The Internet Protocol TCP IP Properties dialog box opens 6 Activate the Use the following IP address check box 7 Type in the network computer s IP address 10 0 0 2 Figure 3 108 Local Area Connection Properties Figure 3 109 Internet Prot...

Страница 177: ... all changes Return to regular mode 10 Connect the Vivid q N and network computer LAN connection using a cross over Network cable Normally with RED connector covers on both sides cable not longer than 100 meters The Vivid q N and the network computer are now ready for export import of files NOTE One can check the connection by pinging to the Vivid q N IP as follows a Select Start Run b Type CMD th...

Страница 178: ...on the control panel 1 On the Vivid q N control panel press the Config button 2 From the System Configuration window click the Connectivity tab at the bottom of the window The Connectivity dialog box opens 3 Select the TCPIP Tab 4 Trackball to the Advanced tab and press the Set button on the control panel 5 Select the Local Area Connection as shown in Figure 3 105 6 Press the Menu button on the co...

Страница 179: ...address 10 0 0 1 or the one provided by the local network administrator NOTE The IP must be different from the IP address used for network computer 12 Type in the Subnet mask 255 255 255 0 or the one provided by the local network administrator NOTE The Subnet mask should be the same for both the network computer and the Vivid q N 13 Click OK 14 Press the Config button on the control panel to close...

Страница 180: ...omputer access the Control Panel as follows a Double click on My Computer icon on desktop b Double click on Control Panel icon 2 Double click on Network Connections icon 3 Double click on Local Area Connection icon The Local Area Connection Properties dialog box opens 4 Select Internet Protocol TCP IP 5 Click the Properties button Figure 3 113 Local Area Connection Properties ...

Страница 181: ...lar mode 8 Connect the Vivid q N and network computer LAN connection using a regular Network cable The Vivid q N and the network computer are now ready for export import of files NOTE One can check the connection by pinging to the Vivid q N IP as follows a Select Start Run b Type CMD then press Enter c Type Ping and IP 10 0 0 1 for Vivid q N then press Enter If return timing is OK you have an oper...

Страница 182: ...DICOM server the following information has to be entered in the scanner DICOM server IP address subnet mask and eventually the gateway DICOM server port number DICOM server AE title the server application s name Name of Device 3 10 4 2 DICOM Server IP Address Setting on the Scanner 1 Press CONFIG F2 and log on as Adm as described in Log On to the System as ADM on page 4 10 2 Select CONNECTIVITY in...

Страница 183: ... 2 VIVID Q N SERVICE MANUAL Chapter 3 System Setup 3 111 The selected flow is shown as seen in the example in Figure 3 116 below Worklist Local Archive DICOM Server Int HD Figure 3 116 Worklist Local Archive DICOM Server Int HD Flow ...

Страница 184: ...s to display the Properties dialog 7 Click on Search Criterias Figure 3 117 The Search Criterias window opens Figure 3 117 8 Highlight the modality filter in the list and click on Remove see Figure 3 117 Figure 3 117 Select Worklist Properties Dialog Box Figure 3 118 Search Criterias Window Select Worklist and then select Properties Worklist Properties Dialog ...

Страница 185: ...he Search Criterias window is updated see Figure 3 118 11 Click OK to close the window 12 From the Worklist Properties Dialog select the IP Address down arrow to choose the Worklist Server from the pull down menu NOTE It is not possible to change the setting in the IP Address field by editing it See description below starting with step 13 to change the setting Figure 3 119 Search Criterias Window ...

Страница 186: ...ange the IP Address settings a From the IP Address pull down menu select Modify to display the IPs dialog box b From the IPs dialog box select the server you want to modify then select Modify Figure 3 120 DICOM Server s Properties Dialog Box Figure 3 121 Select Modify Figure 3 122 Select the Unit to Modify Modify Select server ...

Страница 187: ...eturn to the Properties dialog box f Enter the DICOM server AE Title This entry is case sensitive and must match exactly g Enter the DICOM server port h For some DICOM Servers the default Time out setting 30 is too low Change if necessary by typing a new value seconds i Click OK to close the Worklist Properties dialog box and save the changes Figure 3 123 Edit Name and or IP address Figure 3 124 D...

Страница 188: ...ion to the device verification process The verification process may require up to one minutes When done a sign prefix displayed in front of the listed device indicates whether the test passed green check mark or failed red X Figure 3 125 Verify Connection to a Device Figure 3 126 Verification Result Check Select device to be verified A green check mark indicates that the test passed A red cross as...

Страница 189: ...Vivid q N being configured to the Mitra support personnel 3 10 5 3 Configuration of Modality Worklist Services Identify Dataflow to be Used 1 Identify which dataflow is to be used at the site If the DICOM Modality Worklist will be used then the dataflow must include a Worklist service 2 On the Connectivity screen select the Dataflow tab 3 From the pull down menu select the name of the site s dataf...

Страница 190: ... Value 3 Click the Add to List button 4 Click the OK button Assign DICOM Worklist name to Dataflow 1 Select the Dataflow tab 2 From the Dataflow name pull down menu select the Dataflow which will be used 3 Remove the DICOM Worklist service currently used in the Dataflow 4 From the Select Service pull down menu select the Gateway Modality Worklist service 5 Click the Add button 6 Ensure that the se...

Страница 191: ... that Text is select for the Export file format Test Connectivity with the Vivid HL7 Gateway 1 Start a new study and acquire an image or use an existing study 2 In the Measurements mode make some of the measurements 3 In the Report screen create and store a report 4 In the Patient screen from the Examination List select the study in which you created the report 5 From the More pull down menu selec...

Страница 192: ...er for further analysis on the Vivid q N 3 10 6 2 Query Retrieve Setup on the Vivid q N 1 Press CONFIG F2 and log on as Adm as described in Log On to the System as ADM on page 4 10 2 Select Connectivity 3 Select Dataflow 4 Select Query Retrieve from the Name pull down menu see Figure 3 129 on page 3 121 The selected dataflow Query Retrieve is displayed as shown in Figure 3 128 Figure 3 127 Select ...

Страница 193: ... 3 121 5 Select QueryRetrieve so it is highlighted and then select Properties to display the Properties dialog box Figure 3 128 Query Retrieve Workflow Figure 3 129 Select Query Retrieve s Properties SELECT QUERY RETRIEVE AND THEN SELECT PROPERTIES QUERY RETRIEVE PROPERTIES DIALOG ...

Страница 194: ... menu and edit the setup for one of the predefined servers 7 Enter the correct AE Title and Port Number for the DICOM Query Retrieve server in the respective fields in the Query Retrieve screen Change Search Criterias It is possible to set up special Search Criterias for DICOM Query Retrieve In most cases you may leave the Search Criterias as is and skip this adjustment Follow the steps below to c...

Страница 195: ...r 3 System Setup 3 123 2 Select the correct tag from the Select Tag pull down menu 3 If needed type in the value 4 Select Add to List 5 Click OK to close the Search Criterias window Figure 3 131 Select Search Criterias SEARCH CRITERIAS SELECT TAG ADD TO LIST REMOVE ...

Страница 196: ... Select the Smiley button to Ping the server 2 If the network connection to the server is OK it will be illustrated by a smiling Smiley A sad Smiley indicates that the network connection is failing Typical cause Network cable not connected 3 When ready click OK to close the DICOM Query Retrieve properties and save changes Figure 3 132 DICOM Query Retrieve Properties SMILEY OK VERIFICATION CHECK BO...

Страница 197: ...ICOM Ping 1 Select QueryRetrieve from the Selected devices list 2 Select Check If the test passes a pop up dialog is displayed see left illustration in Figure 3 134 Select OK to continue A green check mark to the left of the Selected devices indicates that the test passed successfully Figure 3 133 Check the DICOM Query Retrieve Workflow Figure 3 134 Test Check Passed QUERYRETRIEVE CHECK ...

Страница 198: ...UAL 3 126 Section 3 10 Connectivity Setup If the test fails a pop up warning is displayed see left illustration in Figure 3 135 Select OK to continue A red X to the left of the Selected devices indicates that the test failed Figure 3 135 Test Check Failed ...

Страница 199: ...ts for all of the images in the exam It also contains measurements and reports generated and saved during the exam the reports are all saved as files in CHM format Any media generated as MPEGvue also contains an embedded MPEGVue viewer allowing the user to view it on any PC without having to install any additional software The exported exam may be viewed on any PC operating on Windows 2000 2003 Wi...

Страница 200: ...ss the Config or F2 button and log on as Adm as described in Log On to the System as ADM on page 4 10 2 Select Connectivity 3 Select Dataflow 4 From the drop down menu select Misc Export see Figure 3 136 5 From selected output devices highlight evue and then click the Properties button refer to Figure 3 137 on page 3 129 Figure 3 136 Dataflow Misc Export ...

Страница 201: ...or the remote computer s ID address in the Remote Path field After the path has been typed it is available for selection from the Dataflow Name drop down menu or you can select an existing path from this menu 7 Activate the Copy Media Player Installation check box NOTE Step 7 is recommended for the first transfer of MPEGVue files This step is not needed for Windows XP After initial transfer of MPE...

Страница 202: ...select Patient List The Patient List will be displayed with the following header 4 Trackball to the Export softkey in the bottom menu shown below and press SET The Export dialog box opens 5 Under Export To select To MPEGvue in the combo box on the right as shown in Figure 3 139 6 Click OK The Patient List screen is displayed with the following header 7 Trackball to the required Patient File and se...

Страница 203: ...ayed 9 If required click OK then select any additional Patient Files for export 10 When export complete click OK then remove the media containing the exported MPEGVue data from the Vivid q N system NOTE If any problems occurred with copying the Patient Files during the export process an error message such as the one below will be displayed showing the status of each of the transferred Patient File...

Страница 204: ...enario where consultation with another doctor in the hospital in real time is required 3 10 8 2 Preparations Before configuring the Vivid q N for eVue dataflow it is necessary to decide upon a specific PC in the hospital as being the e Vue PC station The service technician then configures the Vivid q N to send images to that specific e Vue PC as described below 3 10 8 3 Configuring the Vivid q N f...

Страница 205: ...enu 7 From drop down menu select the Dataflow named Local Archive Int HD eVue 8 Trackball to the Selected devices window and select highlight eVue see Figure 3 140 9 Trackball to the Properties button and press SET The eVue Properties dialog box opens Figure 3 140 Connectivity Dataflow Tab Selected Figure 3 141 eVue Properties Dialog Box ...

Страница 206: ...eded for Windows XP After initial transfer of eVue it is recommended to disable this check box The Vivid q N dataflow is set and ready for export import of eVue files into a network computer From now on whenever the Vivid q N is used for scanning and the Store button is pressed another person will be able to view the stored loop on the remote e Vue PC after a short transmission time When new loops...

Страница 207: ...al Archive Int HD eVue as shown in Figure 3 142 4 Using the soft key buttons select CREATE PATIENT 5 Now start scanning Each image you would like to store press the STORE button A few seconds after the Store button is pressed images will be transferred into the remote computer which was previously set as the destination refer to Figure 3 141 on page 3 133 6 To proceed follow to the instructions as...

Страница 208: ...and Figure 3 144 requesting the user to download and install some drivers The requested drivers may be downloaded from the Internet or if the DVD CD was pre configured those drivers will be located on the MPEGvue DVD CD itself In addition to the above the installation program will test the configuration of the remote PC and will display a message if any component on the computer is not within the ...

Страница 209: ...ally Setting the Network PC for eVue Import 1 On the network computer create a New User by accessing the Control Panel as follows a Double click on My Computer icon on desktop b Double click on Control Panel icon 2 Double click on User Accounts icon Figure 3 144 Download Installation Message Examples 2 ...

Страница 210: ...y Setup The User Accounts dialog box opens 3 Select the Advanced Tab 4 Click on the Advanced button The Local Users and Groups dialog box opens 5 Select the Users folder and right click to select New User Figure 3 145 User Accounts Dialog Box Figure 3 146 Local Users and Groups Dialog Box ...

Страница 211: ...k boxes e Click Create to confirm setting and Close f Close all windows The new user account has been set and is ready for activation Create a new folder for import export and set sharing permissions by proceeding as follows 7 On the network computer double click on the My Computer icon on the desktop 8 Under My Computer window select any local drive for retrieval of data and create a folder for s...

Страница 212: ...ct Rename Rename the folder as eVue _Import 9 Setting the Sharing properties for the new folder as follows a Right click on eVue_Import icon and select Properties The eVue_Import Properties dialog box opens as shown in Figure 3 148 on page 3 141 Important When more than one scanner is used to export with eVue it is recommended to configure each scanner with its own folder for exporting files ...

Страница 213: ...ick on the Permissions button The Permissions for eVue Import dialog box opens d Click the Add button NOTE It is recommended to remove the User Everyone from Share Permissions Figure 3 148 eVue_Import Properties Dialog Box Figure 3 149 Permissions for eVue Import Dialog Box Note It is recommended to remove this user ...

Страница 214: ...elect all to be active activate all the check boxes as shown below and press OK g From the Select Users Computers or Groups dialog box Figure 3 150 click on the Locations button h In the Locations dialog box select your computer from the list and press OK i In the Select Users or Groups dialog box type the User Name in the empty window as shown in Figure 3 151 Figure 3 150 Select Users Computers o...

Страница 215: ...143 j Click the Check Names button The name and path will be detected by underlining as shown below k Now click OK l From the Permission for eVue_Import dialog box highlight and select User Name from the list see Figure 3 152 Figure 3 151 Select Users or Groups Dialog Box Check Names ...

Страница 216: ...computer using the browsing option to select the appropriate path For an example of Vivid q N dataflow settings refer to Figure 3 140 on page 3 133 3 10 9 1 2 Manually Stopping the Firewall on the Network PC NOTE In some cases it is necessary to stop the firewall to allow functions such as Excel export and eVue to access and load files into the Network Computer The Firewall can be an external serv...

Страница 217: ...IVID Q N SERVICE MANUAL Chapter 3 System Setup 3 145 c Select Control Panel from the Menu 2 Double click on Network Connections as shown above 3 Select your network connection and right click 4 From the drop down menu select Properties ...

Страница 218: ...Internet Connection Firewall check box as shown in Figure 3 153 7 Click the OK button to confirm changes and close all windows Stopping an External Service Firewall 1 On the network computer access the Control Panel as follows a Press Start b Select Settings c Select Control Panel from the Menu 2 Double click on Administrative Tools Figure 3 153 Local Area Connection Properties Dialog Box ...

Страница 219: ...ialog box select your firewall program for example Black Ice 5 Right click and select Stop from drop down menu The following message will be displayed indicating that the Firewall is being stopped 6 When finished click Close 7 Now you can try to reconnect the network computer to the Vivid q N system Figure 3 154 Administrative Tools Dialog Box Figure 3 155 Services Dialog Box ...

Страница 220: ...omputer access the Control Panel as follows a Press Start b Select Settings c Select Control Panel from the Menu 2 Double click on Windows Firewall The Windows Firewall dialog box opens 3 Select the General Tab 4 Enable the Off check box as shown in Figure 3 156 5 Press OK 6 Close all windows to return to the scanning screen Figure 3 156 Windows Firewall Dialog Box ...

Страница 221: ...obtain these from the local IT person 2 Close all Internet Explorer windows if open 3 From the C Program Files GEULS eStorePlayer Version1_0 folder double click on the UnRegisterAll bat icon as shown in Figure 3 157 below 4 If two messages are displayed one after another shown in Figure 3 158 and Figure 3 159 click the OK button on each of them to close the message Figure 3 157 Uninstall MPEGvue S...

Страница 222: ... N SERVICE MANUAL 3 150 Section 3 10 Connectivity Setup 5 From the C Program Files GEULS eStorePlayer Version1_0 folder delete all files as shown in Figure 3 160 on page 3 151 Figure 3 158 Uninstall Message 1 Figure 3 159 Uninstall Message 2 ...

Страница 223: ...GE DIRECTION FQ091019 REVISION 2 VIVID Q N SERVICE MANUAL Chapter 3 System Setup 3 151 6 Restart Windows then confirm that the MPEGVue application is no longer installed Figure 3 160 Deleting All Files ...

Страница 224: ... an MPEGVue exam stored on a DVD CD proceed as follows Insert the MPEGVue CD in the computer DVD CD drive The MPEGVue Patient List is displayed see Figure 3 161 below NOTE In the event that the MPEGvue DVD CD is being run for the first time the program will self install the MPEGvue viewer For more details refer to Installing MPEGVue on a Remote PC on page 3 136 To read MPEGVue exams stored on othe...

Страница 225: ...ull size in the MPEGVue Screen view pane There are several ways to select a thumbnail image from the clipboard Use the mouse pointer With the pointer on the required image click the left mouse button to select the image Use the up or down keyboard arrow to view the next or previous loop in the exam Click on the Next Image or Previous Image buttons 11 in Figure 3 162 as required 1 Clipboard select ...

Страница 226: ...ction an image may be saved to any of the following file formats BMP WMV MPEG4 JPEG To save an image click on the diskette icon 8 in Figure 3 162 A Save As dialog box will appear allowing you to select the desired file format in which to save the image 3 10 9 3 7 Performing Measurements on MPEGVue Images The following measurements can be performed on MPEGVue images Distance and area in 2D images H...

Страница 227: ...mpting the user to first logon to Outlook It is possible to send images loops or full exams from any eVue PC An eVue PC is a PC which contains the MPEGvue player and an e mail client application e g Microsoft Outlook The currently selected image or the entire examination can be sent by e mail as an attachment to one or several regular e mail messages Refer to Sending a Full Examination by E mail b...

Страница 228: ...existing recipient address from the drop down menu or type a new address in the Send To field NOTE Up to 10 addresses can be stored for future selection 5 Click Next The user is prompted to enter a password for encryption of the study in the window displayed Figure 3 163 E mail Dialog Box Sending Current Exam Figure 3 164 E mail Address Window Figure 3 165 Enter Password Window ...

Страница 229: ...has been sent from the Outlook Outbox NOTE Examinations sent by E mail as attachments are compressed encrypted and password protected If the size of the exam is too large to be sent as a single attachment it is divided into several zip file attachments sent with several independent E mails each less than 1Mbyte in size The extension of the attached files is mpegvue and can only be opened with the ...

Страница 230: ... MPEGVue Player software to the recipient first complete this procedure then proceed to Sending the MPEGVue Player Software by E mail on page 3 159 The E mail address window is displayed 3 Select an existing recipient address from the drop down menu or type a new address in the Send To field NOTE Up to 10 addresses can be stored for future selection 4 Click Next Figure 3 168 E mail Dialog Box Figu...

Страница 231: ... shown below 5 Click OK to close the message window 6 Check that the message has been sent from the Outlook Outbox When the message has been sent from the Outbox and received by the E mail recipient the image can now be opened in Windows Media Player Sending the MPEGVue Player Software by E mail NOTE This procedure is required once only the first time your recipient is receiving MPEGVue image s Fi...

Страница 232: ...e the message window 6 Check that the message has been sent from the Outlook Outbox NOTE When the message has been sent from the Outbox and has arrived at the addressee the recipient should follow the instructions included in the body of the email in order to install the MPEGVue Player First Time Receipt of MPEGVue Player Software and Images by E mail When a group of messages arrive by e mail and ...

Страница 233: ...ndow then click Yes to proceed When the installation of the MPEGVuePlayer software is complete the MPEGVue Player Screen is displayed as shown in Figure 3 175 on page 3 163 NOTE At this point the MPEGVue startup icon is now displayed on the desktop ready for future use The user may choose to view the images immediately or later as preferred Follow the instructions described in Get New Exams by E m...

Страница 234: ...he MPEGVue utilities described below 1 From the desktop double click on the MPEGVue Startup icon The MPEGVue Startup Menu opens Figure 3 174 MPEGVue Startup Menu 2 Proceed to use the required utility as described in the procedures below 1 Provides access to Outlook Inbox 2 Opens Patient List lists only studies received by email a a button is disabled until images or exams have been received 3 Acti...

Страница 235: ... Startup Menu click on the Get new exams by email button The Start MPEGVue screen is displayed as shown in Figure 3 175 below 2 Click the Outlook E mail button shown in Figure 3 175 The E mail dialog box is displayed refer to Figure 3 168 on page 3 158 3 Activate the Receive Exam radio button then click Next Figure 3 175 Start MPEGVue Screen ...

Страница 236: ...ox is being scanned for studies When complete all studies found in the Inbox are listed in the Found Studies dialog box as shown in Figure 3 176 below 4 Select the required Study from the list NOTE By default the Open Exams for Review and Delete Received Mail from Inbox check boxes are activated 5 Click Next Figure 3 176 List of Studies Found in Inbox ...

Страница 237: ...word is case sensitive In the event that an incorrect password is typed the user is prompted with a warning message as shown here Click OK and enter the correct password 7 Click Next The message Receiving Selected Messages is displayed followed by another message see Figure 3 178 below showing progress of deletion of messages from the Inbox Figure 3 177 Password Window Figure 3 178 Message Showing...

Страница 238: ...mination If you were previously viewing different MPEGvue Patient exams you will need to switch over to the previous instance of the MPEGvue Receiving and Viewing a Partial Examination In the event that the exam is large and a group of e mails is expected it is possible to view a partial exam even before all of the e mail messages have arrived In addition if an e mail message is lost or corrupted ...

Страница 239: ...ove to select and display images of that exam The MPEGVue screen is displayed as shown in the example in Figure 3 162 on page 3 153 Activate e Vue 1 From the MPEGVue Startup Menu click on the Activate e Vue button The Patient List is displayed listing all e Vue exams received refer to Figure 3 180 above 2 Click on the required examination Exam Date labelled 1 in the example above to select and dis...

Страница 240: ...il tab is activated 2 Manage Exams from Email as follows a Make sure the Manage Exams from Email tab is activated as shown in Figure 3 181 The Patient List displays details in table format of all patient exams received by email Patient ID Patient Name Exam Date etc The current path information is displayed below the Patient List as well as number of studies cumulative size and amount of space avai...

Страница 241: ...these tasks have been performed will these two buttons become enabled c To copy or move the selected exams first click the Browse button and select the required destination folder then click the Copy Selected Patients or Move Selected Patients button as appropriate If necessary click the Review Destination folder button to review the destination folder Patient List During the copy or move operatio...

Страница 242: ...tient List displays details in table format of all patient exams received via export from E Vue Patient ID Patient Name Exam Date etc The current path information is displayed below the Patient List as well as number of studies cumulative size and amount of space available on the drive By default the destination path Other Folder radio button is enabled b Select the required exam or exams refer to...

Страница 243: ... path information is displayed below the Patient List together with details of the removable media e g CD DVD ROM By default the destination path Other Folder radio button is enabled additional information below shows the Path to destination folder b Select the appropriate Current Path Information if necessary click the adjacent Browse button and select the correct source directory All patient exa...

Страница 244: ...3 10 Connectivity Setup e Click the Copy Selected Patients button During the copy operation the following message and progress bar is displayed When done the currently selected exam s are available in the destination folder for review Figure 3 185 Exams Selected for Copying ...

Страница 245: ...ue Minimum Requirements Below this information the eVue Operation Utility buttons enable the user to enable or disable the eVue mode as required An additional button Configure eVue is used to perform the eVue configuration procedure NOTE In order to enable eVue operation it is necessary to first perform the eVue configuration procedure as described in the following step b Configure eVue if require...

Страница 246: ...ue folder destination drive If applicable enable the peer to peer connection check box then type the correct current IP address and Subnet mask details Click Save to save the new configuration The Enable eVue button is now active as shown in Figure 3 187 below Figure 3 187 System Configuration Ready to Enable eVue Mode ...

Страница 247: ...onfiguration inconsistencies before using the Enable eVue or Disable eVue functions make sure that your PC is connected to the appropriate network and that all network cables are properly connected Otherwise configuration of your PC may become incorrect and the Configuration utility will be unable to execute the Enable eVue or Disable eVue operations In cases of a peer to peer connection before us...

Страница 248: ... most computers when inserting the DVD CD media with MpegVue files the MpegVue Player will start automatically due to the autoplay option of DVD CD media In the event that any updates are required on the remote computer the program will prompt the user to install the appropriate components as necessary Follow the on screen instructions When done the Patient List is displayed 4 From the Patient Lis...

Страница 249: ... screen Additional thumbnail pictures will be displayed accordingly NOTE The MpegVue Player can be used as a regular player using the Play Stop Forward and Rewind buttons In addition the user can forward images by e mail save images and perform measurements as previously described The MpegVue Player displays two rows of command keys at the bottom of the screen If the remote computer is set up to v...

Страница 250: ...VID Q N SERVICE MANUAL 3 178 Section 3 10 Connectivity Setup View Tool Bars and un checking all tools that are not required until both lines of command keys are visible as shown below Figure 3 189 MPEGVue Player Command Keys Command Keys ...

Страница 251: ...n Time section on page 3 2 3 11 1 Safety Precautions for Moving the Vivid q N Unit 3 11 2 Transportation Box and Packaging Materials Verify that the required packing materials are available All these materials are required to safely package and transport the Vivid q N ultrasound unit and SafeLock Cart if applicable in the cardboard shipping carton for shipment by vehicle or any other means For mor...

Страница 252: ...nd after installation the documentation i e User Manuals Installation Manuals for the peripheral units must be kept as part of the original system documentation This will ensure that all relevant safety and user information is available during the operation and service of the complete system 1 Verify that all details have been entered in the System Installation Details form as described in the Sys...

Страница 253: ...Product Locator Installation Card shown may not be the same as the provided Product Locator card From the factory a sheet with four Product Locator cards for transportation and one for Installation are included Mail the Product Locator Installation Card s to the appropriate product center Figure 3 190 Product Locator Installation Card Example ...

Страница 254: ...tion Specific language versions of the Vivid q N User Manual may also be available Check with your GE Sales Representative for availability During and after installation supplementary documentation such as User Manuals and Installation Manuals for the peripherals must be kept as part of the original system documentation This will ensure that all relevant safety and user information is available du...

Страница 255: ...her as a part of the installation procedure or as required during servicing and periodic maintenance of the Vivid q N ultrasound scanner Note Refer to Chapter 7 Diagnostics Troubleshooting for detailed descriptions of some of the functional checks described in this chapter Table 4 1 Contents in Chapter 4 Section Description Page Number 4 1 Overview 4 1 4 2 General Procedures 4 3 4 3 Functional Che...

Страница 256: ... An empty blank MO Disk P N 066E0490 1 3 GB P N 066E0519 5 4 GB P N 066E0514 8 6 GB ECG Pads ECG Cable IEC EUROPE ASIA ROW P N 2378938 2 At least one probe ideally you should check all the probes used on the system by the site See Section 9 7 Probes on page 9 8 for an overview of available probes ...

Страница 257: ...t has been in the OFF condition for an extended period of time 3 to 5 days or more the unit may not boot or may beep when turned on DANGER TO AVOID THE RISK OF FIRE POWER TO THE SYSTEM MUST BE SUPPLIED FROM A PROPERLY RATED OUTLET IT IS RECOMMENDED TO USE A DEDICATED POWER OUTLET THE POWER PLUG SHOULD NOT UNDER ANY CIRCUMSTANCES BE ALTERED TO A CONFIGURATION RATED LESS THAN THAT SPECIFIED FOR THE ...

Страница 258: ...that the power switch is turned OFF 2 Uncoil the power cable allowing sufficient slack so that the unit can be moved slightly 3 Verify that the power cable is without any visible scratches or any sign of damage 4 Verify that the on site mains voltage is within the limits indicated on the rating label on the base of the Vivid q N portable ultrasound scanner 5 Connect the Mains Power Cable female pl...

Страница 259: ...l boot you may observe that a The unit s ventilation fans starts on full speed but slow down after a few seconds listen to the fan noise b Power is distributed to the peripherals Operator Panel control panel Monitor Front End Processor and Back End Processor c The Back End Processor and rest of the scanner starts with the sequence listed in the following steps 1 Back End Processor is turned ON and...

Страница 260: ...d sets up the Front End electronics and the rest of the scanner 4 The Keyboard backlight is lit 5 As soon as the software has been loaded a 2D screen is displayed on the monitor as shown below NOTE Total time used for start up is typically three minutes Figure 4 3 Start up Progress Bar for Vivid i n Figure 4 4 2D Screen ...

Страница 261: ... recommended under normal circumstances Closing the lid will place the system in Standby Mode Note The system will remain in Standby Mode for as long as battery power will allow The System Exit dialog box Figure 4 5 used when switching OFF the unit gives you the choices described below Standby Use this button to select the Standby mode allowing a shorter reboot time Most of the system is powered d...

Страница 262: ...ged for a longer period of time a full shutdown is automatically performed As described above the battery is automatically charged when the system is plugged to the wall outlet and the power is switched ON It takes approximately 10 hours to charge a flat battery If the system is left in the OFF condition system unplugged from the wall out let for an extended period of time 3 to 5 days or more the ...

Страница 263: ...isplay Then system shut down commences The time required to power down the unit including the Back End Processor may vary from 10 seconds up to approximately 1 minute The last component that shuts down is the light in the LCD display indicating that you may continue with the next step 3 Disconnect the mains power from the wall outlet only after the fans have stopped This will cut power distributio...

Страница 264: ...s possible for the administrator adm to establish unique passwords for each user but don t do it now 3 Select the user adm From the factory the password has been left blank so you may try to log on without any password If the log on fails you may try to use the password service As a last resort contact the hospital s network administrator or person responsible for the ultrasound unit and ask for t...

Страница 265: ...apter 4 General Procedures and Functional Checks 4 11 5 Select System to access the System Setup window The System Settings window is displayed 6 Proceed to select the required settings Table 4 2 Logging on to the System as ADM cont d Step Task Expected Result s ...

Страница 266: ... other side to the rear of the MOD drive When connecting the MOD drive directly to the system it is necessary to use an additional power source As a safety precaution this must be done via an isolation transformer The MOD Drive may be connected once the system is powered ON or after shutdown All software drivers for the MOD Drive are pre configured and installed designated to be used with the spec...

Страница 267: ...the MO Disk 3 Remove the ejected MO Disk from the MO Drive and place it in its cover box for storage in a safe place 4 2 5 4 Connecting External USB Hard Disk to USB Port The External USB Hard Disk can be connected to either of the USB ports upper or lower on the rear connectors panel One must use the additional power source supplied with the External USB Hard Disk to activate the External USB Har...

Страница 268: ...Installing DVD CD into DVD CD Drive NOTE Use only CD R DVD R or DVD R media from a reputable vendor and only high grade media types 1 Press the Eject button on the right side of the DVD CD Drive once to open the disk tray 2 Put a DVD CD disk into the disk tray with the label side facing up 3 Press the Eject button once to close the disk tray After a few seconds the disk is available for reading fo...

Страница 269: ...11 characters may be used for the label name Remember that MO Disks have two sides Side A and Side B Each Side must have a unique name Example MO Disks for storing images may be labeled IMAGE_1A Side A on MO Disk 1 IMAGE_1B Side B on MO Disk 2 IMAGE_2A 4 2 7 Formatting Removable Media This procedure describes how to format an MO Disk or DVD CD media Before you continue be sure about what naming co...

Страница 270: ... software reload are as up to date as possible All user presets except changes to Summary Anatomy and Biometry pages can be saved on an MO disk for reloading on the system 4 2 9 1 Archiving Presets to an MO Disk NOTICE Presets should not be saved on the same MO disk as images because the Archive Menu lists the images but not the presets stored on a MO disk Table 4 3 Saving Presets 1 of 2 STEP TASK...

Страница 271: ...nctional Checks 4 17 3 Enable the User Defined Configuration check box 4 Select the MOD as the Destination 5 Press Backup Now A copy of the Presets is saved on the MO disk 6 Press Alt E on the alphanumeric keyboard The MO disk is ejected Table 4 3 Saving Presets cont d 2 of 2 STEP TASK FUNCTION ...

Страница 272: ... TASK FUNCTION 1 Insert the MO disk with the archived presets into the MOD 2 Press Config or F2 select Admin then select Restore The Restore window is displayed 3 Enable the User Defined Configuration check box 4 Select the MOD as the Source 5 Press Restore Now The Presets are restored to the System 6 Press Alt E on the alphanumeric keyboard The MO disk is ejected ...

Страница 273: ...le from the maximum lowest position to the maximum upper position Verify that the handle is able to reach the maximum lowest and maximum highest positions smoothly 6 Pick up the system using the handle Ensure that the handle is firmly connected to the system Table 4 6 Alphanumeric Keyboard Test Recommended Step Task Expected Result s 1 Power up the System in Normal Scanning Mode 2 Press Config and...

Страница 274: ...ition value is 31 2 for all TGC Sliders 7 Perform the ROTARY TEST as follows Rotate the rotary in both directions and press the button at the center of the rotary The rotary is activated properly pressing on the button will display a row of data for pressing and another row of data for releasing Depress Release 8 Perform the ALPHANUMERIC KEYBOARD BACKLIGHT TEST as follows a Change the combo box ne...

Страница 275: ...ttery green check box Check the Battery yellow check box Press Set Battery yellow LED is On c Uncheck the Battery yellow check box Check the Extern DC green check box Press Set Extern DC green LED is On d Uncheck the Extern DC green check box Check the Extern DC yellow check box Press Set Extern DC yellow LED is On 12 Perform the LID BUTTON TEST as follows a Press the Diagnostic Info button b Plac...

Страница 276: ...ol and that the x and y coordinate values displayed at the bottom of the screen move digit by digit up and down Movement is smooth no jumping and the trackball has no dead areas i e when the trackball is moved there are no areas in which no changes are seen Table 4 9 System ID Test Recommended Step Task Expected Result s 1 Boot up the System in Regular Scanning Mode 2 Press Config 3 Under the Conn...

Страница 277: ...tem Test and press Start PASS 5 Connect the 3S RS probe to the probe port 6 From the Diagnostic Test tree select Front End Test 7 Select TR32 then select TX Select TXProbeTX Test and press Start PASS 8 Select MUX Test then select 3S RS Test and press Start PASS 9 Select TR32 Test then select RX Test Select RSTest with 3S RS and press Start PASS 10 When done press the Esc button Table 4 11 Visual T...

Страница 278: ...nd the cassette Press the Play button on the VCR The recorded Image is played back 6 Verify that in CW Mode both the left and right audio channels are working and that the played back audio is similar to the recorded audio in both the left and right speakers when applicable Table 4 13 B W Printer Test Recommended Step Task Expected Result s 1 Scan a phantom or suitable interface in 2D Mode 2 Press...

Страница 279: ... is installed in a system that is already configured proceed as described below 4 3 2 4 1 Wireless USB Network Functionality Test 1 With the system up and running press Config 2 Click Connectivity and select Dataflow see Figure 4 7 3 From the Dataflow Name field scroll down list Figure 4 7 select a dataflow that the user works with in day to day operations 4 Under Selected devices Figure 4 7 selec...

Страница 280: ... performed as indicated by the green confirmation tick see Figure 4 9 7 Under Selected Devices Figure 4 9 proceed to the next device in this example Remote Database that is under Outputs click Check and proceed as before 8 Continue this procedure until all selected devices have been verified Figure 4 8 Information Check Status Box Figure 4 9 Selected Device Remote Database showing Successful Check...

Страница 281: ...7 2 Create a dummy patient file on the Vivid q N scanner Save several images in the patient file 3 Export the images to the External USB Hard Disk 4 Delete the dummy patient file including images from the Vivid q N database The deleted patient file and images are no longer listed 5 Import the dummy patient file and images from the External USB Hard Disk The patient file is now listed in the Vivid ...

Страница 282: ...allowing the main shelf to be raised 2 While lifting the release handle raise the shelf upwards and make sure it is able to reach its maximum height Ensure that you do not apply too much force to move the main shelf and that the shelf movement is smooth 3 Press the release handle down while pushing the main shelf back downwards to return it to its lowest position The main shelf returns to its lowe...

Страница 283: ...atted successfully is displayed 8 Select the GetVolInfo button The message Media in drive G has following properties Media Label MY_LABEL Media File System Name FAT is displayed 9 Select the Get BTPsector button The message The Bytes Per Sector value of media in drive G is 512 is displayed 10 Select the SetVolLabel1 button The message Media Label set to TEST_LABEL1 is displayed 11 Select the GetVo...

Страница 284: ...edia into the DVD CD device Note For information on types of media see DVD CD RW Drive on page 3 36 9 Select To CD DVD Archive and press OK A pop up is displayed with the message Current media is not formatted Do you wish to format it 10 Change the label to TEST 1 and press OK A progress bar is displayed 11 Press Select All and then press Copy Copying begins and the progress bar displays copying s...

Страница 285: ...nt is deleted from patient list Table 4 20 Plug and Scan Test Recommended Task Expected Result s 1 Press the On Off button on the control console for no more than 3 seconds The system enters Standby mode 2 Turn OFF the system s circuit breaker The system remains in Standby mode indicated by the blinking On Off button LED 3 Turn ON the system s circuit breaker Press the On Off Button The system ret...

Страница 286: ...ging TVI Checks on page 4 37 Color Mode Checks on page 4 34 Probe Connectors Check on page 4 38 NOTE For more details refer to the information provided in the Vivid q N User Manual 4 4 1 2D Mode B Mode Checks 4 4 1 1 Introduction The 2D Mode is the Vivid q N system s default mode 4 4 1 2 Preparations 1 Connect one of the probes See Connecting Probes on page 3 58 for information about connecting th...

Страница 287: ...e rate to increase resolution in image Use Frequency move to lower frequency to increase penetration Use the Reject control to reduce noise in the image Use the DDP control to optimize imaging in the blood flow regions and make a cleaner less noisy image Use UD Clarity Cardiac or UD Speckle reduce non cardiac to reduce image speckle Extra care must be taken to select the optimal Speckle reduction ...

Страница 288: ... to the available grey scale Adjust Compress and Edge Enhance to further optimize the display Adjust Reject to reduce noise while taking care not to eliminate significant low level diagnostic information 4 4 3 Color Mode Checks 4 4 3 1 Introduction Color Flow screens are 2D or M Mode screens with colors representing blood or tissue movement Color Flow may be selected both from 2D mode or from M mo...

Страница 289: ... flow area Radial and Lateral Averaging smooths the image by averaging collected data along the same horizontal line An increase of the lateral averaging will reduce noise but this will also reduce the lateral resolution 4 4 3 5 Select Color M Mode 1 Select M Mode see M Mode Checks on page 4 33 2 Use the trackball assigned function Pos to position the ROI frame over the area to be examined 3 Press...

Страница 290: ...probe or with an ordinary probe By using an ordinary probe you can first bring up a 2D picture for navigation purposes and then add PW CW Doppler 4 4 4 2 Preparations 1 Connect one of the probes to the scanner See Connecting Probes on page 3 58 for information about connecting the probes 2 Turn ON the scanner The 2D Mode window is displayed default mode 3 If needed adjust the Display s Brightness ...

Страница 291: ...5 2 Preparations 1 Connect one of the probes to the scanner s left most probe connector See Connecting Probes on page 3 58 for information about connecting the probes 2 Turn ON the scanner The 2D Mode window is displayed default mode 3 If needed adjust the Display s Brightness and Contrast setting 4 Press TVI 5 Use the trackball assigned function Pos to position the ROI frame over the area to be e...

Страница 292: ...ation menu for the desired probe is listed on the screen 3 Trackball to the desired application Press Select to launch the application To change application without changing the current probe press Appl on the Operator Panel The selected application starts 4 Verify no missing channels All channels are functioning 5 Verify there are no EMI RFI or artifacts specific to the probe No EMI RFI or artifa...

Страница 293: ...justments on page 3 71 2 Check the language settings Refer to Language Selection on page 3 72 3 Ensure that all of the software options are configured correctly Refer to Software Options Configuration on page 3 84 4 Ensure that the hospital details are configured correctly Refer to Table 3 6 on page 3 70 5 Ensure that the VCR is configured as required for the specific site and country Refer to vid...

Страница 294: ...GE DIRECTION FQ091019 REVISION 2 VIVID Q N SERVICE MANUAL 4 40 Section 4 6 Site Log Section 4 6 Site Log Table 4 1 Vivid q N Site Log Date Service Person Problem Comments ...

Страница 295: ...GE DIRECTION FQ091019 REVISION 2 VIVID Q N SERVICE MANUAL Chapter 4 General Procedures and Functional Checks 4 41 Table 4 1 Vivid q N Site Log cont d Date Service Person Problem Comments ...

Страница 296: ...GE DIRECTION FQ091019 REVISION 2 VIVID Q N SERVICE MANUAL 4 42 Section 4 6 Site Log This page was intentionally left blank ...

Страница 297: ...m functions for both the Vivid q N systems It also describes the power distribution system and probes Table 5 1 Contents in Chapter 5 Section Description Page Number 5 1 Overview 5 1 5 2 General Information 5 2 5 3 Front End Unit 5 6 5 4 Back End Processor 5 21 5 5 External Input Output I O 5 29 5 6 Power Supply System 5 30 5 7 Monitor and Operator Panel 5 34 5 8 ECG Module 5 39 5 9 ECG Respirator...

Страница 298: ...y Scale imaging Color M Mode Doppler Different combinations of the above modes 5 2 1 Introduction The Vivid q N systems are equipped with a highly efficient power supply resulting in low power consumption and minimal acoustical noise Among other significant features are the following Integrated low power Front End uses advanced ASIC and FGPA technologies Open connectivity using multiple USB ports ...

Страница 299: ... the Front End FE Electronics to the Back End Processor BEP and finally are displayed on the monitor and peripherals In addition the Vivid q N systems enable acquisition of the following signals ECG and external ECG The ECG module which supports acquisition of three bipolar ECG channels leads I II III is incorporated in the cabinet cage assembly to provide ECG signals to synchronize cardiac ultras...

Страница 300: ...ations via the Operator Panel that has ultrasound specific buttons mode dependent softkey buttons and an alphanumeric keyboard 5 2 2 3 Electronics Vivid q N internal electronics are divided into three main components Front End FE Processor Back End Processor BEP DC DC Power Supply DC DC PS For both Vivid q N systems internal electronics comprise a single card cage that contains both the FEP and th...

Страница 301: ... 0RGXOH 7 9 6 9 YROWDJHV 9 9 9 9 9ROWDJHV 9 67 9 67 9 9 DWWHU 30 WHUQDO 0RQLWRU 2 73 FK 3UH PS 7 URVV 3RLQW 9 FK 7 URVV 3RLQW K 9 FRQYHUWHU QDORJ HDPIRUPLQJ 0L HU 3 4 3 5 63 7 6 5 0 0 17 3 02 3 4 5 N 86 5 DWD Q 0 86 7 7 67 6 LDJQRVWLF LUFXLW RSSOHU XGLR VZLWFK 6ZLWFKLQJ WR 3UH PS 3HQFLO 3XOVHU 3HQFLO 3UREH 5217 3 7R 75 2 URP 2 75 2 0 0 8 56 73 0 0 ORFN LUFXLW 0 0 6 VWHP 7 7HPS RQWURO 73 RQWURO 3 6...

Страница 302: ...ems 1 Scanner Subsystem Consists of the RFI Board Scan Controller and tissue processing For a detailed description see RFI Board on page 5 11 2 Front End Subsystem Includes the following Two TR32 Boards each board includes a 32 channel digital Beamformer For a detailed description see TR32 Boards Transmitter Receiver on page 5 15 P M Probe MUX Board includes CW BF HVMUX For a detailed description ...

Страница 303: ... 9 6 9 YROWDJHV 9 9 9 9 9ROWDJHV 9 67 9 67 9 9 DWWHU 30 WHUQDO 0RQLWRU 2 73 FK 3UH PS 7 URVV 3RLQW 9 FK 7 URVV 3RLQW K 9 FRQYHUWHU QDORJ HDPIRUPLQJ 0L HU 3 4 3 5 63 7 6 5 0 0 17 3 02 3 4 5 N 86 5 DWD Q 0 86 7 7 67 6 LDJQRVWLF LUFXLW RSSOHU XGLR VZLWFK 6ZLWFKLQJ WR 3UH PS 3HQFLO 3XOVHU 3HQFLO 3UREH 5217 3 7R 75 2 URP 2 75 2 0 0 8 56 73 0 0 ORFN LUFXLW 0 0 6 VWHP 7 7HPS RQWURO 73 RQWURO 3 6ZLWFK 60 ...

Страница 304: ...3 86 6 9 08 3UREH 08 7 5 6LJQDOV 56 3UREH 2 73 FK 3UH PS 7 URVV 3RLQW 9 FK 7 URVV 3RLQW K 9 FRQYHUWHU QDORJ HDPIRUPLQJ 0L HU 3 4 3 5 63 7 6 5 0 0 17 3 02 3 4 5 N 86 5 DWD Q 0 86 7 7 67 6 LDJQRVWLF LUFXLW RSSOHU XGLR VZLWFK 6ZLWFKLQJ WR 3UH PS 3HQFLO 3XOVHU 3HQFLO 3UREH 5217 3 7R 75 2 URP 2 75 2 0 0 8 56 73 0 0 ORFN LUFXLW 0 0 6 VWHP 7 7HPS RQWURO 73 RQWURO 3 6ZLWFK RQQHF ...

Страница 305: ...embly on the right side as shown in Figure 5 5 Figure 5 5 Bottom Assembly showing Location of Front End Figure 5 6 Keyboard Assembly in Opened Position WARNING WARNING When opening and closing the Keyboard Assembly take care not to damage the cables connected to the BEP indicated in Figure 5 6 above BEP RS Probe Connector Power Supply Front End BEP Cables Keyboard Assembly ECG Cable ECG Module ...

Страница 306: ... FQ091019 REVISION 2 VIVID Q N SERVICE MANUAL 5 10 Section 5 3 Front End Unit Figure 5 7 Bottom Assembly showing Position of Boards RFI TR32 P M Probe and MUX Board TR32 Boards located below the RFI Board RFI Board ...

Страница 307: ...rator Tx voltage Enable Disable Probe Sensing Control of TR32 and P M Boards Ultrasound data acquisition and processing Figure 5 8 RFI Block Diagram 5 3 3 2 Watchdog and Power ON Reset For safety reasons a HW watchdog stops ultrasound transmit and resets the DSP if the DSP stops toggling the watchdog inputs Once enabled it is not possible to disable the watchdog unless the board is reset or power ...

Страница 308: ...proceeds as follows 1 The actual FPGA contents bit streams are written into DSP memory from the Host 2 The DSP configures serial port 0 to aid configuration 3 The DSP writes the bit streams to serial port 0 4 The DSP verifies that the FPGAs are configured correctly 5 3 3 5 PCI Connection The RFI Board interfaces directly to the PCI bus via the DSP PCI to the local bus bridge ...

Страница 309: ...y 5 13 5 3 3 6 RFI Board Connectors Figure 5 9 RFI Board Connector Locations Table 5 2 RFI Board Connectors Connector Description P5 To P M P6 PCI Flex to RFI P14 To power supply J1 To TR32 Boards J2 To TR32 Boards P5 to P M P14 to Power Supply P6 PCI Flex to RFI J1 to TR32 Boards J2 to TR32 Boards ...

Страница 310: ... below minimum temperature the RFI stops scanning and disables Tx voltage The minimum temperature references are set to 15 o C A temperature reading as low as 15 o C indicates a probe temperature sensing error Table 5 3 RFI Board Input DC Voltages Input Description Connector PIN Connected From 3 3 V DC voltage from PS P14 1 4 From PS HVP_IN Fixed DC high voltage 80 V P14 9 From PS HVN_IN Fixed DC ...

Страница 311: ...2A and TR32B see Figure 5 10 Each TR32 Board is a complete 32 channel ultrasound Front End that includes the following features and functions 32 Transmitters 32 receiving channels T R switch Pre Amp TGC 32 channel Beam Former First stage of Analog Beam Former for CW mode included in the receive input ASIC Clock distribution starting with input at PECL level Figure 5 10 TR32 Board Block Diagram Fig...

Страница 312: ...scription Connector PIN Connected From 5 VA DC voltage distributed via RFI Board A indicates analog circuit J2 80 81 82 RFI 1 8 V DC voltage distributed via RFI Board J2 85 96 RFI 3 3 V DC voltage distributed via RFI Board J2 97 110 RFI 5 VA DC voltage distributed via RFI Board A indicates analog circuit J2 78 79 RFI TXPSP High voltage positive Transmit high voltage varies from 2 5 to 50 V distrib...

Страница 313: ...rds reside in the RFI Board The two TR32 Boards are linked together in parallel The way in which they operate depends upon the probe currently in use and also on the current type of Transmit Receive mode Transmit Receive modes can be divided into two types as shown in the following examples CW Mode half the channels transmit signals and half the channels receive signals simultaneously 2D Mode sign...

Страница 314: ...les up to 64 receive transmit channels and performs the following functions Receiving the channels and connecting them to the TR32 Boards Probe connectors High voltage MUX that selects 64 out of 128 inputs routed to the TR32 boards Pencil s probe Pulser and receive pre amplifier Analog Doppler processor a signal path for CW mode containing analog Beam Former Band Pass filter I Q base band converte...

Страница 315: ...tion Theory 5 19 Figure 5 15 Probe and MUX Board Connector Locations Table 5 6 Probe and MUX Board Connectors Connector Description J1 Pencil Probe Connector J2 RS Probe Connector J3 To Upper TR32 Board J5 To RFI Board J1 Pencil Probe Connector P3 Not connected J5 J3 J2 RS Probe Connector ...

Страница 316: ...age distributed in P M Board J5 16 21 RFI Board 3 3 V DC voltage distributed in P M Board J5 5 8 RFI Board 5 VA DC voltage distributed in P M Board A indicates analog circuit J5 13 15 RFI Board 5 VA DC voltage A indicates analog circuit J5 9 12 RFI Board HVPSP Transmit high voltage varies from 2 5 to 50 V J5 2 RFI Board HVPSN Transmit high voltage varies from 2 5 to 50 V J5 1 RFI Board ...

Страница 317: ...m A block diagram of the BEP is provided in Figure 5 17 Vivid q N Back End Processor Block Diagram on page 5 22 The various components that comprise the Vivid q N BEP are described in the following sections ETX SBC Central Processing Unit CPU on page 5 23 ETX Base Board on page 5 23 Hard Disk on page 5 25 Fan Control on page 5 25 RTC BIOS Battery on page 5 25 Back End Processor Location of Compone...

Страница 318: ...GE DIRECTION FQ091019 REVISION 2 VIVID Q N SERVICE MANUAL 5 22 Section 5 4 Back End Processor Figure 5 17 Vivid q N Back End Processor Block Diagram DFN QG 7 6 DVHERDUG 3 0RQLWRU 0RQLWRU 86 3 0 86 3RUWV ...

Страница 319: ...s interfaces to the following components HDD Front End RFI Board USB ports Docking port speaker phones and speaker jacks Keyboard Battery VGA Fans Power supply The Power Management Controller PMC mounted on the ETX Base Board ensures automatic transition between the various power modes stable DC condition and provides power status LED display The Docking port located on the rear panel of the ETX B...

Страница 320: ...e Board Figure 5 18 ETX Base Board Block Diagram 5 4 3 2 VGA Interface The interface to the VGA is via the VGA connector on the rear side of the ETX Base Board The VGA port is connected to the DIB where VGA signals are converted to DVI and split into three channels to drive the system LCD display 15 or 17 as applicable and external monitor 5 4 3 3 CardBus Interface Not in use ...

Страница 321: ...rd disk F Drive Swap file partition The partition size is 1GB The following additional partitions are hidden Grub 32MB Repository 10GB NOTE When connected to the system a DVD device or disk on key will not necessarily be shown as G drive 5 4 5 Fan Control The Fan board holds five fans and is mounted on the left side of the bottom assembly A special fan speed controller chip is used to control the ...

Страница 322: ...rocessor 5 4 7 Back End Processor Location of Components Figure 5 20 Views of the Back End Processor BEP To Fan Board From DC DC Power Supply KBD LAN VGA PCI Cable to RFI Internal Battery Docking Connector RTC BIOS Battery PCMCIA Not in use HDD Upper View Lower View USB Port ETX SBC CPU ...

Страница 323: ...All connections to P1 P2 P3 and P4 according to ETX specs Table 5 9 BEP Connectors Connector Description J7 VGA J19 EXT DC INPUT J18 DOCKING J20 Speakerphones J16 RFI P1 P4 ETX J5 LCD PANEL J6 KEYBOARD J17 PS UNIT J14 H D Adaptor Card J15 BATTERY J13 CARDBUS J10 RTC BIOS Battery J8 Protection Key J11 J12 FANS J9 Speakers J5 J16 J17 J11 J6 J44 J13 J7 J19 J18 J14 ...

Страница 324: ...he Fan board see Figure 5 19 on page 5 25 Table 5 10 BEP Input DC Voltages Input Description Connector PIN Connected From EXT_DC 20 V DC from PS J17 1 2 3 4 5 PS Battery Varies from 14 V to 16 7 V DC depending on battery capacity Distributed via PS J17 11 12 13 14 15 PS 12 V_BE DC voltage from PS BE indicates Back End J17 19 PS 5 V_STB DC voltage from PS STB indicates Standby J17 20 PS 5 V_BE DC v...

Страница 325: ...f VGA to S Video adaptor RJ 45 connector for LAN connection Two USB ports for external peripherals 20V DC inlet main DC power to the system Figure 5 22 Vivid q NSystem Rear Panel Connections Legend 1 Two interchangeable USB ports digital printer DVD RW CD RW and other peripherals 2 Docking connector 3 Port for DC IN AC Adapter 4 SVGA Output VCR option or CRT monitor option 5 LAN 10 100 Base TX Eth...

Страница 326: ...ower Supply Unit located inside and mounted to the bottom assembly provides the system with both Low Voltage and High Voltage power and also enables recharging of the battery The Power Supply Unit controls the following main functions Input switching stage selects between the external DC source and the internal battery Back End Low Voltage power supply LVPS Standby power supply Front End Low Volta...

Страница 327: ...it Components Block Diagram 5 6 3 1 Critical Temperature Sensor The PS Unit includes temperature sensors When the monitoring application measures the maximum temperature limit or above it will shut down the system After the temperature settles down the PS unit will enable the DC DC operation 5 6 4 DC Source Selector This circuitry selects the source of the power When the AC to DC converter input i...

Страница 328: ...on to AC operation and vice versa When shutting down the system leave the main power cable connected to keep the battery fully charged NOTE The lithium ion technology used in the system s battery is significantly less hazardous to the environment than the lithium metal technology used in some other batteries NOTE The battery is designed to be replaced every 2 years Table 5 11 DC Source Selector Co...

Страница 329: ...eaters Do not leave the battery in direct sunlight Do not pierce the battery with a sharp object hit it or step on it Do not use a damaged battery Do not solder a battery Do not connect the battery to an electrical outlet CAUTION If the Vivid q N portable ultrasound system is not being used for periods of one month or longer the battery should be removed during lengthy non use period CAUTION To av...

Страница 330: ...the layout of the keyboard and operator panel The buttons and controls are grouped together for ease of use the different areas of the keyboard and operator panel include the following Soft menu Keys part of the Extended Keyboard TGC GAIN rotary Alphanumeric KB Extended KB Trackball Trackball buttons Front panel Hand rest area of front panel Figure 5 25 Vivid q N System Keyboard and Operator Panel...

Страница 331: ... Keyboard Block Diagram 5 7 2 Keyboard and Operator Panel Components 5 7 2 1 Power ON OFF Button The Power On Off button receives 3 3 V from the BEP Once shorted this voltage is routed to the PMC which will activate or perform the appropriate task as required 5 7 2 2 Alphanumeric Keyboard The Vivid q N alphanumeric keyboard with a key arrangement similar to that of a laptop keyboard is based on th...

Страница 332: ...These are equivalent to the normal PC mouse left and right click Set left click Menu right click The operation of these buttons is supported via the PS 2 Board Zoom Trackball and Store Buttons These buttons even though located beside the trackball are part of the External Keyboard buttons and not part of the Alphanumerical or regular trackball buttons The operation of these buttons is supported vi...

Страница 333: ...driving the power On Off and status LEDs 2 5V BE Back End is used for the remaining circuits The keyboard operates with 5 voltage deviation on each supply The keyboard has current limiting circuitry implemented on the BEP to protect it against excessive current consumption via the USB and or short circuits 5 7 2 10 Keyboard ID The keyboard PCB contains an EEPROM which stores a variety of informati...

Страница 334: ... 5 38 Section 5 7 Monitor and Operator Panel 5 7 2 12 LCD Display Unit The display monitor is a 15 LCD and is connected via a flex cable to the BEP as shown in Figure 5 28 Figure 5 28 LCD Display Flex Cable Connection to BEP Flex Cable BEP Monitor LCD Display ...

Страница 335: ...nels leads I II The External ECG module supports acquisition of a single bipolar ECG input channel ranging from 1 to 1 volt allowing amplification of 1000 The minimal allowed impedance is 10 M ohm The ECG module is located under the keyboard assembly see Figure 5 6 on page 5 9 All power and communication is supplied to the ECG module via the USB hub located in the keyboard module as shown in Figur...

Страница 336: ...ry currents apply the values listed in Table 5 12 below taken from table IV in IEC601 1 section 19 3 The ECG signals have double reinforced isolation B a from live parts Hence creepage distance and air clearance in the module are 8 mm and 5 mm respectively to withstand 4000 volts isolation between applied part and grounded part The applied parts and enclosure have basic isolation B a Therefore cre...

Страница 337: ...Vivid q N Internal ECG Respiratory module is designed to enable acquisition of the following signals ECG Respiratory and external ECG The Internal ECG Respiratory Board is located in the cabinet cage assembly refer to Figure 5 6 on page 5 9 All power and communication is supplied to the ECG module via the USB hub located in the keyboard module as shown in Figure 5 31 below Connections to and from ...

Страница 338: ...98 31 2 Hz for Monitor use only Lead Fault Indicator Yes A2D resolution 12 bit 2 complement Sample Rate 1000 Table 5 15 Internal ECG Respiratory Board Specifications External ECG Characteristic Specification Input Range ac 10 V peak to peak Bandwidth 3db 0 8 65 5 Hz 65 5 Hz in firmware Lead Fault Indicator Yes A2D resolution 12 bit 2 complement Sample Rate 1000 Table 5 16 Internal ECG Respiratory ...

Страница 339: ...tor output type being used as follows Option 1 Monitor with single ended Positive output Connect the signal lead to pin 2 on the connector Connect the ground shielding to pins 5 and 7 on the connector Option 2 Monitor with single ended Negative output Connect the signal lead to pin 5 on the connector Connect the ground shielding to pins 2 and 7 on the connector Option 3 Monitor with Differential o...

Страница 340: ...e ac 2v peak to peak A2D resolution 12 bit 2 complement Sample Rate 500 samples second Ground Isolation 4 kV rms Table 5 18 Connector Pin Out J5 ECG Respiration External ECG Pin Number Specification 1 External ECG Input 2 ECG Input Respiration Input Output LL 3 ECG Input Respiration Input Output RA 4 ECG Respiration Output LA 5 External ECG Select Signal Input Short to GND on Cable 6 GND GND for E...

Страница 341: ...5 45 Table 5 19 Connector Pins Out J3 J4 USB Pin Number Specification J3 1 J4 28 J4 30 VUSB 5V DC Input from USB Bus J3 2 J4 8 D USB differential Data signal J3 5 J3 shell D USB differential Data signal J4 1 3 5 7 9 11 13 15 17 19 21 23 25 27 29 2 4 6 10 12 14 16 20 22 24 26 GND USB Bus GND J3 J5 J4 ...

Страница 342: ...ed to print out reports and exams and is controlled in one of two ways depending on the system configuration Directly via the USB port Via LAN connection The printing operation to the Color Inkjet Printer is performed by pressing the Alt P keys Normally inkjet printers are used to print out Reports but in some cases also ultrasound images 5 10 1 2 DVD CD Reader and CD Writer DVD CDR W The DVD CDR ...

Страница 343: ...etwork Adapter The Vivid q N supports a unique type of Wireless Network Adapter For details regarding type and installation refer to Wireless USB Network Adaptor on page 3 35 The Wireless Network Adapter provides a mobile network connection to the local area network The Wireless Network Adapter is supported via the USB port ...

Страница 344: ...d to provide the best thermal conduction allowing the maximum amount of heat to be removed from the system It is crucial that the system ventilation access is not blocked a distance of at least 20 cm from right and left sides of the system should be kept clear In addition operating the system in an unclean environment could introduce foreign objects into the unit and create blockage of the airflow...

Страница 345: ...uality or shades visible on the Vivid q N LCD Display may be the result of improper monitor calibration Therefore adjustments may be made to the Contrast Brightness Watermark and or Blue Tint as required Important LCD Display adjustments should be made in the correct order as stated in the following procedures NOTE Incorrect calibration of the Vivid q N monitor may also result in less than optimal...

Страница 346: ...increase the brightness To assist in making Brightness adjustments an adjustment bar is displayed below the screen NOTE The screen Brightness is calibrated when the dark blocks on the left numbers 1 through 6 see Figure 6 1 and the white bars on the right numbers 1 through 12 are all just visible 6 1 2 3 Testing Your Contrast and Brightness Settings Observe the V watermark on the lower part of the...

Страница 347: ...2 Adjustment Procedure NOTE Systems with BT11 installed software have a Blue Tint 2 option that enables blue tint enhancement This option can be switched off if preferred by the user NOTE This option applies to the following LCD monitor installations System Vivid i n Monitor BOE HYDIS 1 NOTE On older Vivid i q systems where the IDTECH 1 monitor is supplied the Blue Tint 2 option is not applicable ...

Страница 348: ...GE DIRECTION FQ091019 REVISION 2 VIVID Q N SERVICE MANUAL 6 4 Figure 6 6 Identifying Monitor Type ...

Страница 349: ...ion Screen 2 To adjust the blue tint hold down ALT then use the and keys as required Repeatedly pressing will decrease the blue tint repeatedly pressing will increase the blue tint NOTE To assist in making blue tint adjustments an adjustment bar is displayed below the screen see Figure 6 8 3 Press Alt Q to exit to the Display Calibration Screen Figure 6 7 LCD Display Calibration Screen showing Tes...

Страница 350: ...IVID Q N SERVICE MANUAL 6 6 6 1 2 5 2 Turning Off the Blue Tint 2 Option 1 Press Config Service The Service Screen opens see Figure 6 9 2 Under LCD Setup de select Blue Tint 2 to turn off this option Figure 6 9 Service Screen LCD Setup ...

Страница 351: ... the External Monitor as the Primary monitor but does not have access to it and therefore cannot make separate adjustments to it using the controls on the External Monitor itself Moreover the calibration preset currently in use on the Vivid q N system is not optimal for the External Monitor In this scenario adjustments Brightness only can be made to the External Monitor using the calibration contr...

Страница 352: ...s 1 Purchase a standard VGA isolated splitter Do not use the GE VGA isolated splitter P N 5390022 as this has a special pin configuration dedicated for use with CardioLab MacLab Carto 2 Connect the device to an isolation transformer Ensure that the device is not connected to another non medical device which can cause isolation failure through the third device 3 Power the second device via a medica...

Страница 353: ...1 4 Configuring Print Orientation For information on Print Orientation Portrait or Landscape refer to Configuring Printing Orientation Portrait or Landscape and Paper Size on page 3 23 6 1 5 Video System Adjustments 6 1 5 1 Video System Adjustment Procedure For details on Video System adjustments PAL or NTSC setup refer to Figure 3 46 on page 3 49 6 1 6 Beamformer Calibration 6 1 6 1 Beamformer Ca...

Страница 354: ...day then allow it to continue to run automatically overnight For details see Figure 6 10 below IMPORTANT During the Battery Calibration procedure no scanning can be performed NOTE For step by step instructions see Performing the Battery Calibration Procedure on page 6 11 Figure 6 10 Recommendations Battery Calibration Procedure May take up to 4 hours May take up to 2 hours Battery calibrated Towar...

Страница 355: ...be completed overnight as outlined in Figure 6 10 1 Click on the battery icon at the bottom of the scanning screen OR from the message window shown below click Recalibrate The Battery Calibration Wizard Page 1 opens Figure 6 11 2 Make sure the AC power cable is connected to the Vivid q N then click Next to commence the first stage of the process Full Charge to maximum capacity This step will fully...

Страница 356: ... for the confirmation window to be displayed showing that the battery is fully charged See Battery Calibration Wizard Page 2 in Figure 6 12 4 Click Next The Battery Calibration Wizard Page 3 opens see Figure 6 13 on page 6 13 Figure 6 12 Battery Calibration Wizard Page 2 ...

Страница 357: ...Adjustments 6 13 5 Disconnect the AC power cable from the Vivid q N then click Next The second phase of the process Full Discharge commences and the Battery Calibration Wizard Page 3 is displayed as shown in Figure 6 14 on page 6 14 Figure 6 13 Battery Calibration Wizard Page 3 ...

Страница 358: ...vid q N system automatically shuts down at the end of this process the battery calibration procedure is now complete 7 The following morning re connect the AC power cable and turn ON power to the system NOTE The system may now be used normally without any dependence on battery capacity status Figure 6 14 Battery Calibration Wizard Page 3 ...

Страница 359: ...stic tools to locate system problems and failures The Vivid q N ultrasound unit includes built in diagnostic tools that can be accessed from the scanner application Table 7 1 Contents in Chapter 7 Section Description Page Number 7 1 Overview 7 1 7 2 Diagnostics 7 2 7 3 Performing Full System Diagnostics 7 19 7 4 Performing Front End FE Diagnostics 7 24 7 5 Monitoring Tests 7 86 7 6 Performing Back...

Страница 360: ...ved When the Back End is operating you can verify proper voltages and temperatures in the Front End and in the Power Supply To check the Front End parts the tests must follow a logical sequence in order to identify the faulty component For example testing communication between the Front End and the Back End begins by testing the RFI board and the PCI bus before testing all the other boards in the ...

Страница 361: ...information The Data Flow Map area on the right is designed to provide an instant visual representation of the system components the color illumination of graphic buttons light blue light gray and status indicators green red yellow indicates which component or set of components is currently undergoing diagnostic testing see the examples in Figure 7 2 on page 7 4 In this way it is easy to visually ...

Страница 362: ...10 NOTE When performing a specific test for an intermittent problem it is highly recommended to use the Loop option use the combo box or type the required number of loops as appropriate Looping the test will assist in detecting the problem NOTE Once the test has been completed a log can be viewed as described in the View Log section on page 7 6 Figure 7 2 Data Flow Map Graphic Color Illumination o...

Страница 363: ...Displays a menu of diagnostic test sequences and tests available for selection Execute Displays the name of the currently selected diagnostic test or test sequence Controls and Special Instructions Displays any special instructions for checks required before performing the test For example Make sure system is calibrated Disconnect probe and press Start The area also includes these controls a Start...

Страница 364: ... currently selected test sequence Result Lists test results as either PASS or FAIL Loop Lists name of loop and the sub tests within the loop Date Date test was performed Tests Scroll Bar and Arrows Enables scrolling through the list of Test Log Files A test sequence may have up to four reports Since only one specific test may have failed the scroll arrows enable jumping directly from one Failed te...

Страница 365: ...rase Button Clears all test sequence log files for that specific currently selected test listed in the Tests window passed and failed tests It is not recommended to clear the test sequence log files unless a test failed due to user intervention or as a result of a false alarm It is necessary to erase each log file separately Exit Button Closes the View Log dialog box Returns to the Diagnostic Test...

Страница 366: ...first harmonic is displayed in the Report window When there is more than one report listed the first report is displayed by default Double clicking on another report for example Test signal amplitude second harmonic will evoke the display of that report in the Report window as shown in the example in Figure 7 4 below Figure 7 3 View Log Dialog Box ...

Страница 367: ...g on a currently selected channel marks a red square on the report graph and also evokes the display of the following information relative to that specific point Average Deviation standard deviation from the Average Max and Min The signal should be within the limits marked in the white area the dotted line represents the Average as shown in Figure 7 4 Figure 7 4 ADC Test Viewing Report Test Signal...

Страница 368: ...es approximately 10 minutes for completion 7 2 4 1 1 Full System Test FE and BEP Performs a full sequence of complete Front End and Back End tests automatically that do not require user intervention This is particularly recommended for detecting problems that are intermittent in nature since a test may be paused at any stage and any detected failures reviewed For test procedure instructions see th...

Страница 369: ...st verifies that the calibration saved on the Hard Disk is within acceptable limits For test procedure instructions see the DC Offset Verification section page 7 28 7 2 4 2 2 RFI Tests Full RFI Test The Full RFI Test performs a complete test sequence and includes all the RFI board tests described below For test procedure instructions see the Full RFI Test section page 7 31 RFI FE Cache Test Tests ...

Страница 370: ...atterns are summed and focused on the BF 32A and generated to the RFI demodulator For test procedure instructions see the TR32 BF Digital Test section page 7 46 System BF Digital Test In this test both Beamformers are generating internal test patterns The patterns from the BF of the TR 32B board are summed and focused in the BF of the TR32A board From here the pattern is generated through MLA0 and...

Страница 371: ...e expected results are shown on the Test report For test procedure instructions see the ACW Delay Range Test section page 7 68 ACW Pre Mixer Gain Test The ACW Analog CW Pre Mixer Gain Test checks the PM Gain level A test signal shifted from the mixer frequency is generated and the test compares the 0db RMS to the levels of the other Gains The RMS level is expected to be lower than the selected Gai...

Страница 372: ...e sensors in the system to ensure that the system is operating within the pre defined temperature limits and that there is no overheating of any components For test procedure instructions see the Temperatures Test section page 7 96 7 2 4 3 4 Fans Speed Test The Fans Speed Monitoring Test is used to check that the Fan Controller is fully operational and that all five fans operate simultaneously at ...

Страница 373: ...ovided in the PC Doctor section page 7 115 Automatic Full Back End Test without Hard Disk This test performs a full system check without a Hard Disk scan The test sequence includes all automatic tests excluding the Hard Disk For test procedure instructions see the Full Back End Test w o Hard Disk Scan section page 7 115 Full PC Doctor Test 50 min The Full PC Doctor Test requires 50 mins longer tha...

Страница 374: ...Tests the MXX commands PAND PANDN POR and PXOR If errors are detected the failed commands are listed CPU MMX Shift Tests the MXX commands PSLL and PSRL If errors are detected the failed commands are listed CPU MMX Data Transfer Tests the MXX commands MOVD and MOVQ If errors are detected the failed commands are listed CPU MMX Misc Tests the MXX commands PCMPEQ PCMPGT PACKSS PACKUS and PUNPCK If err...

Страница 375: ... with 18 test patterns one pattern at a time These tests fill the entire screen with a single color Video Data Transfer Tests the graphics acceleration part of the video controller This test fills the screen with black and white concentric squares and rectangles of various sizes and colors If errors are detected the locations of the problems are displayed Video Text Output Prints a text string in ...

Страница 376: ...st logs as FAILED For test procedure instructions see the Network Test section page 7 130 Interactive Audio Test The Audio Test is performed to check for proper operation of the audio system the following selections are available Left Channel Right Channel Both Channels and MIDI For test procedure instructions see the Audio Test section page 7 132 Monitor Test The Monitor Test is used to perform a...

Страница 377: ...ly if the Vivid q N system shows signs of an intermittent problem As described in this section the testing sequence can be paused and restarted at any stage providing a quick and easy method of reviewing any detected faults The different types of Full System Diagnostic Tests are described in detail in the Diagnostic Test Window Menu Options section on page 7 10 For instructions on performing each ...

Страница 378: ... components are highlighted blue in the Schematic View as shown below Figure 7 5 Full System FE and BEP Test 2 As indicated in the Special Instructions area make sure the system is calibrated and disconnect any probe currently connected to the system 3 Under the Special Instructions area activate the Loops checkbox and select the required number of Loops from the combo box 4 Adjacent to On Fail se...

Страница 379: ...were identified Red Problems were identified in these components during the performance of the test Yellow The tests executed so far on these components have passed but not all recommended tests have been performed 6 At any stage trackball to the Pause button and press Set if required 7 To resume testing from the point where you paused trackball to the Start button and press Set When the Full Syst...

Страница 380: ...SION 2 VIVID Q N SERVICE MANUAL 7 22 Section 7 3 Performing Full System Diagnostics 8 If necessary use the scroll bars and or arrows to scroll through the list of Test results Figure 7 6 View Test Log Full System Test BEP and FE ...

Страница 381: ...test If errors were identified results exceeding acceptable upper or lower limits verify that all system cables and boards are connected not misplaced and functioning properly as described in Chapter 5 Components and Function Theory If the problem persists this indicates that either the specific board you tested is faulty or that another board that supports the operation of that board is faulty Co...

Страница 382: ...equence will help to derive the correct conclusions regarding the source of the problem As described in this section the testing sequence can be paused and restarted at any stage providing a quick and easy method of reviewing any detected faults For instructions on performing a specific test refer to the relevant test in the appropriate sub sections Calibration Tests as described in the Calibratio...

Страница 383: ...ection from the Diagnostic Test Tree see Figure 7 7 below and press Set The DC Offset Calibration name is displayed under Execute the relevant system components to be tested in this case all components are highlighted light blue in the Schematic View as shown below Figure 7 7 DC Offset Calibration Test 2 As indicated in the Special Instructions area disconnect any probes currently connected to the...

Страница 384: ...d tests for these components have been completed and no problems were identified Red Problems were identified in these components during the performance of the test Yellow The tests executed so far on these components have passed but not all recommended tests have been performed 6 At any stage trackball to the Pause button and press Set if required 7 To resume testing from the point where you paus...

Страница 385: ...e to the upper or lower limits repeat the DC Offset Calibration test again and review the newly acquired results If errors were identified results exceeding acceptable upper or lower limits verify that all system cables and boards are connected not misplaced and functioning properly as described in Chapter 5 Components and Function Theory If the problem persists this indicates that either the spec...

Страница 386: ...own below 2 As indicated in the Special Instructions area disconnect any probes currently connected to the system and make sure that nothing is touching the probe connectors 3 Under the Special Instructions area activate the Loops checkbox and select the required number of Loops from the combo box 4 Adjacent to On Fail select either Stop or Continue as required Stopping on failure enables you to r...

Страница 387: ...ired 7 To resume testing from the point where you paused trackball to the Start button and press Set When the DC Offset Verification Test sequence is complete the Diagnostic Test window displays the Finished message the View Test Log window opens automatically listing all tests performed and showing details of which tests passed or failed as shown in the example in Figure 7 10 8 If necessary use t...

Страница 388: ...lower limits verify that all system cables and boards are connected not misplaced and functioning properly as described in Chapter 5 Components and Function Theory If the problem persists this indicates that either the specific board you tested is faulty or that another board that supports the operation of this board is faulty Continue trouble shooting down to the appropriate board If necessary pe...

Страница 389: ...e Full RFI Test name is displayed under Execute the relevant system component to be tested is highlighted light blue in the Schematic View RFI as shown below 2 As indicated in the Special Instructions area disconnect any probes currently connected to the system and make sure that nothing is touching the probe connectors 3 Under the Special Instructions area activate the Loops checkbox and select t...

Страница 390: ...ere you paused trackball to the Start button and press Set When the Full RFI Test sequence is complete the Diagnostic Test window displays the Finished message the View Test Log window opens automatically listing all tests performed and showing details of which tests passed or failed as shown in the example in the example in Figure 7 12 8 If necessary use the scroll bars and or arrows to scroll th...

Страница 391: ...eat the test If errors were identified results exceeding acceptable upper or lower limits verify that all system cables and boards are connected not misplaced and functioning properly as described in Chapter 5 Components and Function Theory If the problem persists this indicates that either the specific board you tested is faulty or that another board that supports the operation of that board is f...

Страница 392: ...e that nothing is touching the probe connectors 3 Under the Special Instructions area activate the Loops checkbox and select the required number of Loops from the combo box 4 Adjacent to On Fail select either Stop or Continue as required Stopping on failure enables you to review a failed test the moment it fails Alternatively you may prefer testing to continue on failure and later you may review t...

Страница 393: ...u paused trackball to the Start button and press Set When the RFI FE Cache Test sequence is complete the Diagnostic Test window displays the Finished message the View Test Log window opens automatically listing all tests performed and showing details of which tests passed or failed as shown in the example in Figure 7 14 8 If necessary use the scroll bars and or arrows to scroll through the list of...

Страница 394: ...n repeat the test If errors were identified results exceeding acceptable upper or lower limits verify that all system cables and boards are connected not misplaced and functioning properly as described in Chapter 5 Components and Function Theory If the problem persists this indicates that either the specific board you tested is faulty or that another board that supports the operation of that board...

Страница 395: ...as shown below 2 As indicated in the Special Instructions area disconnect any probes currently connected to the system and make sure that nothing is touching the probe connectors 3 Under the Special Instructions area activate the Loops checkbox and select the required number of Loops from the combo box 4 Adjacent to On Fail select either Stop or Continue as required Stopping on failure enables you...

Страница 396: ...d press Set if required 7 To resume testing from the point where you paused trackball to the Start button and press Set When the RFI Analog Circuits Test sequence is complete the Diagnostic Test window displays the Finished message the View Test Log window opens automatically listing all tests performed and showing details of which tests passed or failed as shown in the example in Figure 7 16 8 If...

Страница 397: ...eat the test If errors were identified results exceeding acceptable upper or lower limits verify that all system cables and boards are connected not misplaced and functioning properly as described in Chapter 5 Components and Function Theory If the problem persists this indicates that either the specific board you tested is faulty or that another board that supports the operation of that board is f...

Страница 398: ...and make sure that nothing is touching the probe connectors 3 Under the Special Instructions area activate the Loops checkbox and select the required number of Loops from the combo box 4 Adjacent to On Fail select either Stop or Continue as required Stopping on failure enables you to review a failed test the moment it fails Alternatively you may prefer testing to continue on failure and later you ...

Страница 399: ...modulator Short Test sequence is complete the Diagnostic Test window displays the Finished message the View Test Log window opens automatically listing all tests performed and showing details of which tests passed or failed as shown in the example in Figure 7 18 8 If necessary use the scroll bars and or arrows to scroll through the list of Test results NOTE For this test there is one report Demodu...

Страница 400: ...n repeat the test If errors were identified results exceeding acceptable upper or lower limits verify that all system cables and boards are connected not misplaced and functioning properly as described in Chapter 5 Components and Function Theory If the problem persists this indicates that either the specific board you tested is faulty or that another board that supports the operation of that board...

Страница 401: ...low 2 As indicated in the Special Instructions area disconnect any probes currently connected to the system and make sure that nothing is touching the probe connectors 3 Under the Special Instructions area activate the Loops checkbox and select the required number of Loops from the combo box 4 Adjacent to On Fail select either Stop or Continue as required Stopping on failure enables you to review ...

Страница 402: ...d coming from the speakers NOTE If no sound is heard it is necessary to perform the BEP Audio Test as described in Audio Test on page 7 132 In the event this test also fails the problem is probably in the BEP refer to Performing Back End Diagnostics on the System on page 7 108 6 At any stage trackball to the Pause button and press Set if required 7 To resume testing from the point where you paused...

Страница 403: ...very close to the upper or lower limits perform calibration as described in DC Offset Calibration on page 7 25 and then repeat the test If errors were identified results exceeding acceptable upper or lower limits verify that all system cables and boards are connected not misplaced and functioning properly as described in Chapter 5 Components and Function Theory If the problem persists this indicat...

Страница 404: ...his test no probe should be connected to the system and nothing should be touching the probe connectors 1 In the Diagnostic Test window trackball to TR32 BF Digital Test in the list of TR32 BF tests available for selection from the Diagnostic Test Tree see Figure 7 21 below and press Set The TR32 BF Digital Test name is displayed under Execute the relevant system components to be tested are highli...

Страница 405: ...nding to the various system components will be highlighted in the appropriate color to indicate the current test status as follows Green All recommended tests for these components have been completed and no problems were identified Red Problems were identified in these components during the performance of the test Yellow The tests executed so far on these components have passed but not all recomme...

Страница 406: ...t your local On Line Center for assistance If errors were identified but the results were very close to the upper or lower limits perform calibration as described in DC Offset Calibration on page 7 25 and then repeat the test If errors were identified results exceeding acceptable upper or lower limits verify that all system cables and boards are connected not misplaced and functioning properly as ...

Страница 407: ...low 2 As indicated in the Special Instructions area disconnect any probes currently connected to the system and make sure that nothing is touching the probe connectors 3 Under the Special Instructions area activate the Loops checkbox and select the required number of Loops from the combo box 4 Adjacent to On Fail select either Stop or Continue as required Stopping on failure enables you to review ...

Страница 408: ...tage trackball to the Pause button and press Set if required 7 To resume testing from the point where you paused trackball to the Start button and press Set When the System BF Digital Test sequence is complete the Diagnostic Test window displays the Finished message the View Test Log window opens automatically listing all tests performed and showing details of which tests passed or failed as shown...

Страница 409: ...7 25 and then repeat the test If errors were identified results exceeding acceptable upper or lower limits verify that all system cables and boards are connected not misplaced and functioning properly as described in Chapter 5 Components and Function Theory If the problem persists this indicates that either the specific board you tested is faulty or that another board that supports the operation o...

Страница 410: ...w 2 As indicated in the Special Instructions area disconnect any probes currently connected to the system and make sure that nothing is touching the probe connectors 3 Under the Special Instructions area activate the Loops checkbox and select the required number of Loops from the combo box 4 Adjacent to On Fail select either Stop or Continue as required Stopping on failure enables you to review a ...

Страница 411: ...re you paused trackball to the Start button and press Set When the ADC Test sequence is complete the Diagnostic Test window displays the Finished message the View Test Log window opens automatically listing all tests performed and showing details of which tests passed or failed as shown in the example in Figure 7 28 NOTE The ADC test has four test reports which are listed in Reports on the right B...

Страница 412: ...ond report the report is highlighted in the Reports list and the corresponding results are shown in the Report window below as shown in Figure 7 29 10 Use the tools provided to scroll through the channels and view the results as previously described 11 When done trackball to the Close button and press Set to close the View Report window 12 Select the third report the report is highlighted in the R...

Страница 413: ... channels and view the results as previously described 14 When done trackball to the Close button and press Set to close the View Report window 15 Select the fourth report the report is highlighted in the Reports list and the corresponding results are shown in the Report window below as shown in Figure 7 31 Figure 7 30 View Test Log Third Harmonic ...

Страница 414: ... perform calibration as described in DC Offset Calibration on page 7 25 and then repeat the test If errors were identified results exceeding acceptable upper or lower limits verify that all system cables and boards are connected not misplaced and functioning properly as described in Chapter 5 Components and Function Theory If the problem persists this indicates that either the specific board you t...

Страница 415: ... below 2 As indicated in the Special Instructions area disconnect any probes currently connected to the system and make sure that nothing is touching the probe connectors 3 Under the Special Instructions area activate the Loops checkbox and select the required number of Loops from the combo box 4 Adjacent to On Fail select either Stop or Continue as required Stopping on failure enables you to revi...

Страница 416: ...here you paused trackball to the Start button and press Set When the Rx Test sequence is complete the Diagnostic Test window displays the Finished message the View Test Log window opens automatically listing all tests performed and showing details of which tests passed or failed as shown in the example in Figure 7 33 NOTE The Rx test has two test reports Test Signal Amplitude and Frequency which a...

Страница 417: ...roblems were identified it is recommended to re boot the system this is obligatory when prompted If the test passed but the original problem persists contact your local On Line Center for assistance If errors were identified but the results were very close to the upper or lower limits perform calibration as described in DC Offset Calibration on page 7 25 and then repeat the test If errors were ide...

Страница 418: ...IVID Q N SERVICE MANUAL 7 60 Section 7 4 Performing Front End FE Diagnostics 13 Trackball to the Exit button and press Set to close the View Test Log dialog box 14 Press the Esc button on the keyboard to close the Diagnostic Test Window ...

Страница 419: ...nnectors 1 In the Diagnostic Test window trackball to ACW IQ Symmetry Test in the list of ACW tests available for selection from the Diagnostic Test Tree see Figure 7 32 below and press Set The ACW IQ Symmetry Test name is displayed under Execute the relevant system components to be tested are highlighted light blue in the Schematic View P M as shown below 2 As indicated in the Special Instruction...

Страница 420: ...he test progress Status indicators in the Data Flow map corresponding to the various system components will be highlighted in the appropriate color to indicate the current test status as follows Green All recommended tests for these components have been completed and no problems were identified Red Problems were identified in these components during the performance of the test Yellow The tests exe...

Страница 421: ...On Line Center for assistance If errors were identified results exceeding acceptable upper or lower limits verify that all system cables and boards are connected not misplaced and functioning properly as described in Chapter 5 Components and Function Theory If the problem persists this indicates that either the specific board you tested is faulty or that another board that supports the operation o...

Страница 422: ...onnect any probes currently connected to the system and make sure that nothing is touching the probe connectors 3 Adjacent to On Fail select either Stop or Continue as required Stopping on failure enables you to review a failed test the moment it fails Alternatively you may prefer testing to continue on failure and later you may review the report 4 Trackball to the Start button and press Set The A...

Страница 423: ...all to the Start button and press Set When the ACW Matrix Test sequence is complete the Diagnostic Test window displays the Finished message the View Test Log window opens automatically listing all tests performed and showing details of which tests passed or failed as shown in the example in Figure 7 38 NOTE The ACW Matrix Test test has three test reports Signal Frequency Signal RMS and Signal SNR...

Страница 424: ... the second report Signal RMS the report is highlighted in the Reports list and the corresponding results are shown in the Report window below as shown in Figure 7 39 9 Use the tools provided to scroll through the channels and view the results as previously described 10 When done trackball to the Close button and press Set to close the View Report window 11 Select the third report Signal SNR the r...

Страница 425: ...rs were identified results exceeding acceptable upper or lower limits verify that all system cables and boards are connected not misplaced and functioning properly as described in Chapter 5 Components and Function Theory If the problem persists this indicates that either the specific board you tested is faulty or that another board that supports the operation of that board is faulty Continue troub...

Страница 426: ...isconnect any probes currently connected to the system and make sure that nothing is touching the probe connectors 3 Adjacent to On Fail select either Stop or Continue as required Stopping on failure enables you to review a failed test the moment it fails Alternatively you may prefer testing to continue on failure and later you may review the report 4 Trackball to the Start button and press Set Th...

Страница 427: ...the Start button and press Set When the ACW Delay Range Test sequence is complete the Diagnostic Test window displays the Finished message the View Test Log window opens automatically listing all tests performed and showing details of which tests passed or failed as shown in the example in Figure 7 42 NOTE The ACW Delay Range Test test has three test reports Signal Frequency Signal RMS and Signal ...

Страница 428: ...e second report Signal RMS the report is highlighted in the Reports list and the corresponding results are shown in the Report window below as shown in Figure 7 43 9 Use the tools provided to scroll through the channels and view the results as previously described 10 When done trackball to the Close button and press Set to close the View Report window 11 Select the third report Signal SNR the repo...

Страница 429: ... were identified results exceeding acceptable upper or lower limits verify that all system cables and boards are connected not misplaced and functioning properly as described in Chapter 5 Components and Function Theory If the problem persists this indicates that either the specific board you tested is faulty or that another board that supports the operation of that board is faulty Continue trouble...

Страница 430: ...he relevant system components to be tested are highlighted light blue in the Schematic View P M as shown below 2 As indicated in the Special Instructions area disconnect any probes currently connected to the system and make sure that nothing is touching the probe connectors 3 Adjacent to On Fail select either Stop or Continue as required Stopping on failure enables you to review a failed test the ...

Страница 431: ...en completed and no problems were identified Red Problems were identified in these components during the performance of the test Yellow The tests executed so far on these components have passed but not all recommended tests have been performed 5 At any stage trackball to the Pause button and press Set if required 6 To resume testing from the point where you paused trackball to the Start button and...

Страница 432: ... errors were identified results exceeding acceptable upper or lower limits verify that all system cables and boards are connected not misplaced and functioning properly as described in Chapter 5 Components and Function Theory If the problem persists this indicates that either the specific board you tested is faulty or that another board that supports the operation of that board is faulty Continue ...

Страница 433: ...ents to be tested are highlighted light blue in the Schematic View P M as shown below 2 As indicated in the Special Instructions area disconnect any probes currently connected to the system and make sure that nothing is touching the probe connectors 3 Adjacent to On Fail select either Stop or Continue as required Stopping on failure enables you to review a failed test the moment it fails Alternati...

Страница 434: ...have been completed and no problems were identified Red Problems were identified in these components during the performance of the test Yellow The tests executed so far on these components have passed but not all recommended tests have been performed 5 At any stage trackball to the Pause button and press Set if required 6 To resume testing from the point where you paused trackball to the Start but...

Страница 435: ...st and the corresponding results are shown in the Report window below as shown in Figure 7 49 9 Use the tools provided to scroll through the channels and view the results as previously described 10 When done trackball to the Close button and press Set to close the View Report window 11 Select the third report BPF2 the report is highlighted in the Reports list and the corresponding results are show...

Страница 436: ...hannels and view the results as previously described 13 When done trackball to the Close button and press Set to close the View Report window 14 Select the fourth report Signal SNR the report is highlighted in the Reports list and the corresponding results are shown in the Report window below as shown in Figure 7 51 Figure 7 50 View Test Log ACW BPF Test BPF2 ...

Страница 437: ... errors were identified results exceeding acceptable upper or lower limits verify that all system cables and boards are connected not misplaced and functioning properly as described in Chapter 5 Components and Function Theory If the problem persists this indicates that either the specific board you tested is faulty or that another board that supports the operation of that board is faulty Continue ...

Страница 438: ...omponents to be tested are highlighted light blue in the Schematic View P M as shown below 2 As indicated in the Special Instructions area disconnect any probes currently connected to the system and make sure that nothing is touching the probe connectors 3 Adjacent to On Fail select either Stop or Continue as required Stopping on failure enables you to review a failed test the moment it fails Alte...

Страница 439: ...ve been completed and no problems were identified Red Problems were identified in these components during the performance of the test Yellow The tests executed so far on these components have passed but not all recommended tests have been performed 5 At any stage trackball to the Pause button and press Set if required 6 To resume testing from the point where you paused trackball to the Start butto...

Страница 440: ... test passed but the original problem persists contact your local On Line Center for assistance If errors were identified results exceeding acceptable upper or lower limits verify that all system cables and boards are connected not misplaced and functioning properly as described in Chapter 5 Components and Function Theory If the problem persists this indicates that either the specific board you te...

Страница 441: ...below 2 As indicated in the Special Instructions area disconnect any probes currently connected to the system and make sure that nothing is touching the probe connectors 3 Under the Special Instructions area activate the Loops checkbox and select the required number of Loops from the combo box 4 Adjacent to On Fail select either Stop or Continue as required Stopping on failure enables you to revie...

Страница 442: ... At any stage trackball to the Pause button and press Set if required 7 To resume testing from the point where you paused trackball to the Start button and press Set When the Pencil RX Test sequence is complete the Diagnostic Test window displays the Finished message the View Test Log window opens automatically listing all tests performed and showing details of which tests passed or failed as show...

Страница 443: ...wer limits verify that all system cables and boards are connected not misplaced and functioning properly as described in Chapter 5 Components and Function Theory If the problem persists this indicates that either the specific board you tested is faulty or that another board that supports the operation of that board is faulty Continue trouble shooting down to the appropriate board If necessary perf...

Страница 444: ...ystem components to be tested are highlighted light blue in the Schematic View as shown below 2 As indicated in the Special Instructions area disconnect any probes currently connected to the system and make sure that nothing is touching the probe connectors 3 Under the Special Instructions area activate the Loops checkbox and select the required number of Loops from the combo box 4 Adjacent to On ...

Страница 445: ... passed but not all recommended tests have been performed 6 At any stage trackball to the Pause button and press Set if required 7 To resume testing from the point where you paused trackball to the Start button and press Set When the Full System Monitoring Test sequence is complete the Diagnostic Test window displays the Finished message the View Test Log window opens automatically listing all tes...

Страница 446: ...at result values are within the pre defined Max and Min limits as shown in Figure 7 59 10 Select the second report Temperatures the report is highlighted in the Reports list and the corresponding results are shown in the Report window below as shown in Figure 7 60 Figure 7 59 View Test Log Full System Monitoring Test Fixed Voltages ...

Страница 447: ... and that result values are within the pre defined Max and Min limits as shown in Figure 7 60 12 Select the third report Fans Speed the report is highlighted in the Reports list and the corresponding results are shown in the Report window below as shown in Figure 7 61 Figure 7 60 View Test Log Full System Monitoring Test Temperatures ...

Страница 448: ...t result values are within the pre defined Max and Min limits as shown in Figure 7 59 14 Select the fourth report Battery Parameters the report is highlighted in the Reports list and the corresponding results are shown in the Report window below as shown in Figure 7 62 Figure 7 61 View Test Log Full System Monitoring Test Fans Speed ...

Страница 449: ...that result values are within the pre defined Upper and Lower limits as shown in Figure 7 62 16 Select the fifth report Tx Voltages the report is highlighted in the Reports list and the corresponding results are shown in the Report window below as shown in Figure 7 63 Figure 7 62 View Test Log Full System Monitoring Test Battery Parameters ...

Страница 450: ...ration as described in DC Offset Calibration on page 7 25 and then repeat the test If errors were identified results exceeding acceptable upper or lower limits verify that all system cables and boards are connected not misplaced and functioning properly as described in Chapter 5 Components and Function Theory If the problem persists this indicates that either the specific board you tested is fault...

Страница 451: ...t fails Alternatively you may prefer testing to continue on failure and later you may review the report 4 Trackball to the Start button and press Set The Fixed Voltages Test commences While the test proceeds the name of the test currently in progress Fixed Voltages is displayed in the Execute field and the current Loop and specific test are shown below The messages Init Done and Please Wait are di...

Страница 452: ...e test passed and that result values are within the pre defined Max and Min limits as shown in Figure 7 65 8 When done trackball to the Exit button and press Set to close the View Report window 9 After reviewing the test results proceed as follows If no problems were identified it is recommended to re boot the system this is obligatory when prompted If the test passed but the original problem pers...

Страница 453: ...hat another board that supports the operation of this board is faulty Continue trouble shooting down to the appropriate board If necessary perform a specific test If the problem still persists contact the GE On Line Center for assistance 10 Trackball to the Exit button and press Set to close the View Test Log dialog box 11 Press the Esc button on the keyboard to close the Diagnostic Test Window ...

Страница 454: ...lternatively you may prefer testing to continue on failure and later you may review the report 4 Trackball to the Start button and press Set The Temperatures Test commences While the test proceeds the name of the test currently in progress Temperatures is displayed in the Execute field and the current Loop and specific test are shown below The messages Init Done and Please Wait are displayed besid...

Страница 455: ...View Test Log window opens automatically listing all tests performed and showing details of which tests passed or failed as shown in the example in Figure 7 67 NOTE For this test there is one report Temperatures which is listed in the Reports window on the right By default this report is displayed in the Reports window below 7 Check that the test passed and that result values are within the pre de...

Страница 456: ...he test If errors were identified results exceeding acceptable upper or lower limits verify that all system cables and boards are connected not misplaced and functioning properly as described in Chapter 5 Components and Function Theory If the problem persists this indicates that either the specific board you tested is faulty or that another board that supports the operation of this board is faulty...

Страница 457: ...ls Alternatively you may prefer testing to continue on failure and later you may review the report 4 Trackball to the Start button and press Set The Fans Speed Test commences While the test proceeds the name of the test currently in progress Fans Speed is displayed in the Execute field and the current Loop and specific test are shown below The messages Init Done and Please Wait are displayed besid...

Страница 458: ...lt values for each fan are within the pre defined Max and Min limits as shown in Figure 7 69 8 When done trackball to the Exit button and press Set to close the View Report window 9 After reviewing the test results proceed as follows If no problems were identified it is recommended to re boot the system this is obligatory when prompted If the test passed but the original problem persists contact y...

Страница 459: ...that another board that supports the operation of this board is faulty Continue trouble shooting down to the appropriate board If necessary perform a specific test If the problem still persists contact the GE On Line Center for assistance 10 Trackball to the Exit button and press Set to close the View Test Log dialog box 11 Press the Esc button on the keyboard to close the Diagnostic Test Window ...

Страница 460: ...tery PS as shown below 2 Under the Special Instructions area activate the Loops checkbox and select the required number of Loops from the combo box 3 Adjacent to On Fail select either Stop or Continue as required Stopping on failure enables you to review a failed test the moment it fails Alternatively you may prefer testing to continue on failure and later you may review the report 4 Trackball to ...

Страница 461: ...l to the Start button and press Set When the Battery Parameters Test sequence is complete the Diagnostic Test window displays the Finished message the View Test Log window opens automatically listing all tests performed and showing details of which tests passed or failed as shown in the example in Figure 7 71 NOTE For this test there is one report Battery Status which is listed in the Reports wind...

Страница 462: ...aced and functioning properly as described in Chapter 5 Components and Function Theory If the test fails again repeat the Fan Speed Test If the problem persists this indicates that either the specific board you tested is faulty or that another board that supports the operation of this board is faulty Continue trouble shooting down to the appropriate board If necessary perform a specific test If th...

Страница 463: ...ttery PS as shown below 2 Under the Special Instructions area activate the Loops checkbox and select the required number of Loops from the combo box 3 Adjacent to On Fail select either Stop or Continue as required Stopping on failure enables you to review a failed test the moment it fails Alternatively you may prefer testing to continue on failure and later you may review the report 4 Trackball to...

Страница 464: ...ball to the Start button and press Set When the Tx Voltages Test sequence is complete the Diagnostic Test window displays the Finished message the View Test Log window opens automatically listing all tests performed and showing details of which tests passed or failed as shown in the example in Figure 7 73 NOTE For this test there is one report Tx Voltages which is listed in the Reports window on t...

Страница 465: ...boards are connected not misplaced and functioning properly as described in Chapter 5 Components and Function Theory If the problem persists this indicates that either the specific board you tested is faulty or that another board that supports the operation of this board is faulty Continue trouble shooting down to the appropriate board If necessary perform a specific test If the problem still pers...

Страница 466: ...escribed in the Accessing the Front End Diagnostic Options section on page 7 25 7 6 1 1 Extended Keyboard Test NOTE For a description of this test refer to the information in the Extended Keyboard Test on page 7 15 1 In the Diagnostic Test window trackball to Extended Keyboard Test in the list of BEP tests available for selection from the Diagnostic Test Tree see Figure 7 74 below and press Set Th...

Страница 467: ...ny of the other ATGC sliders above or below i e all other sliders remain stationary 4 Repeat step 3 to test each of the other ATGC sliders 5 Check all keyboard keys by pressing each in turn as follows a Press one key make sure the depressed key is shown as depressed in the Test Screen b Release the key make sure the released key is no longer showing as depressed in the Test Screen 6 Repeat step 5 ...

Страница 468: ...d illuminated green Patient CW Application etc alternatively check each one one by one individually b trackball to the Backlights button under Lights Control and press Set Make sure that all the extended keyboard backlighting is correctly illuminated 13 Trackball to the Battery Light button top right of Test Screen and press Set Make sure that all the corresponding LEDs is activated illuminates gr...

Страница 469: ... in Figure 7 76 below 17 Trackball to the Exit button and press Set to close the View Test Log dialog box 18 Proceed as follows If the test passed but the original problem persists contact your local On Line Center for assistance 19 Press the Esc button on the keyboard to close the Diagnostic Test Window Figure 7 76 View Test Log Extended Keyboard Test ...

Страница 470: ...P tests available for selection from the Diagnostic Test Tree see Figure 7 77 below and press Set The ECG Test name is displayed under Execute the relevant system components to be tested are highlighted light blue in the Schematic View BEP Peripherals Keyboard as shown below 4 Under the Special Instructions area activate the Loops checkbox and select the required number of Loops from the combo box...

Страница 471: ...eshooting 7 113 7 Make sure that the resolution scale is set to 1 Sec as shown in Figure 7 78 above 8 Trackball to the Open Device button and press Set The ECG signal is displayed in the Data area as shown in the example below Figure 7 78 ECG Device Test Screen Figure 7 79 Test ECG Data ...

Страница 472: ...ayed on the screen as shown in Figure 7 79 10 When done trackball to the Exit button and press Set 11 When prompted by the following message select Yes or No as applicable 12 Proceed as follows If the test passed but the original problem persists contact your local On Line Center for assistance 13 Press the Esc button on the keyboard to close the Diagnostic Test Window ...

Страница 473: ...page 7 130 7 6 1 3 1 Full Back End Test w o Hard Disk Scan NOTE For a description of this test refer to Full Back End Test without Hard Disk on page 7 15 1 In the Diagnostic Test window trackball to Full Back End Test w o Hard Disk Scan in the list of PC Doctor tests available for selection from the Diagnostic Test Tree see Figure 7 80 below and press Set The Test name is displayed under Execute t...

Страница 474: ...mponents during the performance of the test Yellow The tests executed so far on these components have passed but not all recommended tests have been performed 5 At any stage trackball to the Pause button and press Set if required 6 To resume testing from the point where you paused trackball to the Start button and press Set When the Full Back End Test w o Hard Disk Scan sequence is complete the Di...

Страница 475: ... supports the operation of this board is faulty Continue trouble shooting down to the appropriate board If necessary perform a specific test If the problem still persists contact the GE On Line Center for assistance 10 Trackball to the Exit button and press Set to close the View Test Log dialog box 11 Press the Esc button on the keyboard to close the Diagnostic Test Window 7 6 1 3 2 Full PC Doctor...

Страница 476: ...for these components have been completed and no problems were identified Red Problems were identified in these components during the performance of the test Yellow The tests executed so far on these components have passed but not all recommended tests have been performed 5 At any stage trackball to the Pause button and press Set if required 6 To resume testing from the point where you paused track...

Страница 477: ...r that another board that supports the operation of this board is faulty Continue trouble shooting down to the appropriate board If necessary perform a specific test If the problem still persists contact the GE On Line Center for assistance 10 Trackball to the Exit button and press Set to close the View Test Log dialog box 11 Press the Esc button on the keyboard to close the Diagnostic Test Window...

Страница 478: ... as follows Green All recommended tests for these components have been completed and no problems were identified Red Problems were identified in these components during the performance of the test Yellow The tests executed so far on these components have passed but not all recommended tests have been performed 5 At any stage trackball to the Pause button and press Set if required 6 To resume testi...

Страница 479: ...r for assistance If errors were identified results exceeding acceptable upper or lower limits verify that all system cables and boards are connected not misplaced and functioning properly as described in Chapter 5 Components and Function Theory If the problem persists this indicates that either the specific board you tested is faulty or that another board that supports the operation of this board ...

Страница 480: ...ls Alternatively you may prefer testing to continue on failure and later you may review the report 4 Trackball to the Start button and press Set The Hard Drive Full Test w o Scan commences While the test proceeds the name of the test currently in progress is displayed in the Execute field and the current Loop and specific test are shown below The messages Init Done and Please Wait are displayed be...

Страница 481: ...r Seek Random Seek Funnel Scan 8 When done trackball to the Exit button and press Set to close the View Report window 9 After reviewing the test results proceed as follows If no problems were identified it is recommended to re boot the system this is obligatory when prompted If the test passed but the original problem persists contact your local On Line Center for assistance If errors were identif...

Страница 482: ...moment it fails Alternatively you may prefer testing to continue on failure and later you may review the report 4 Trackball to the Start button and press Set The Full Memory Test commences While the test proceeds the name of the test currently in progress is displayed in the Execute field and the current Loop and specific test are shown below The messages Init Done and Please Wait are displayed be...

Страница 483: ...ttern Test Memory Parity Test 8 When done trackball to the Exit button and press Set to close the View Report window 9 After reviewing the test results proceed as follows If no problems were identified it is recommended to re boot the system this is obligatory when prompted If the test passed but the original problem persists contact your local On Line Center for assistance If errors were identifi...

Страница 484: ...oment it fails Alternatively you may prefer testing to continue on failure and later you may review the report 4 Trackball to the Start button and press Set The Full Video Test commences While the test proceeds the name of the test currently in progress is displayed in the Execute field and the current Loop and specific test are shown below The messages Init Done and Please Wait are displayed besi...

Страница 485: ...Data Transfer Video Text Output 8 When done trackball to the Exit button and press Set to close the View Report window 9 After reviewing the test results proceed as follows If no problems were identified it is recommended to re boot the system this is obligatory when prompted If the test passed but the original problem persists contact your local On Line Center for assistance If errors were identi...

Страница 486: ... moment it fails Alternatively you may prefer testing to continue on failure and later you may review the report 4 Trackball to the Start button and press Set The PCI Test commences While the test proceeds the name of the test currently in progress is displayed in the Execute field and the current Loop and specific test are shown below The messages Init Done and Please Wait are displayed beside th...

Страница 487: ...ed as follows If no problems were identified it is recommended to re boot the system this is obligatory when prompted If the test passed but the original problem persists contact your local On Line Center for assistance If errors were identified results exceeding acceptable upper or lower limits verify that all system cables and boards are connected not misplaced and functioning properly as descri...

Страница 488: ...he moment it fails Alternatively you may prefer testing to continue on failure and later you may review the report 4 Trackball to the Start button and press Set The Network Test commences While the test proceeds the name of the test currently in progress is displayed in the Execute field and the current Loop and specific test are shown below The messages Init Done and Please Wait are displayed bes...

Страница 489: ...ceed as follows If no problems were identified it is recommended to re boot the system this is obligatory when prompted If the test passed but the original problem persists contact your local On Line Center for assistance If errors were identified results exceeding acceptable upper or lower limits verify that all system cables and boards are connected not misplaced and functioning properly as desc...

Страница 490: ... 96 below and press Set The Test name is displayed under Execute the relevant system components to be tested are highlighted light blue in the Schematic View BEP Peripherals Keyboard as shown below 2 Trackball to the Start button and press Set The interactive PC Dr for Windows Audio Test screen is displayed as shown in Figure 7 97 3 Trackball to the Left Channel Right Channel Both Channels or Midi...

Страница 491: ...g the test results proceed as follows If no problems were identified it is recommended to re boot the system this is obligatory when prompted If the test passed but the original problem persists contact your local On Line Center for assistance If errors were identified results exceeding acceptable upper or lower limits verify that all system cables and boards are connected not misplaced and functi...

Страница 492: ... of Interactive PC Doctor tests available for selection from the Diagnostic Test Tree see Figure 7 99 below and press Set The Test name is displayed under Execute the relevant system components to be tested are highlighted light blue in the Schematic View BEP Peripherals Keyboard as shown below 2 Trackball to the Start button and press Set The interactive PC Dr for Windows Monitor Test screen is d...

Страница 493: ... the displayed screen press any key to return to PC Dr for Windows Monitor Test screen 6 When done trackball to the Close button and press Set to exit the test When the Monitor Test sequence is complete the Diagnostic Test window displays the Finished message the View Test Log window opens automatically listing all tests performed and showing details of which tests and sub tests passed or failed a...

Страница 494: ... identified results exceeding acceptable upper or lower limits verify that all system cables and boards are connected not misplaced and functioning properly as described in Chapter 5 Components and Function Theory If the problem persists this indicates that either the specific board you tested is faulty or that another board that supports the operation of this board is faulty Continue trouble shoo...

Страница 495: ...s shown in the example in Figure 7 102 The bookmark will allow users to place a time stamp where a particular problem has occurred while continuing with their current activity with minimum interruption NOTE The log file bookmark will later make it easy for service engineers to locate the location of the failure logging more precisely 7 7 2 Extracting Logs Whenever log extraction is necessary due t...

Страница 496: ... select the required export destination DVD CD or Memory Stick then click Save and Export A Zip file named logfile_ date _ time zip is copied onto the selected removable media NOTE Previously users were required to save log files before exporting them With version BT06 these two operations are performed as one step 5 When done click the Exit button The System Problem Reporting dialog closes 6 Pres...

Страница 497: ... in the External position as shown in Figure 7 104 below 2 Insert the blank DVD CD media into the DVD CD RW drive tray 3 On the Vivid q N system press the Config key 4 Select the Connectivity Tab and activate the Tools Tab 5 Under Removable Media select the media type CD DVD Writeable from the Media drop down menu as shown in Figure 7 105 Figure 7 104 Power Switch in External Position NOTICE IMPOR...

Страница 498: ...REVISION 2 VIVID Q N SERVICE MANUAL 7 140 Section 7 7 Automatic Error Log 6 Click the Format button When DVD CD formatting is complete a formatting successful message is displayed together with details of the DVD CD capacity ...

Страница 499: ...e 7 4 Extensive Log Categories and Failure Scenarios Extensive Log Category Type of Failure Archive Loss of patient information or images System lock up due to database corruption Display of message warning that the archive is corrupted Any suspicion that there may be a problem with the archive Connectivity Network is not set up correctly Losing network connection Problems connecting to a DICOM se...

Страница 500: ...iate checkboxes to activate the categories for which detailed analysis is required refer to the recommendations in Table 7 4 NOTE The impact of activating a checkbox would be to generate larger detailed log files After usage make sure to return to the default settings unflagged to conserve the size of the log files After 7 days the system will automatically return to the default settings 4 When do...

Страница 501: ... File Ranges NOTE By default the log files may be very large as they are not limited by time date The user is able to limit the size timeframe of the log files by choosing the required settings as described below 1 Activate the Export Logs Using checkbox as shown in Figure 7 107 above 2 Proceed to set the required Log Range as follows Either Activate the Time Range radio button then use the From T...

Страница 502: ...eted press Ctrl E to eject the media Table 7 5 Attachment Categories and Recommendations for Use Category Type of Information and Recommended Use Diagnostic Reports Should be used whenever a diagnostic test has failed and it is necessary to forward the information to GE for analysis Crash and Memory Dumps Useful for any type of memory crash or system lock up problem Keyboard Strokes Log Shows the ...

Страница 503: ...e NOTE Successful upload of logs to the GE ftp site can only be achieved when the designated PC is connected to the Internet and when all security measures such as firewalls taken at the local network do not prevent the utility from performing the upload To Perform the Upload Procedure 1 Place the media in any Windows based PC and run the UploadLog exe The Upload Log dialog is displayed 2 Click Se...

Страница 504: ...e local GE personnel that you have uploaded files to the GE ftp site NOTE In the event that the upload process fails check your local network security settings to make sure that they did not prevent the upload Otherwise contact GE personnel 7 7 2 4 DB Scan To Perform the Database Scan Procedure 1 Press ALT D The System Problem Reporting dialog opens Figure 7 110 Upload Complete Figure 7 111 System...

Страница 505: ...he message The action may take a long time Please wait During this procedure a log file which contains information about the integrity of the database will automatically be created and stored in the Logs directory in the folder name Log If required this log file may be sent as an attachment when exporting log files For more details see Setting the Log File Attachments on page 7 144 Figure 7 112 Da...

Страница 506: ...GE DIRECTION FQ091019 REVISION 2 VIVID Q N SERVICE MANUAL 7 148 Section 7 7 Automatic Error Log This page was intentionally left blank ...

Страница 507: ...Replacement Procedure 8 10 Rear Cover Latch Assembly Replacement Procedure 8 20 LCD Display Cover Hinges Replacement Procedure 8 22 Bottom Assembly Replacement Procedure 8 25 LCD Display Frame Replacement Procedure 8 27 8 3 Internal Component Replacement Procedures 8 29 P M Probe and MUX Board Replacement Procedure 8 29 TR32 and RFI Boards Replacement Procedure 8 32 BEP Replacement Procedure 8 40 ...

Страница 508: ...vers as indicated in the Bearing Handle replacement procedure 8 2 1 2 Time Required 10 minutes 8 2 1 3 Preparations None 8 2 1 4 Bearing Handle Removal Procedure 1 Close the Vivid q N LCD cover making sure both front latches are securely fastened Figure 8 1 2 Release the captive screw on either side of the Bearing Handle there are two screws that secure the handle in position by turning 1 4 turn i...

Страница 509: ...h hands to pull the Bearing Handle slightly apart in order to slot the ends into the handle holes on the Vivid q N casing 2 Carefully fasten each captive screw on either side of the Bearing Handle to secure the handle in position by turning 1 4 turn in a clockwise direction NOTE When tightening the captive screws do not use excessive force do not apply more than 1 4 turn overtightening will damage...

Страница 510: ...e ultrasound scanner 2 Close the Vivid q N LCD cover making sure both front latches are securely fastened 3 Carefully turn the Vivid q N over placing it face down 4 While holding the Vivid q N steady pull the locking latch away from the battery and slide the battery sideways out of the battery compartment to remove it completely from the system NOTE When removing A defective batterY ensure that it...

Страница 511: ...er 4 Reconnect the AC adapter and all cables to the Vivid q N portable ultrasound scanner 5 Proceed to perform the following functionality tests SafeLock Cart Grounding Continuity on page 10 22 only if the Vivid q N system is currently mounted on the SafeLock cart SafeLock Cart Chassis Current Leakage Test on page 10 24 Calibration Tests on page 7 25 Battery Parameters Test on page 7 102 WARNING W...

Страница 512: ... in Chapter 3 System Setup 8 2 3 4 Hard Disk Removal Procedure 1 Make sure the Vivid q N LCD Display cover is securely closed and that the scanner is standing firmly on a flat surface 2 Working from the rear of the scanner rear panel use a small Phillips screwdriver to loosen and remove the two screws that secure the Hard Disk in the hard disk module holder as shown in Figure 8 6 below Figure 8 6 ...

Страница 513: ...e two screws previously removed to secure the Hard Disk in position refer to Figure 8 6 on page 8 6 NOTE The formatting process limits the size of the partition E on the hard disk to approximately 120GB To identify which hard disk is installed on your system boot up the system and enter the BIOS configuration as described in Setting the BIOS on page 8 114 The hard disk is identified by the Primary...

Страница 514: ...nter The following message is displayed The following window displays 3 Press any key The system ejects the CD 4 Remove the CD from the CD drive 5 Insert the appropriate software installation CD into the CD drive The following options are displayed NOTE If you need to abort the process at this stage prior to formatting do so by pressing the On Off switch and holding down for a few seconds until th...

Страница 515: ...all software procedure corresponding to the BT level of your system Refer to the Software Upgrade Procedure Overview on page 8 99 Note IMPORTANT if both the Hard Disk and Back End are being replaced simultaneously it is necessary to re configure the LCD type 9 When done proceed to perform the following functionality tests Software Configuration Checks on page 4 39 Calibration Tests on page 7 25 Fu...

Страница 516: ...and Keyboard Removal Procedure 1 Remove the bearing handle as described in the Bearing Handle Removal Procedure on page 8 2 2 Place the Vivid q N portable ultrasound scanner face down and remove the battery as described in the Battery Removal Procedure on page 8 4 3 Loosen and remove each of the 9 screws that fasten the Control Panel and Keyboard onto the Bottom Assembly as indicated in Figure 8 1...

Страница 517: ...ntrol Panel and Keyboard during other replacement procedures Step 6 will only be required if indicated 6 Lift the Control Panel and Keyboard up to gain access to the cable connector underneath and disconnect the control panel keyboard cable from the system as shown in Figure 8 16 Figure 8 15 Removing the Control Panel and Keyboard Figure 8 16 Disconnecting the Control Panel Keyboard Cable Disconne...

Страница 518: ...th those in the Bottom Assembly 3 Close the Vivid q N LCD Display cover making sure both front latches are securely fastened 4 Carefully turn the Vivid q Nover placing it face down 5 Return and fasten each of the 9 screws that secure the Control Panel and Keyboard onto the Bottom Assembly refer to Figure 8 14 above 6 Re install the battery as described in the Battery Installation Procedure on page...

Страница 519: ... wish to remove and its neighboring keycap 2 Use the screw driver to gently lever off the defective keycap until it is completely loosened from its base see Figure 8 17 below 3 Lift off and remove the defective keycap 8 2 4 5 2 Keycap Installation Procedure 1 Carefully place the appropriate new keycap in position on the keyboard taking care to place the plastic alignment pin in the correct positio...

Страница 520: ...f the bracket that fasten the trackball assembly to the base of the Control Panel as shown in Figure 8 18 below 3 Disconnect the three trackball cable connectors from the trackball assembly carefully pull them out and remove the trackball assembly from the Control Panel 8 2 4 5 4 Trackball Installation Procedure 1 Return a new trackball assembly to the correct location on the Control Panel 2 Caref...

Страница 521: ...e keycap see Figure 8 19 below 8 2 4 5 6 ATGC Slider Keycap Installation Procedure 1 Carefully place a new slider keycap in position on the slider base taking care to place the plastic alignment pin in the correct location 2 Gently push the slider keycap down until it snaps into position 8 2 4 5 7 ATGC Rotary Knob Removal Procedure NOTE This section describes the replacement procedure for ATGC Rot...

Страница 522: ...the defective knob see Figure 8 20 below 8 2 4 5 8 ATGC Rotary Knob Installation Procedure 1 Carefully place a new ATGC Rotary Knob in position on the keyboard taking care to place the plastic alignment pin in the correct location 2 Gently push the ATGC Rotary Knob down until it snaps into position Figure 8 20 ATGC Rotary Knob Replacement ...

Страница 523: ... the event that the traces res file is not deleted prior to installing the new ECG Respiratory board the following error message will later be displayed 2 Shut down the Vivid q N ultrasound unit as described in Chapter 3 System Setup Removal Procedure 1 Lift the Control Panel and Keyboard up to gain access to the cable connector underneath and disconnect the keyboard control panel cable from the s...

Страница 524: ...location on the base of the Control Panel 3 Re connect the ECG cable see Figure 8 22 above 4 Re connect the Flex Cable previously removed from the ECG Board to the new ECG Respiratory Board 5 Return and fasten the four screws two long and two short on either side of the bracket to secure the ECG Respiratory Module assembly to the base of the Control Panel refer to Figure 8 21 on page 8 17 When per...

Страница 525: ...s shown in Figure 8 23 11 Proceed to perform the following functionality tests Isolated Patient Lead Source Leakage Lead to Ground on page 10 26 Isolated Patient Lead Source Leakage Lead to Lead on page 10 27 Isolated Patient Lead Sink Leakage Isolation Test on page 10 27 SafeLock Cart Grounding Continuity on page 10 22 only if the Vivid q N system is currently mounted on the SafeLock cart SafeLoc...

Страница 526: ...Assembly Removal Procedure 1 Disconnect the AC adapter and all cables from the Vivid q N portable ultrasound scanner 2 Remove the Bearing Handle as described in the Bearing Handle Removal Procedure on page 8 2 3 Remove the Control Panel and Keyboard as described in the Control Panel and Keyboard Removal Procedure on page 8 10 4 Remove the LCD Display Frame as described in the LCD Display Frame Rem...

Страница 527: ...ion Procedure on page 8 57 4 Return the LCD Display Frame as described in the LCD Display Frame Installation Procedure on page 8 28 5 Return the Control Panel and Keyboard as described in the Control Panel and Keyboard Installation Procedure on page 8 12 6 Return the Bearing Handle as described in the Bearing Handle Installation Procedure on page 8 3 7 Reconnect the AC adapter and all cables to th...

Страница 528: ...ivid q N ultrasound unit as described in System Setup 8 2 6 4 LCD Display Cover Hinges Removal Procedure 1 Remove the bearing handle as described in the Bearing Handle Removal Procedure on page 8 2 2 Remove the Control Panel and Keyboard as described in the Control Panel and Keyboard Removal Procedure on page 8 10 3 Slide to open the two connector latches and disconnect the LCD Flex ribbon cable f...

Страница 529: ...e must be aligned with the holes in the Bottom Assembly as explained in the next step 3 Gently maneuver the LCD cover by raising and lowering it while exerting pressure to slide the LCD Display Cover until the hinge holes are aligned with the Bottom Assembly screw holes see right hinge in Figure 8 27 on page 8 23 4 On the Left hinge return and fasten the 2 screws previously removed to the Bottom A...

Страница 530: ...anel and Keyboard Installation Procedure on page 8 12 10 Close and open the lid a few times to ensure proper closure of the LCD Display cover 11 Reconnect the AC adapter and all cables to the Vivid q N portable ultrasound scanner 12 Proceed to perform the following functionality tests SafeLock Cart Grounding Continuity on page 10 22 only if the Vivid q N system is currently mounted on the SafeLock...

Страница 531: ...moval Procedure on page 8 10 5 Remove the P M Board as described in the P M Probe and MUX Board Removal Procedure on page 8 30 6 Remove the TR32 and RFI Boards as described in the TR32 and RFI Boards Removal Procedure on page 8 34 7 Remove the BEP as described in the BEP Removal Procedure on page 8 40 8 Remove the HVPS as described in the DC to DC Power Supply Removal Procedure on page 8 48 9 Remo...

Страница 532: ...lation Procedure on page 8 50 7 Return the BEP as described in the BEP Installation Procedure on page 8 44 8 Return the TR32 and RFI Boards as described in the TR32 and RFI Boards Installation Procedure on page 8 38 9 Return the P M Board as described in the P M Probe and MUX Board Installation Procedure on page 8 31 10 Return the Control Panel and Keyboard as described in the Control Panel and Ke...

Страница 533: ...rasound unit as described in Chapter 3 System Setup 8 2 8 4 LCD Display Frame Removal Procedure 1 With the LCD Display in the open upright position use a flat screwdriver to remove the screw cap from each of the four screws that fasten the LCD display frame in position as shown in Figure 8 28 below Figure 8 28 Removing the Screw Caps from the LCD Display Frame 2 Loosen and remove the four screws F...

Страница 534: ...rn the LCD display frame to the correct position and using both hands press the frame under the securing clips on all four sides to fasten it against the LCD display Refer to Figure 8 30 on page 8 28 2 Return and tighten the four screws previously removed 3 With the LCD Display in the open upright position return the screw cap to each of the four screws that fasten the LCD frame in position as sho...

Страница 535: ...rews do not overtighten or use excessive force 8 3 1 P M Probe and MUX Board Replacement Procedure 8 3 1 1 Tools Use the appropriate Phillips and flat screw drivers as indicated in the bottom assembly replacement procedures 8 3 1 2 Time Required 15 minutes 8 3 1 3 Preparations Shut down the Vivid q N ultrasound unit as described in Chapter 3 System Setup WARNING WARNING DO NOT TOUCH ANY BOARDS WIT...

Страница 536: ...e 8 2 2 Remove the Control Panel and Keyboard as described in the Control Panel and Keyboard Removal Procedure on page 8 10 3 Loosen and remove the four screws that secure the P M Board to the RFI Board as shown in Figure 8 31 4 Loosen the two screws that fasten the P M Board to the Bottom Assembly as shown in Figure 8 32 below Figure 8 31 Removing the Screws that Secure the P M Board to the RFI B...

Страница 537: ...8 33 and Figure 8 32 above 2 Return and fasten the four screws to secure the P M Board to the RFI Board as shown in Figure 8 31 on page 8 30 3 Return the Control Panel and Keyboard as described in the Control Panel and Keyboard Installation Procedure on page 8 12 4 Return the bearing handle as described in the Bearing Handle Installation Procedure on page 8 3 5 Proceed to perform the following fun...

Страница 538: ...annot be used with a TR32 Board V7 Always verify this by examining the version number stated on the board as shown in Figure 8 34 below NOTE Before installing the TR32 V12 board check that the DCDC V4 board P N 2403248 4 is already installed Always verify this by examining the Power Supply DCDC Board version number stated in the About Screen HwVersion tab as shown in Figure 8 35 below If the DCDC ...

Страница 539: ...crew drivers as indicated in the bottom assembly replacement procedures 8 3 2 2 Time Required 15 minutes 8 3 2 3 Preparations Shut down the Vivid q N ultrasound unit as described in Chapter 3 System Setup CAUTION When removing the boards ESD may cause damage to a board Always have the ESD hand strip connected to the machine chassis and to your hand ...

Страница 540: ...the Control Panel and Keyboard as described in the Control Panel and Keyboard Removal Procedure on page 8 10 3 Loosen the eight screws that secure the TR32 and RFI Boards to the Bottom Assembly as shown in Figure 8 36 below 4 Remove the eight screws see Figure 8 37 5 Disconnect the PCI cable flex BEP to RFI from the cable connector on RFI Board as shown in Figure 8 36 Loosen Screws that Secure TR3...

Страница 541: ... of the P M Board upwards and hinge it open to gain access to the RFI and TR32 Board assembly beneath as shown in Figure 8 41 below The RFI and TR32 Boards are seated together in the system as one unit 8 Lift the RFI and TR32 Board assembly upwards and remove it from the Bottom Assembly as shown Figure 8 38 Disconnecting the PCI Cable from the RFI Board Figure 8 39 Disconnecting the DC Power Suppl...

Страница 542: ...acement Procedures in Figure 8 41 below 9 Remove the RFI Board from the TR32 Boards separate by gently pulling them apart as shown in Figure 8 42 below Figure 8 41 Removing the RFI and TR32 Boards from the Bottom Assembly Figure 8 42 Removing the RFI Board from the TR32 Boards TR32 Boards RFI Board ...

Страница 543: ...Procedures 8 37 10 Separate the two TR32 Boards from each other as shown in Figure 8 43 below NOTE Replace the defective board as described in the appropriate steps of the following procedure Figure 8 43 Separating the Two TR32 Boards from Each Other RFI Board TR32 Board TR32 Board ...

Страница 544: ...oval Procedure 1 Prepare each of the two TR32 Boards as follows a Apply a small quantity of heat sink paste Dow Corning 340 Heat Sink Compound or similar to each of the eleven areas shown in Figure 8 44 marked with arrows b Attach the TR32 Board to its respective heat sink pad by placing the heat sink on the TR32 Board the obverse side of the heat sink is shown in Figure 8 45 CAUTION WHEN INSTALLI...

Страница 545: ...e DC Power Supply see Figure 8 39 on page 8 35 6 Reconnect the PCI cable flex BEP to RFI to the cable connector on RFI Board see Figure 8 38 on page 8 35 7 Return the eight screws and fasten the TR32 and RFI Board assembly firmly in position on the Bottom Assembly refer to Figure 8 36 and Figure 8 37 on page 8 34 8 Return the Control Panel and Keyboard to its original position as described in the ...

Страница 546: ...4 4 Remove the Hard Disk as described in the Hard Disk Removal Procedure on page 8 6 5 Loosen and remove the two securing nuts one on each side of the VGA Connector located on the Vivid q N rear panel as shown Figure 8 46 6 Remove the Control Panel and Keyboard as described in the Control Panel and Keyboard Removal Procedure on page 8 10 7 Disconnect all the cables from the BEP NOTE When replacing...

Страница 547: ...nnect the HVPS to BEP power cable d Disconnect the Fan Speaker to BEP power cable 8 Unscrew and remove the four screws that secure the BEP to the Bottom Assembly as shown in Figure 8 47 Disconnecting Cables from the BEP LCD Flex cable BEP to RFI Flex cable HVPS to BEP Power cable Fan Speaker to BEP cable ...

Страница 548: ...ated in Figure 8 49 that serves to seat the BEP firmly in position It is necessary to loosen and release this tab lift it up using a screw driver if necessary in order to facilitate complete removal of the BEP 9 Using both hands lift the BEP out of the Bottom Assembly and remove it from the system as shown Figure 8 48 Removing the Screws from the BEP Figure 8 49 Releasing the Plastic Securing Tab ...

Страница 549: ...n removing the BEP for replacement with the SATA BEP disconnect the control panel keyboard cable Figure 8 51 from the parallel BEP you have just removed and keep this cable for installing on the SATA BEP Figure 8 50 Removing the BEP from the Bottom Assembly Figure 8 51 Control Panel Keyboard Cable Control Panel Keyboard Cable ...

Страница 550: ...he bracket is shown on the left in Figure 8 52 in the picture on the right the bracket is shown in position in the Vivid q N scanner Notice that the bracket sits on the PCMCIA slot flap which is pressed open while the adaptor bracket is positioned on the flap itself To install the adaptor bracket the flap is pressed open Figure 8 53 and the adaptor bracket is placed in position The procedure is de...

Страница 551: ...ccess codes already registered in the Hard Disk Only qualified personnel should perform these tasks 2 Check that the BEP is seated correctly then return and fasten the four screws previously removed to secure the BEP to the Bottom Assembly refer to Figure 8 48 on page 8 42 3 Re connect all the cables to the BEP Proceed as follows refer to Figure 8 47 on page 8 41 a Re connect the Speaker to BEP po...

Страница 552: ...lation Procedure on page 8 3 9 Turn ON the system and boot up 10 Perform a complete functional check of the system as described in Chapter 4 General Procedures and Functional Checks 11 Proceed to perform the following functionality tests SafeLock Cart Grounding Continuity on page 10 22 only if the Vivid q N system is currently mounted on the SafeLock cart SafeLock Cart Chassis Current Leakage Test...

Страница 553: ...IOS Battery Removal Procedure 1 Remove the BEP as described in the BEP Removal Procedure on page 8 40 2 Take out the BIOS battery located on the bottom of the BEP as shown in Figure 8 55 8 3 4 5 BIOS Battery Installation Procedure NOTE Before proceeding refer to the Preparation Procedure on page 8 45 1 Fit a new BIOS battery in position on the BEP refer to Figure 8 55 2 Re install the BEP as descr...

Страница 554: ...hapter 3 System Setup 8 3 5 4 DC to DC Power Supply Removal Procedure 1 Make sure the Vivid q N LCD Display cover is securely closed and place the scanner face down Remove the battery as described in the Battery Removal Procedure on page 8 4 2 Remove the bearing handle as described in the Bearing Handle Removal Procedure on page 8 2 3 Disconnect each of the two Power Supply cables from the DC Powe...

Страница 555: ...n Figure 8 58 below 6 Proceed to perform the following functionality tests SafeLock Cart Grounding Continuity on page 10 22 only if the Vivid q N system is currently mounted on the SafeLock cart SafeLock Cart Chassis Current Leakage Test on page 10 24 Calibration Tests on page 7 25 Full System Test on page 7 10 Figure 8 57 Loosening the Screws on the DC Power Supply Figure 8 58 Removing the DC Pow...

Страница 556: ...e 8 57 on page 8 49 3 Reconnect each of the two Power Supply cables to the DC Power Supply HVPS to BEP and HVPS to RFI as shown in Figure 8 56 on page 8 48 4 Return the bearing handle as described in the Bearing Handle Installation Procedure on page 8 3 5 Make sure the Vivid q N LCD Display cover is securely closed and place the scanner face down Re install the battery as described in the Battery ...

Страница 557: ... Preparation Shut down the Vivid q N ultrasound unit as described in Chapter 3 System Setup 8 3 6 4 Fan Removal Procedure 1 Remove the bearing handle as described in the Bearing Handle Removal Procedure on page 8 2 2 Remove the Control Panel and Keyboard as described in the Control Panel and Keyboard Removal Procedure on page 8 10 3 Unscrew and remove the two screws that secure the Fan Assembly to...

Страница 558: ... the front and then the rear to remove it from the Bottom Assembly lay it down adjacent to the system ready for the next step as shown in Figure 8 61 below Figure 8 61 Removing the Fan Assembly 6 Disconnect the Fan cable from the BEP and completely remove the Fan Assembly from the system as shown in Figure 8 62 below Figure 8 62 Disconnecting the Fan Cable from the BEP ...

Страница 559: ...embly is seated in the correct position Return and fasten the two screws previously removed to secure the Fan Assembly to the Bottom Assembly as shown in Figure 8 59 on page 8 51 4 Reconnect the speaker cable to the fan assembly as shown in Figure 8 60 5 Return the Control Panel and Keyboard as described in the Control Panel and Keyboard Installation Procedure on page 8 12 6 Return the bearing han...

Страница 560: ... described in the Control Panel and Keyboard Removal Procedure on page 8 10 3 Loosen and remove the two screws on each of the speaker housings four in total 4 Disconnect the speaker cables from the fan assembly 5 Gently lift the speaker assembly towards you and remove from the system 8 3 7 5 Speaker Assembly Installation Procedure 1 Return a replacement speaker assembly to the original position en...

Страница 561: ...ply P N 5439596 should be available if this is required See Note on page 8 58 8 3 8 1 Tools Use the appropriate Phillips and flat screw drivers and Loctite 402 glue as indicated in the AUO LCD Display replacement procedure 8 3 8 2 Time Required 15 minutes 8 3 8 3 Preparation 1 Make sure all required tools and parts are available 2 Adhere the appropriate Vivid label onto the new display frame 3 Rem...

Страница 562: ...t the LCD Flex ribbon cable from BEP refer to Figure 8 65 4 Unscrew and remove the four screws two on either side as shown in Figure 8 66 that secure the Rear Cover and Latch Assembly to the Bottom Assembly 5 Detach the Rear Cover and Latch Assembly from the Bottom Assembly and remove Figure 8 65 Connector Latches Figure 8 66 Rear Cover and Latch Assembly Securing Screws ...

Страница 563: ...s supplied 1 Protect the Bottom Assembly with a protective cloth as shown in Figure 8 67 2 Check that there is a coating of Loctite 402 on each of the screw threads 3 Carefully position the AUO LCD Display Assembly on the Bottom Assembly hinges and secure the LCD Display Assembly in position with the four screws provided two each side see Figure 8 66 Note Check that there is a coating of Loctite 4...

Страница 564: ... bearing handle as described in the Bearing Handle Installation Procedure on page 8 3 11 For the final stage of the LCD Display installation procedure proceed to calibrate the newly installed LCD Display by making any adjustments required to the Brightness Contrast and or Blue Tint as described in the LCD Display Adjustments and Calibration on page 6 1 12 Proceed to perform the following functiona...

Страница 565: ...eference the relevant parts are illustrated in Table 8 3 below Table 8 2 AUO LCD Cable and Flex RSPL Kit P N 5443867 Contents Part Description Quantity LCD flex 8 bit data cable 1 Inverter Flex Board cable 1 AUO LCD cable LCD to LED driver 1 Flex Board 1 LCD backlight Inverter Board 1 Klebeband Kapton tape 2 Display flex cover 1 Ferrite core 1 Table 8 3 AUO LCD Cable and Flex RSPL Kit Illustrated ...

Страница 566: ...e 8 3 1 Remove the AUO LCD display refer to the AUO LCD Display Removal Procedure on page 8 55 2 Disconnect the AUO LCD cable 3 from the rear of the LCD panel 3 Disconnect and remove the flex board 4 by unscrewing the two retaining screws encircled in Figure 8 70 4 Disconnect the Inverter Flex Board cable 2 from the LCD Backlight Inverter board 5 then disconnect the LCD Back Light Inverter board f...

Страница 567: ... the Flex Board cable through the Display Flex Cover 6 making sure that the Display Flex Cover is correctly orientated as shown in Figure 8 72 3 Thread the Flex Board cable through the ferrite core 7 and secure the ferrite with a strip of Kapton tape Figure 8 72 4 Connect the Inverter Flex Board cable 2 to the Flex Board 4 then connect its other end to the LCD Backlight Inverter board 5 Figure 8 7...

Страница 568: ...st be prepared by folding as shown in Figure 8 73 Folding the flex cable in this manner enables the LCD panel to lie flat in the lid housing 6 Fold the LCD flex as shown in Figure 8 73 7 Connect the LCD flex to the Flex Board The sub assembly parts should now be as shown in Figure 8 74 Figure 8 73 LCD flex fold Figure 8 74 Sub assembly showing Parts Assembled Tip Fold here at 20 cm from right end ...

Страница 569: ... 8 75 11 Refit the AUO LCD Display in the system s top rear cover as described in the AUO LCD Display Installation Procedure on page 8 57 12 Check that the LCD Display can be tilted upwards and downwards and that it holds its set position 13 Proceed to perform the following functionality tests SafeLock Cart Grounding Continuity on page 10 22 only if the Vivid q N system is currently mounted on the...

Страница 570: ...ED WITHIN 15 FEET OF ANY MAGNETIC EQUIPMENT DANGER Electrical hazards exist at several points in the system Familiarize yourself with all hazardous voltages and high current levels before removing any of the covers DANGER DO NOT wear the ESD wrist band strap when removing parts from the power supply unit Before removing any part of the power unit turn the power OFF and disconnect the power cord WA...

Страница 571: ...s Label Item Label Item 1 Top Shelf Assembly with handle 8 Bottom Cover Front 2 ECG Cable Protector 9 Bottom Cover Rear AC Assembly Cover 3 Peripheral Power Outlet 10 AC Power Cable Bumper Protector 4 AC Cable Hook 11 AC Distribution Assembly behind cover 5 Probe Shelf with probe holders 12 SafeLock Cart Bottom Assembly 6 Rear Upper Cover 13 Front Wheels with locking lever 7 Rear Lower Cover 14 Re...

Страница 572: ...e supporting the cover with one hand carefully remove the cover see Figure 8 77 8 4 2 4 Upper Cover Rear Installation Procedure 1 Return the cover to the correct position on the rear of the SafeLock Cart see Figure 8 77 2 While holding the cover to prevent it from falling return and fasten the two upper screws see Figure 8 77 3 Fasten the four remaining screws that secure the upper cover rear 4 Pr...

Страница 573: ... Cover rear unscrew the four AC Cable Hook retaining screws see Figure 8 78 and remove the cable hook holder 8 4 3 3 AC Cable Hook Installation Procedure 1 Position the AC Cable Hook on the Upper Cover rear and return and fasten the four retaining screws 2 Proceed to perform the following functionality tests SafeLock Cart Grounding Continuity on page 10 22 SafeLock Cart Chassis Current Leakage Tes...

Страница 574: ...crews refer to Figure 8 81 and Figure 8 79 2 Remove the Bumper Protector from the Cart 8 4 4 3 AC Power Cable Bumper Protector Installation Procedure NOTE If this is a first time installation of the bumper protector it is necessary to remove the two existing Phillips screws located on the rear of the SafeLock Cart AC Cable connection area as shown in Figure 8 79 1 Apply a little Loctite glue on th...

Страница 575: ...the mounting tabs ears with the screws then pushing the bumper downwards until it is seated securely See Figure 8 81 4 Proceed to perform the following functionality tests SafeLock Cart Grounding Continuity on page 10 22 SafeLock Cart Chassis Current Leakage Test on page 10 24 Figure 8 81 AC Power Cable Bumper Protector Mounted on SafeLock Cart AC Power Cable Bumper Protector ...

Страница 576: ...lation Procedure If this is a first time installation of the ECG Cable Protector it is necessary to remove the two plastic guide holders from the Top Shelf Assembly as shown in Figure 8 82 While facing the SafeLock Cart i e working from the front of the Cart these are located on the right side of the SafeLock Cart 1 Thoroughly clean the surface of the Top Shelf Assembly in particular the recessed ...

Страница 577: ...ecuring screw then the front securing screw 3 Return and fasten the rear securing screw Figure 8 84 then the front securing screw Figure 8 85 illustrates the ECG Cable Protector secured in position on the SafeLock Cart Figure 8 83 Placing the ECG Cable Protector in Position CAUTION When placing the ECG Cable Protector in position take care not to damage the plastic Figure 8 84 Fastening the Rear S...

Страница 578: ...to perform the following functionality tests SafeLock Cart Grounding Continuity on page 10 22 SafeLock Cart Chassis Current Leakage Test on page 10 24 Figure 8 85 ECG Cable Protector Secured on SafeLock Cart ECG Cable Protector Mounted on SafeLock Cart ECG Cable Protector as seen when in Use ECG Cable Connected to Scanner ...

Страница 579: ...the lower cover rear and while supporting the cover with one hand gently remove the cover see Figure 8 86 8 4 6 4 Lower Cover Rear Installation Procedure 1 Return the cover to the correct position on the rear of the SafeLock Cart see Figure 8 86 2 While holding the cover to prevent it from falling fasten the retaining screws of the lower cover rear 3 Proceed to perform the following functionality ...

Страница 580: ... rear 2 Remove the Upper Cover Rear as described in the Upper Cover Rear Removal Procedure on page 8 66 3 Remove the Lower Cover Rear as described in the Lower Cover Rear Removal Procedure on page 8 73 4 Remove the three retaining screws of the AC Assembly Cover and remove the cover Figure 8 87 below The AC Distribution Assembly is now exposed as shown in Figure 8 88 5 Cut all cable ties holding t...

Страница 581: ...round screw to the AC Distribution Assembly Figure 8 88 above 3 Reconnect the peripheral power cable to the AC Distribution Assembly Figure 8 88 above 4 Secure all cables in position with new cable ties 5 Return the AC Assembly cover and fasten the three screws previously removed 6 Return the Lower Cover Rear as described in the Lower Cover Rear Installation Procedure on page 8 73 7 Return the Upp...

Страница 582: ...eLock Cart as described in Upper Cover Rear Removal Procedure on page 8 66 and Lower Cover Rear Removal Procedure on page 8 73 8 4 8 3 Peripheral Power Cable Removal Procedure 1 Disconnect the Peripheral Power cable from the AC Distribution Assembly 2 Cut any cable ties that secure the cable 3 Disconnect all grounding connections 4 Remove the Peripheral Power socket by squeezing the plastic clip h...

Страница 583: ...wer socket in position in the SafeLock s Upper Cover front see item 4 in Figure 8 76 page 8 65 2 With the AC power socket plugged into the cart Figure 8 90 left picture connect the ground cable to the body of the cart 3 Route the Peripheral AC Outlet cable as shown in the middle picture of Figure 8 90 4 Secure the cable with the cable clamp in the direction shown in Figure 8 91 5 Route the cable a...

Страница 584: ...Figure 8 92 Figure 8 92 Routing of Cable Downwards inside Rear Upper Cover 7 Fasten the Peripheral AC Outlet cable to the Main Harness cable as shown in Figure 8 93 Figure 8 93 Peripheral AC Outlet Cable Fastened to Main Harness Cable 8 Plug the Peripheral AC Outlet cable into the power supply and connect the Ground lead to the body of the cart Figure 8 94 Note use of cable fasteners along length ...

Страница 585: ... u shape and fasten together with tie wraps as shown in Figure 8 95 11 Check that the routing procedure has been implemented correctly lower the cart s top shelf and make sure that the cables do not interfere with the movement of the cart s top shelf Figure 8 94 Peripheral AC Outlet and Ground Cable Connected Figure 8 95 USB Power Cable Folded and Fastened with Tie wraps ...

Страница 586: ...ter 8 section 8 4 3 4 13 Return the Upper Cover rear and Lower Cover rear of the SafeLock Cart as described in Upper Cover Rear Installation Procedure on page 8 66 and Lower Cover Rear Installation Procedure on page 8 73 14 Once more slide the top shelf up and down a number of times and check that the movement is smooth and that there is no interference of the cables with the up down movement of t...

Страница 587: ...as shown in Figure 8 97 4 From above the Top Shelf carefully push the Main Cable Harness Vivid q N power supply cable through the top shelf aperture and gently pull it through from below 5 From below the Top Shelf carefully push the DVD connectors through the front upper cover 6 Remove the Main Cable Harness from the cart 8 4 9 4 Main Cable Harness Installation Procedure 1 From the Upper Assembly ...

Страница 588: ...oval Procedure 1 Turn OFF power to the SafeLock Cart and disconnect the AC power cable from the AC input assembly at the base of the cart rear 2 Remove the Upper Cover Rear as described in the Upper Cover Rear Removal Procedure on page 8 66 3 Disconnect the P6 cable and USB connector from the USB board as shown in Figure 8 97 4 Remove the upper and lower bolts that attach the USB board to the uppe...

Страница 589: ... 98 2 Reconnect the P6 cable to the P6 connector on the USB board 3 Reconnect the USB cable to the USB board 4 Return the Upper Cover Rear as described in the Upper Cover Rear Installation Procedure on page 8 66 5 Reconnect the AC power cable to the AC input assembly at the base of the cart rear and turn ON power to the SafeLock Cart 6 Proceed to perform the following functionality tests SafeLock ...

Страница 590: ...8 66 3 Remove the Lower Cover Rear as described in the Lower Cover Rear Removal Procedure on page 8 73 4 Disconnect the Main Harness cable from the AC unit cut both tie clips and free the Main Cable Harness so that it does not interfere with the Gas Spring 5 Gradually raise the Upper Assembly until the lower Gas Spring securing screw is accessible 6 Lie the SafeLock cart on its left side with the ...

Страница 591: ...ocking nut counter clockwise until it rises about a quarter way upwards on the thread 3 Insert the Gas Spring handle into the Gas Spring Housing Assembly until it is flush with the outer cylindrical surface of the housing assembly 4 Attach the Gas Spring to the housing assembly by turning it clockwise until the locking nut makes contact with the housing assembly see Figure 8 100 Figure 8 99 Compre...

Страница 592: ...s Spring and then reconnect it to the AC unit 8 Secure all cables in position with new cable ties 9 Return the Lower Cover Rear as described in the Lower Cover Rear Installation Procedure on page 8 73 10 Return the Upper Cover Rear as described in the Upper Cover Rear Installation Procedure on page 8 66 11 Proceed to perform the following functionality tests SafeLock Cart Grounding Continuity on p...

Страница 593: ...er with one hand remove the four retaining screws as shown in Figure 8 102 2 Remove the DVD Holder from the base of the Top Shelf 8 4 12 3 DVD Holder Installation Procedure 1 Working from beneath the Top Shelf align the replacement DVD Holder in the correct position 2 Return and fasten the four retaining screws as shown in Figure 8 102 to secure the DVD Holder firmly in position Figure 8 102 DVD H...

Страница 594: ...AN Holder retaining screws see Figure 8 103 and remove the LAN Holder 3 Remove the LAN Isolation Box 8 4 13 3 LAN Isolation Box and Holder Installation Procedure 1 Position the LAN Isolation Box in the LAN Holder and replace the LAN Holder with the Isolation Box in their appropriate location beneath the Top Shelf 2 Return and tighten the two retaining screws to secure the LAN Holder 3 Connect the ...

Страница 595: ...e Lower Cover Rear as described in the Upper Cover Rear Removal Procedure on page 8 66 5 Remove the USB board as described in the USB Board Removal Procedure on page 8 82 6 Remove the gas spring as described in Gas Spring Replacement Procedure on page 8 84 7 Disconnect the two cables P1 cable and peripheral power cable from the top of the AC Input Assembly as described in AC Distribution Assembly ...

Страница 596: ... Return the USB Box as described in the USB Board Installation Procedure on page 8 83 5 Fasten all cables in position using new cable ties 6 Return the Lower Cover Rear as described in the Lower Cover Rear Installation Procedure on page 8 73 7 Return the Upper Cover Rear as described in the Upper Cover Rear Installation Procedure on page 8 66 8 Reconnect all required peripherals to the SafeLock Ca...

Страница 597: ... from the Vivid q N portable ultrasound scanner 2 Working from the front of the SafeLock Cart and below the main shelf loosen and remove the three screws that secure the handrest to the main shelf see Figure 8 106 below 3 Remove the handrest 8 4 15 4 Handrest Installation Procedure 1 Install a replacement handrest on the SafeLock Cart s main shelf making sure the three screw holes are aligned corr...

Страница 598: ...N ultrasound unit 8 4 16 3 Probe Shelf Assembly Removal Procedure 1 Remove all peripherals from the Vivid q N portable ultrasound scanner 2 Working from the front of the SafeLock Cart and underneath the probe shelf assembly loosen and remove the two lower screws highlighted that secure the shelf in position Figure 8 107 below 3 While supporting the shelf with one hand loosen and remove the two upp...

Страница 599: ...return and fasten the two upper screws previously removed 3 Return and fasten the two lower screws one on either side making sure that the shelf is firmly secured in position 4 Place the required peripheral on the probe shelf assembly 5 Re connect all peripherals to the Vivid q N portable ultrasound scanner 6 Proceed to perform the following functionality tests SafeLock Cart Grounding Continuity o...

Страница 600: ...ble Hook Removal Procedure 1 From below the Probe Shelf remove the Probe Cable Hook retaining screw see Figure 8 109 on page 8 94 2 Gently pull the Probe Cable Hook upwards to remove it 8 4 17 3 Probe Cable Hook Installation Procedure 1 Insert the Probe Cable Hook in its position on the Probe Shelf 2 From below return and replace the Probe Cable Hook retaining screw Figure 8 109 Probe Cable Hooks ...

Страница 601: ...N ultrasound unit as described in Chapter 3 System Setup 8 4 18 3 Front Wheel Removal Procedure 1 Disconnect mains power from the AC adapter 2 Disconnect the AC adapter and all cables and peripherals from the Vivid q N portable ultrasound scanner 3 Remove the Vivid q N and all peripherals from the SafeLock Cart 4 Carefully lay the SafeLock Cart on its back 5 Loosen and remove the four bolts that s...

Страница 602: ...reviously removed and make sure that wheel is secured firmly to the chassis 3 Stand the SafeLock Cart upright 4 Return the Vivid q N and all peripherals to their appropriate positions on the SafeLock Cart 5 Re connect the AC adapter and all cables and peripherals to the Vivid q N portable ultrasound scanner 6 Re connect mains power to the AC adapter 7 Proceed to perform the following functionality...

Страница 603: ...emoval Procedure 1 Disconnect mains power from the AC adapter 2 Disconnect the AC adapter and all cables and peripherals from the Vivid q N portable ultrasound scanner 3 Remove the Vivid q N and all peripherals from the SafeLock Cart 4 Carefully lay the SafeLock Cart on its side 5 Loosen and remove the four bolts that secure the rear wheel to the SafeLock Cart chassis see Figure 8 111 6 Remove the...

Страница 604: ...removed see Figure 8 111 and make sure that wheel is secured firmly to the chassis 3 Stand the SafeLock Cart upright 4 Return the Vivid q N and all peripherals to their appropriate positions on the SafeLock Cart 5 Re connect the AC adapter and all cables and peripherals to the Vivid q N portable ultrasound scanner 6 Re connect mains power to the AC adapter 7 Proceed to perform the following functi...

Страница 605: ... commencing software installation or whenever upgrading the software Normally the Vivid q N system is supplied from the manufacturer with the software already installed In some cases it is necessary to re install the software Refer to the following sub sections as appropriate 8 5 1 1 Vivid q N Software Upgrade Overview 8 100 8 5 1 2 Vivid q N Software Upgrade Installation Reinstallation Procedure ...

Страница 606: ...cialist visit is recommended Until an Application Specialist has visited the site it is recommended that only the factory default presets be used NOTE After performing an upgrade all logs are deleted It is recommended that these should be recorded should they be needed in the future NOTICE Before performing a Vivid q N Software Upgrade from Version BT11 to BT12 it is mandatory to backup the Archiv...

Страница 607: ...resent Wireless network settings if present Trackball speed InSite ExC settings 4 Modify the BIOS settings as described below in Modifying BIOS Settings prior to Software Installation 5 Proceed to perform the Formatting and Partitioning the Hard Disk Automatic Procedure BT 12 on page 8 124 6 When done continue to Table 8 6 on page 8 103 and follow the Vivid q N Software Upgrade Installation Reinst...

Страница 608: ...w listed in Boot priority order as shown below promote it to the second position in the list by selecting it then while pressing and holding Shift repeatedly pressing the button until USB HDD is in the number 2 position Figure 8 112 4 Click the Exit menu and select Exit Saving Changes 5 When prompted click Yes to confirm and exit 6 Return to step 5 on page 8 101 to complete the Preparation procedu...

Страница 609: ... the rear panel and make sure the LED is blinking Table 8 6 Step by Step Vivid q N Software Upgrade Installation Reinstallation Procedure Step Instruction Expected Result 1 Perform a complete shutdown of the system 2 Remove the battery and remove all peripherals currently connected to the system Make sure no peripherals are connected to the USB connectors including the DVD and the PCMCIA 3 Insert ...

Страница 610: ...ile loading commences While in progress the following screen is displayed When complete after approximately 10 minutes the following message is displayed prompting you to select the required option 7 Select the following option Full Clean Install System Application Documentation then press Enter The following Warning message is displayed 8 Press Yes to continue The following message is displayed p...

Страница 611: ...th the option selected in this step The message window closes the process of copying files from the Flash Drive to the system repository commences This requires approximately 2 minutes during which time a series of screens are displayed including the following User documentation files User Manual in all languages are then copied Table 8 6 Step by Step Vivid q N Software Upgrade Installation Reinst...

Страница 612: ...d the following options are displayed 10 Select the following option Reboot Machine then press Enter The following Warning message is displayed 11 Press Yes to continue The following message is displayed Table 8 6 Step by Step Vivid q N Software Upgrade Installation Reinstallation Procedure Step Instruction Expected Result ...

Страница 613: ...ystem e g DVD drive c Press OK to continue The system reboots and then begins the software installation process This stage of the process takes approximately 20 minutes during which time a progress indicator is displayed as shown in the example below A series of progress bars blank and additional screens are displayed shown in these examples Table 8 6 Step by Step Vivid q N Software Upgrade Instal...

Страница 614: ... N SERVICE MANUAL 8 108 Section 8 5 Software Loading The system automatically reboots then displays the following screens Table 8 6 Step by Step Vivid q N Software Upgrade Installation Reinstallation Procedure Step Instruction Expected Result ...

Страница 615: ...on is complete it is still in progress The system performs a number of reboots before completing the installation During the installation procedure various screens will be displayed DO NOT ATTEMPT TO STOP THE INSTALLATION BEFORE COMPLETION At the end of the software installation the Software License dialog box appears Table 8 6 Step by Step Vivid q N Software Upgrade Installation Reinstallation Pr...

Страница 616: ...sadm Click Logon The normal scanning screen is displayed 17 To verify the software version press Config and click About at the bottom of the screen Select the System Version tab The About screen opens and from the System Version tab the installed software version is displayed on the screen 18 Verify that the software version corresponds with the System SW version you have installed check against t...

Страница 617: ...Configuration and then de select GSP Resources 20 Install peripherals 21 Restore the settings Verify proper Connectivity functionality refer to Connectivity Setup on page 3 85 22 Proceed to perform the following functionality tests Software Configuration Checks on page 4 39 Calibration Tests on page 7 25 Full System Test on page 7 10 Table 8 6 Step by Step Vivid q N Software Upgrade Installation R...

Страница 618: ...m a complete shutdown of the system 2 Remove the battery and remove all external devices peripherals currently connected to the system 3 Insert the USB Flash Drive containing the full software version and supporting documentation into a USB port on the rear Panel 4 On the console hold down the ON OFF button for three seconds The system powers ON and when system boot up from the USB Flash Drive is ...

Страница 619: ...n press Enter The following message is displayed 8 IMPORTANT Perform these steps before proceeding a Remove the USB Flash Drive from the USB port on the rear panel b Check that no other media is connected to the system e g DVD drive c Press OK to continue The system reboots into normal scanning mode 9 Verify the User Manual version corresponds with the version you have installed check against the ...

Страница 620: ...hile booting press F2 Config Diag on alphanumeric keyboard 2 Type the password marlin04 3 Exit and save presets 4 Select Exit section and load Setup Defaults 5 Select Main section 6 Set correct System Time and System Date Set Date using next format MM DD YYYY 7 Check that IDE Primary Master is detected 8 Proceed to Setting the BIOS Advanced Parameters on page 8 115 Figure 8 114 BIOS Main Tab ...

Страница 621: ...enu and press Enter Advanced Chipset Control is highlighted BIOS Parameter Corresponding Figure Chipset Control Figure 8 116 on page 8 116 PCI PNP Configuration Figure 8 117 on page 8 116 Memory Cache Figure 8 119 on page 8 117 I O Device Configuration Figure 8 119 on page 8 117 Keyboard Features Figure 8 120 on page 8 118 Hardware Monitor Figure 8 121 on page 8 118 Watchdog Settings Figure 8 122 ...

Страница 622: ...e 8 116 4 Press Esc to return to the Advanced menu home screen Figure 8 115 5 Scroll to PCI PNP Configuration and press Enter to open the PCI PNP Configuration screen 6 Set the parameters in the PCI PNP Configuration screen as shown above in Figure 8 117 7 Press Esc to return to the Advanced menu home screen Figure 8 115 Figure 8 116 BIOS Advanced Chipset Control Parameters Figure 8 117 BIOS Advan...

Страница 623: ... screen as shown above in Figure 8 118 10 Press Esc to return to the Advanced menu home screen Figure 8 115 11 Scroll to I O Device Configuration and press Enter to open the I O Device Configuration screen 12 Set the parameters in the I O Device Configuration screen as shown above in Figure 8 119 Figure 8 118 BIOS Advanced Memory Cache Parameters Figure 8 119 BIOS Advanced I O Device Configuration...

Страница 624: ...s screen 15 Set the parameters in the Keyboard Features screen as shown above in Figure 8 120 16 Press Esc to return to the Advanced menu home screen Figure 8 115 17 Scroll to Hardware Monitor and press Enter to open the Hardware Monitor screen 18 Set the parameters in the Hardware Monitor screen as shown above in Figure 8 121 Figure 8 120 BIOS Advanced Keyboard Features Parameters Figure 8 121 BI...

Страница 625: ...chdog Settings screen 21 Set the parameters in the Watchdog Settings as shown above in Figure 8 122 22 Press Esc to return to the Advanced menu home screen Figure 8 115 23 Scroll to Display Control and press Enter to open the Display Control screen 24 Set the parameters in the Display Control screen as shown above in Figure 8 123 Figure 8 122 BIOS Advanced Watchdog Settings Figure 8 123 BIOS Advan...

Страница 626: ...turn to the Advanced menu home screen Figure 8 115 26 Scroll to Miscellaneous and press Enter to open the Miscellaneous screen 27 Set the parameters in the Miscellaneous screen as shown above in Figure 8 124 28 Proceed to Additional BIOS Settings on page 8 121 Figure 8 124 BIOS Advanced Miscellaneous Parameters ...

Страница 627: ...his section 1 From the BIOS main menu see Figure 8 114 select the Advanced menu and press Enter 2 Select the Security menu and press Enter 3 Set the parameters in the Security screen as shown above in Figure 8 125 4 Press Esc to return to the main BIOS screen Figure 8 114 on page 8 114 BIOS Parameter Corresponding Figure Security Figure 8 125 on page 8 121 Power Figure 8 126 on page 8 122 Boot Fig...

Страница 628: ...een as shown above in Figure 8 126 7 Press Esc to return to the main BIOS screen Figure 8 114 on page 8 114 8 Select the Boot menu and press Enter 9 Set the parameters in the Boot parameters screen as shown above in Figure 8 127 10 Press Esc to return to the main BIOS screen Figure 8 114 on page 8 114 Figure 8 126 BIOS Power Parameters Figure 8 127 BIOS Boot Parameters ...

Страница 629: ...xit Saving Changes as shown in Figure 8 128 12 Reboot the system and check that the Supervisor PASSWORD was installed properly 13 Proceed to perform the following functionality tests Software Configuration Checks on page 4 39 Calibration Tests on page 7 25 Full System Test on page 7 10 Figure 8 128 BIOS Exit Screen ...

Страница 630: ... supporting documentation P N 5455533 into one of the USB ports on the rear panel 4 On the console hold down the ON OFF button for three seconds The system powers ON and when system boot up from the USB Flash Drive is complete the following message is displayed prompting you to select the required option 5 Select the following option Format Hard Disk then press Enter A short series of screens disp...

Страница 631: ...ogress is displayed on the screen When Hard Disk formatting is complete the system automatically reboots The following options are now displayed 8 Proceed to perform the Software Installation procedure as described in Vivid q N Software Upgrade Installation Reinstallation Procedure BT11 to BT12 on page 8 103 Table 8 8 Formatting and Partitioning the Hard Disk Automatic Procedure cont d 2 of 2 Step...

Страница 632: ...reen only appears after the first boot up of the system 4 Insert media e g CD DVD or connect to a network repository 5 Click the Admin tab at the bottom of the screen 6 Click the Disk Management tab at the top of the screen see Figure 8 130 NOTICE IMPORTANT Contact the customer and request that a full incremental back up be performed prior to upgrade If necessary refer them to the Vivid q N User M...

Страница 633: ...r Operation select Copy see Figure 8 131 8 Under Destination Device see Figure 8 130 select the required media device 9 Click Start and follow the on screen wizard instructions The system stores the images 8 6 1 3 Running the Export Procedure 1 Insert the required storage media into the system Figure 8 131 Copy Images for Export ...

Страница 634: ... 132 3 From the screen select the Patients List The Search Create Patient screen is displayed see Figure 8 133 Figure 8 133 Search Create Patient Screen 4 Click the Export soft key at the bottom of the screen see Figure 8 134 NOTE If the Export button is not displayed click More consecutively until the Export button is displayed Figure 8 134 Export and More Soft Keys Figure 8 132 Patient Menu ...

Страница 635: ...is displayed to indicate that only the database is exported to the target media 5 Click OK The Export screen opens see Figure 8 136 6 From the Export screen select the required destination media Figure 8 136 and click OK The Export Patient List screen opens Figure 8 137 Figure 8 135 Database Export Warning Figure 8 136 Export Screen ...

Страница 636: ...tion 8 6 Performing a Complete System Back up Figure 8 137 Export Patient Archive 7 Click the soft keys at the bottom of the screen consecutively in the following order as the system processes the actions Select All Copy and Done see Figure 8 138 Figure 8 138 Soft Keys ...

Страница 637: ...e screen see Figure 8 139 NOTE If the Import button is not displayed click More consecutively until the Import button is displayed NOTE A warning is displayed Figure 8 141 to indicate that only the database is imported to the target device Figure 8 140 Database Export Import Warning 5 Click OK The Import screen appears see Figure 8 141 6 Under From in the Import screen select the required media so...

Страница 638: ...er as the system processes the actions see Figure 8 142 NOTE Wait while the system processes each action before pressing the next soft key 8 Press Alt E to eject the CD 9 Press 2D on the keyboard to return to the default scanner screen 8 6 2 How to Restore User defined Presets For details refer to Archiving and Loading Presets on page 4 16 Figure 8 142 Select All Copy and Done Buttons ...

Страница 639: ...n Figure 8 143 below 8 7 1 Connecting and Removing Peripherals For detailed instructions on connecting peripherals to the Vivid q N portable ultrasound scanner refer to the following procedure as appropriate USB Global Modem on page 3 34 Wireless USB Network Adaptor on page 3 35 DVD CD RW Drive on page 3 36 MOD Drive on page 3 43 External USB Hard Disk on page 3 44 For detailed installation and re...

Страница 640: ... peripherals perform the following functionality tests SafeLock Cart Grounding Continuity on page 10 22 only if the Vivid q N system is currently mounted on the SafeLock cart SafeLock Cart Chassis Current Leakage Test on page 10 24 NOTE For details on connecting and configuring printers refer to Connecting Printers on page 3 21 ...

Страница 641: ...2 4 External USB Hard Disk Removal Procedure NOTE Ensure that there is no activity on the drive before you turn it off If power is turned off while files are being written to the drive the files will be corrupted 1 Switch OFF the power to the unit The power switch is located at the rear of the unit see Figure 8 145 on page 8 136 2 Disconnect the AC Power cable connected between the power supply an...

Страница 642: ...sk is configured as a mirrored volume RAID 1 This ensures optimal data integrity and immediate access to the data even if one disk fails 4 Verify that both MODE switches are set to the ON position as illustrated Figure 8 145 External USB Hard Disk Rear View and Cables WARNING WARNING IN THE EVENT THAT THE AC DC POWER CONVERTER AND CABLES HAVE BEEN SUPPLIED WITH THE POWER IN CABLE PART 066E0661 COL...

Страница 643: ... Hard Disk to a laptop or PC 2 Power up the External USB Hard Disk 3 Under My Computer after a while the disk will show as a new drive named Removable Disk refer to Figure 8 147 on page 8 138 It will be allocated the next available drive letter CAUTION CHANGING THE VOLUME CONFIGURATION WILL ERASE ALL EXISTING DATA IF THE DRIVE CONTAINS FILES YOU WANT TO SAVE MOVE THEM TO ANOTHER DRIVE BEFORE CHANG...

Страница 644: ...ion 8 7 Peripherals Figure 8 147 Removable Disk Shown under My Computer 4 Right click the drive name Removable Disk and select Rename from the menu Figure 8 148 Select Rename from the Drop down Menu 5 Enter the name you have decided to use for the drive Removable Disk F ...

Страница 645: ...rive in the future 8 Use the Safely Remove Hardware tool in the Task Bar before continuing with the next step 9 Disconnect the USB cable from the laptop or PC 8 7 2 7 Connecting the External USB Hard Disk to the Vivid q N Scanner 1 Connect the USB cable to a USB port on the Vivid q N scanner 2 Turn ON power to the Vivid q N ultrasound scanner 3 Under My Computer refer to Figure 8 147 on page 8 138...

Страница 646: ...GE DIRECTION FQ091019 REVISION 2 VIVID Q N SERVICE MANUAL 8 140 Section 8 7 Peripherals This page left blank to facilitate double sided printing ...

Страница 647: ...iew of replacement parts for the Vivid q N Table 9 1 Contents in Chapter 9 Section Description Page Number 9 1 Overview 9 1 9 2 List of Abbreviations 9 2 9 3 Mechanical Hardware Parts 9 3 9 4 Electronic Parts 9 4 9 5 Cables 9 6 9 6 Software 9 7 9 7 Probes 9 8 9 8 Peripherals 9 10 9 9 SafeLock Cart Parts 9 11 9 10 Optional Modo Cart 9 13 9 11 Spare Part Kits 9 14 9 12 Product Manuals 9 18 ...

Страница 648: ...breviations Assy Assembly BEP Back End Processor Ctrl Control FEP Front End Processor FRU 1 Replacement part available in parts hub FRU 2 Replacement part available from the manufacturer lead time involved LCD Liquid Crystal Display Int Internal I O Input Output PWA Printed Wire Assembly Recv Receive XFRMR Transformer ...

Страница 649: ...ardware Parts ITEM PART NAME PART NUMBER DESCRIPTION QTY FRU 1 KEYCAP KIT VIVID q N BT11 S2423463 BT 11 and higher 1 Y 2 Internal Battery Pack 5423275 Replaces 2378963 2 S2423267 FL200027 and FL200068 1 Y 3 Vivid q cover kit S2423362 1 Y 4 BOTTOM BASIC ASSY RSPL Kit 5393630 For Vivid q N 1 Y 5 HANDLE BLACK VIVID I BT09 S2423363 For Vivid q N 1 Y ...

Страница 650: ...RIPTION QTY FRU 1 Vivid q IR KB RSPL Kit 5503081 1 Y 2 Vq Operator Panel w o ECG Keyboard Assy 5376323 1 Y 3 Trackball S2423360 BT 09 1 Y 4 Backend assy S2424596 SATA BEP SERVICE KIT BT 06 and BT 09 Replaces R2380485 1 Y 5 DC DC POWER SUPPLY V4 ASSEMBLY R2403248 4 1 Y 6 AC adaptor wo cable S2422706 BT 06 and BT 09 1 Y 7 Hard Disk Module 2376515 2 BT 06 and BT 09 Excludes software 1 Y ...

Страница 651: ...d q R2423283 1 Y 11 ECG Module Assy N5448727 For Vivid q N Replaces NR2421861 1 Y 12 TR32 v12 Board N5444671 For Vivid q N Replaces NS2423369 1 Y 13 Probe and MUX Assy N5452376 For Vivid q N Replaces N5420885 1 Y 14 RFI Board N2418295 2 For Vivid q N 1 Y 15 Hard Disk Duplication Jig 2414958 2 BT 06 and BT 09 1 Y Table 9 3 Electronic parts cont d 2 of 2 ITEM PART NAME PART NUMBER DESCRIPTION QTY FR...

Страница 652: ...09727 BT 06 and BT 09 1 Y 2 LEAD WIRE KIT EUROPE YELLOW RED GREEN S2424558 For Vivid q N 1 Y 3 Cable ECG Cable Europe 2418832 2 BT 06 and BT 09 Replaces FL200039 1 Y 4 Cable External ECG 2413451 BT 06 and BT 09 Replaces FL200054 1 Y 5 Cable Vi Power Cable Continental Europe 2 5A 250V 2412094 2 BT 06 and BT 09 1 Y 6 RFI TO BB V2 FLEX VI Q R2361860 2 RFI TO BASE BOARD FLEX V2 1 Y 7 Cable and Flex ki...

Страница 653: ... REVISION 2 VIVID Q N SERVICE MANUAL Chapter 9 Renewal Parts 9 7 Section 9 6 Software Table 9 5 Software ITEM PART NAME PART NUMBER DESCRIPTION QTY FRU 1 SW and Doc disk on key BT12 N5444462 Software for Vivid q N BT 12 1 Y ...

Страница 654: ...S 2377059 H4000PE 1 Y 11 Probe 10S RS 2377040 H4000PF 1 Y 12 Probe M4S RS H40452LH 1 5 3 6 MHz 1 Y 13 Probe 9L RS H40442LL 4 0 13 0 MHz 1 Y 14 Probe 6T RS KN100093 H45531MZ Must have TEE Probe Interface Module H45021D 1 Y 15 Probe 6Tc RS KN100104 H45551ZE 2 9 MHz to 8 0 MHz 1 Y 16 Probe 9T RS KN100073 H45531YM Must have TEE Probe Interface Module H45021D 1 Y 17 Probe P2D RS 2411689 H45021C 1 Y 18 ...

Страница 655: ...Y 29 TEE Clip On Bite Guard Adult H45511EE 1 Y 30 TEE Clip On Bite Guard Adult OR H45521CB 1 Y 31 TEE Conventional Bite Guard Pediatric H45521JG 1 Y 32 TEE Conventional Bite Guard Adult H45521JH 1 Y 33 Adult TEE Scanhead Protection Cover H45521CK 1 Y 34 Pediatric TEE Scanhead Protection Cover H45541RN 1 Y Table 9 6 Probes cont d 2 of 2 ITEM PART NAME PART NUMBER DESCRIPTION QTY FRU ...

Страница 656: ...S MD30000E PAL S VHS 066E9513 1 Y 7 Video Scan Converter H45531XE 2412280 1 Y 8 Modem USB 5114058 1 Y 9 USB Flash Card 1GB R2422220 1 Y 10 USB Flash Card 512MB H45531XG 2411544 1 Y 11 NetGear PCIMCIA Network Card 2417006 1 Y 12 VGA adaptor 2420728 1 Y 13 DVD RW Samsung T084M RSBN S2423870 Replaces 2421141 2 and 2417993 2 Supplied without power supply Either use the one already installed on the sys...

Страница 657: ...Cart Parts 1 of 2 ITEM PART NAME PART NUMBER DESCRIPTION QTY FRU 1 AC Distribution Assy 220V 240V S2423305 1 Y 2 Handrest S2423250 1 Y 3 Lower Shelf Package assy S2422977 1 Y 4 Main Column S2422975 1 Y 5 Top Shelf Kit S2422974 1 Y 6 Probe Shelf Assy Kit S2422972 1 Y 7 Gas Spring S2423307 1 Y 8 Lower Shelf Rear Cover Cart Kit S2422976 1 Y ...

Страница 658: ...id i Cart Gel Holder Cup S2422982 1 Y 13 Probe Cable Hooks S2422983 1 Y 14 AC Cable Hook S2422984 1 Y 15 Pencil Probe Holder Kit S2422985 1 Y 16 Pheripherals Power Out Cable S2422986 1 Y 17 Vi Cart Screw Kit S2423344 1 Y 18 USB Network Cables Kit S2423489 1 Y 19 5V Med Grade AC Adapter PSE Kit S2423131 1 Y Table 9 8 SafeLock Cart Parts cont d 2 of 2 ITEM PART NAME PART NUMBER DESCRIPTION QTY FRU ...

Страница 659: ...er peripherals shelves hand rest and handles Y 2 Cable Clip M Cart KTZ220885 BT 06 and BT 09 Cable Clip M Cart 2 Y 3 Isolation Transformer M Cart KTZ220714 BT 06 and BT 09 Isolation Transformer Power Supply IMED300WR M Cart 1 Y 4 Probe Holder Kit M Cart 5183958 BT 06 and BT 09 Probe Holder Kit M Cart 1 Y 5 Front and Rear Wheels M Cart KTZ220887 BT 06 and BT 09 Front and Rear Wheels M Cart 2 Y 6 Fu...

Страница 660: ...Vi_q SATA BEP SERVICE KIT TR32 Board 1 Y 1 Spare Part Kit 1 for Vivid i n BT06 FL200087 BT 06 1 Y 2 Spare Part Kit 2 FL200115 BT 09 This kit includes Vi_q SATA BEP SERVICE KIT RFI Board 1 Y 3 Spare Part Kit 2 FL200088 BT 06 1 Y 4 RFI BOARD V2 NATURAL N2418295 2 1 Y 5 PROBE AND MUX ASSY NATURAL N5393629 1 Y 6 TR32 V12 Board RSPL Kit Norway N5444671 1 Y 7 FRONTEND ASSY Vivid i q NATURAL N2375187 2 I...

Страница 661: ...ID I R2376696 1 Y 10 ECG BOARD V3 Vivid i q N Natural N2419020 1 Y 11 Spare Part Kit 3 OBSOLETE This kit includes Keyboard assy FL200059 Fans and Speakers Kit FL200040 Cable and Flex kit FL200037 ECG Module Assy w Cables FL200036 1 N 12 Spare Part Kit 3 FL200089 BT 06 Table 9 10 Spare part kits cont d 2 of 4 ITEM PART NAME PART NUMBER DESCRIPTION QTY FRU ...

Страница 662: ...ncludes Doc CD FL200028 SW CD FL200103 SW ver 1 36 19 Appl SW 6 1 0 build 122 FL200107 Application SW Patch for Vivid q N 1 Y 17 VI COVER KIT BT09 S2423361 This kit includes BOTTOM BASIC ASSY VIVID I CARTON PIZA 40X32X5 CM DISPLAY RIGHT LATCH ASSY DISPLAY LEFT LATCH ASSY REAR DISPLAY COVER VIVID I DISPLAY FRONT FRAME ASSY VIVID I EXTERNAL GE LOGO LABEL IN GRAY DISPLAY SCREW CAP MAGNET PERMANENT 4X...

Страница 663: ...IVID I DISPLAY RIGHT LATCH ASSY VIVID I DISPLAY LEFT LATCH ASSY VIVID I REAR DISPLAY COVER VIVID I DISPLAY FRONT FRAME ASSY DISPLAY SCREW CAP VIVID I MAGNET PERMANENT 4X20MM DISPLAY FLEX COVER VIVID I INTERNAL BATTERY DUMMY CASE ASSY HARD DISK PANEL VIVID IBT 06 1 Y Table 9 10 Spare part kits cont d 4 of 4 ITEM PART NAME PART NUMBER DESCRIPTION QTY FRU ...

Страница 664: ... i n Vivid q N Unpacking Packing Procedure FL094023 1 N 3 BT 12 Vivid q N User manual English FQ092023 1 N 4 BT 12 Vivid q N User manual French FQ092024 1 N 5 BT 12 Vivid q N User manual Indonesian FQ092025 6 BT 12 Vivid q N User manual Russian FQ092026 7 BT 12 Vivid q N User manual Turkish FQ092006 1 N 8 BT 12 Vivid q N Reference manual English FQ092007 1 N 9 Vivid i n SafeLock Cart User manual E...

Страница 665: ...Vivid q N ultrasound scanner and its peripherals These procedures are designed to protect your investment in the system and are intended to maintain the quality of system performance After delivery and installation of the Vivid q N ultrasound unit your service representative will contact you to schedule the first of several routine service visits In addition to routine maintenance by trained Field...

Страница 666: ...MAIN CIRCUIT BREAKER BEFORE YOU REMOVE ANY PARTS BE CAUTIOUS WHENEVER POWER IS STILL ON AND COVERS ARE REMOVED CAUTION PRACTICE GOOD ESD PREVENTION WEAR AN ANTI STATIC STRAP WHEN HANDLING ELECTRONIC PARTS AND EVEN WHEN DISCONNECTING CONNECTING CABLES CAUTION Do not pull out or insert circuit boards while power is ON CAUTION Do not operate this unit unless all board covers and frame panels are secu...

Страница 667: ...ege of Radiology USA it is the customer s responsibility to have a Quality Assurance program in place for each scanner The program must be directed by a medical physicist the supervising radiologist physician or appropriate designee Routine Quality Control testing of the system must be conducted regularly The same tests are performed regularly during each period so that changes can be monitored ov...

Страница 668: ...gh levels of safety dependability and system performance Your GE Service Representative has an in depth knowledge of your Vivid q N ultrasound scanning system and can best provide competent efficient service Please contact us for details of your nearest GE Service Representative and or a quotation for services by our qualified professional FSEs The service procedures and recommended intervals show...

Страница 669: ...Also after corrective maintenance or as required by your facility s QA program Surface Probe Current Leakage Checks Also after corrective maintenance or as required by your facility s QA program Endocavity Probe Current Leakage Checks As prescribed in the Probe Manual Transesphongeal TEE Probe Current Leakage Checks As prescribed in Probe Manual Surgical Probe Current Leakage Checks As prescribed ...

Страница 670: ...asions Equipment for loose or missing hardware The keyboard for defects Brakes for defective operation DANGER TO AVOID ELECTRICAL SHOCK HAZARD DO NOT REMOVE THE PANELS OR COVERS FROM THE MACHINE THIS SERVICING MUST BE PERFORMED BY QUALIFIED SERVICE PERSONNEL ONLY FAILURE TO COMPLY COULD RESULT IN SERIOUS INJURY DANGER IF ANY DEFECTS ARE OBSERVED OR ANY SYSTEM MALFUNCTIONS OCCUR DO NOT OPERATE THE ...

Страница 671: ... ep Item Description 1 Ask Listen Ask the customer if they have any problems or questions about the equipment 2 Paperwork Note all probes and system options 3 Power up Turn the system power ON and verify that all fans and peripherals turn on Watch the displays during power up to verify that no warning or error messages are displayed 4 Probes Verify that the system properly recognizes all probes 5 ...

Страница 672: ...heck the basic system controls that affect this mode of operation 5 Applicable Software Optionsa a Some software may be considered as standard depending upon system model configuration Verify the basic operation of all optional modes such as Multi Image 3D Contrast Harmonics Cine Stress Echo etc Check the basic system controls that affect each the operation of each option 9 Probe Elements Perform ...

Страница 673: ...erify hardcopy output of the Color video page printer Clean heads and covers if necessary 4 DICOM Verify that DICOM is functioning properly Send an image to a DICOM device 5 InSite iLinq Verify that InSite is functioning properly Ensure two way remote communications Warranty Contract Customers only 7 ECG Verify basic operation with customer 8 DVD CDRW Verify that the DVD CDRW is functioning proper...

Страница 674: ...TION When performing Cleaning Procedures to prevent the risk of system damage always observe the following precautions Use only cleaning materials and solutions such as Isopropyl Alcohol IPA as recommended in the procedures described in Table 10 7 on page 10 11 Do not use any solutions or products not listed in the Vivid q N User Manual Do not spray any liquid directly onto the Vivid q N covers LC...

Страница 675: ...ies Wring out as much of the liquid as possible then wipe the LCD Display again Do not let any liquid drip into the computer Be sure to dry the LCD Display before closing the cover 3 Control Panel and Keyboard Control Panel On a weekly basis moisten a soft non abrasive folded cloth or sponge with a 70 30 mixture of isopropyl alcohol and water that does not contain impurities Do not use any solutio...

Страница 676: ...d water Never allow liquid to flow into the keyboard Use a 70 30 mixture of isopropyl alcohol and water Staff users doctors Monitor display surface Weekly In event of contamination clean immediately with a 70 30 mixture of isopropyl alcohol and water Clean with dry soft lint free cloth When contaminated with blood or other stains secretions use a 70 30 mixture of isopropyl alcohol and water Soft l...

Страница 677: ...pect the Probe Holders for cracks or damage 7 SafeLock Cart Check all four SafeLock Cart wheels and castors for wear Check the brakes on each of the two front wheels Make sure that pressing the brake locks the wheel preventing it from swivelling or rolling and therefore stopping movement of the SafeLock Cart Verify that releasing the brakes allows free movement of the SafeLock Cart Check the SafeL...

Страница 678: ... during scanning 13 Peripherals Check and clean the peripherals according to the manufacturer s directions To prevent EMI or system overheating dress the peripheral cables inside the peripheral cover 14 External I O Check all connectors for damage and verify that the labeling is good 15 Power and System Status Indicators Check for proper operation of all Power and System Status Indicators 16 Batte...

Страница 679: ... to clean the probe NOTE For detailed information on handling endocavity probes refer to the appropriate supplementary instructions for each probe WARNING WARNING Any evidence of wear on a probe indicates that it must not be used Improper handling may easily damage ultrasound probes See the Vivid q N User Manual and also refer to the probe manufacturer s handling instructions for more details Fail...

Страница 680: ...s handling instructions user manual 10 5 4 Probe Cleaning 10 5 4 1 Basic Probe Cleaning NOTE For details on general probe cleaning refer to the information provided in the Vivid q N User Manual NOTE For specific probe cleaning instructions refer to the individual probe Users Manual or care card supplied with the probe WARNING WARNING Any evidence of wear on a probe indicates that it must not be us...

Страница 681: ... instructions to disinfect the probe including concentration and soaking time 10 minutes is a typical disinfecting period 4 Follow step 3 for a much longer duration to sterilize the probe 10 hours is a typical cold chemical sterilization duration 5 When complete thoroughly rinse the washed lens in clear water Apply sterile distilled water for at least 60 seconds Air dry 6 Check the lens for cracki...

Страница 682: ...sibly clean and properly disinfected The purpose of the regulation is to protect employees in the transportation industry as well as the persons who will receive and or open the package NOTE The US Department of Transportation DOT has ruled that items that were saturated and or dripping with human blood that are now caked with dried blood or which were used or intended for use in patient care are ...

Страница 683: ... INSPECTIONS CAUTION Compare all safety test results with safety test results of previously performed safety tests e g last year etc in event of unexplainable abrupt changes of safety test results consult experienced authorized service personnel or ge for further analysis CAUTION To avoid the risk of electrical shock the unit under test must not be connected to other electrical equipment Remove al...

Страница 684: ...s enclosed in plastic parts only and therefore does not have any accessible metal parts when the scanner is not mounted on the SafeLock Cart it is not necessary to perform the following safety tests i e they apply only to the SafeLock Cart itself Chassis Current Leakage Test Grounding Continuity Test Probe Frequency for Checking Surface Once per year or in accordance with QA program Endocavitary T...

Страница 685: ...ition Open Ground Reverse Polarity Open Neutral Mains Applieda a Mains Applied is the Sink Leakage Test In this test mains supply voltage is supplied to the part or equipment to determine the amount of current that will pass sink to Ground if a patient comes into contact with the part USA 0 05 mA 0 05 mA 0 05 mA 0 05 mA N A Other 0 1 mA 0 5 mA 0 5 mA 0 5 mA 5 0 mA Table 10 15 Type CF Applied Part ...

Страница 686: ...ester can detect the condition in which the Neutral grounded supply conductor and the Grounding protective earth conductor have been reversed If later tests indicate high current leakages this should be suspected as a possible cause and the outlet wiring should be visually inspected 10 6 4 SafeLock Cart Grounding Continuity NOTE This test is applicable to the SafeLock Cart only It is not necessary...

Страница 687: ...es to the tested AC wall outlet cable side Ground pin 2 Using the other Ohmmeter probe touch the exposed metal part of the SafeLock Cart 3 Set the meter Function switch to the Resistance position 4 Measure and record the Ground wire resistance This should be less than 0 2 Ohms NOTE Since very low resistance is measured the Ohmmeter probe resistance should be subtracted from the reading NOTE Electr...

Страница 688: ...est reading of current When using the Microguard or a similar test instrument its power plug may be inserted into the wall outlet and the equipment under test be plugged into the receptacle on the panel of the meter This places the meter in the grounding conductor and the current flowing from the case to Ground will be indicated in any of the current ranges The maximum allowable limit for chassis ...

Страница 689: ...ss than the values shown in Table 10 13 Record all data Table 10 16 Typical Data Sheet for Chassis Source Current Leakage Test Unit Power Tester Polarity Switch Tester Neutral or Ground Switch Test 1 Probe Connector Test 2 Caster Wheel Test 3 CRT Test 4 Optional Test 5 Optional Enter Name of tested peripheral here ON NORM OPEN ON NORM CLOSED ON REV OPEN ON REV CLOSED OFF NORM OPEN OFF NORM CLOSED ...

Страница 690: ...uch as the lead switch should be operated to find the worst case condition NOTE Electrical leakage testing may be accomplished with any calibrated Electrical Safety Analyzer tool compliant with AAMI ESI 1993 or IEC 60601 or AS NZS 3551 CAUTION Equipment damage possibility To avoid damaging the unit never switch the polarity and the neutral status when the unit is powered ON Be sure to turn the uni...

Страница 691: ...t Lead Sink Leakage Isolation Test NOTE Refer to the procedure in the IEC 60601 1 NOTE Electrical leakage testing may be accomplished with any calibrated Electrical Safety Analyzer tool compliant with AAMI ESI 1993 or IEC 60601 or AS NZS 3551 NOTE It is not necessary to test each lead individually or power condition combinations as required in previous tests CAUTION Line voltage is applied to the ...

Страница 692: ...OUND CLOSED Patient Lead to Ground Current Leakage Test and Patient Lead to Lead Current Leakage Test 115V 10uA 10uA 220 240V 500uA 10uA Table 10 18 Maximum Allowance Limit for ECG Lead Isolation Sink Test AC Power Source Maximum Allowance Limit Patient Lead Isolation Current Test 115V 20uA 220 240V 5mA Table 10 19 Typical Data Sheet for ECG Lead to Lead Test ECG Power Tester Polarity Switch Teste...

Страница 693: ...ith the Ground OPEN and CLOSED with power line polarity Normal and Reversed and with the unit OFF and ON For each combination the probe must be active to find the worst case condition NOTE Each probe will have a certain amount of current leakage depending on its design Small variations in probe current leakages are normal from probe to probe Other variations will result from differences in line vo...

Страница 694: ...or 4 Set the meter s FUNCTION switch to EXTERNAL position 5 Connect the probe for test with the connector of the console 6 Add the saline probe and the imaging area of the probe into the saline bath 7 Turn unit power ON for the first part turn it OFF for the second half 8 Depress the ISO TEST rocker switch and record the highest current reading 9 Follow the test conditions described in Table 10 20...

Страница 695: ...r switch the Polarity and the status of Neutral Be sure to turn OFF power to the unit before switching them using the POLARITY switch and or the NEUTRAL switch Failure to comply with this warning may cause damage to the unit Table 10 20 Typical Data Sheet for Transducer Source Current Leakage Test Transducer Tested Unit Power Tester Power POLARITY Switch Tester GROUND or NEUTRAL Switch Measurement...

Страница 696: ...r NOTE Each probe will have some amount of leakage depending on its design Small variations in probe current leakages are normal from probe to probe Other variations will result from differences in line voltage and test lead placement The maximum allowable current leakage for body surface contact probes differs from that of inter cavity probes Be sure to enter the correct probe type in the appropr...

Страница 697: ......

Страница 698: ... 2013 and 2015 General Electric Company GE Vingmed Ultrasound AS P O Box 141 N 3191 HORTEN NORWAY www gehealthcare com ...

Отзывы: