Chapter 5
Working with Touch Panel
35
Please
Read Firs
t
(2) Switching between [CAMERA MENU], [VIEW MENU], and [TOOL MENU]
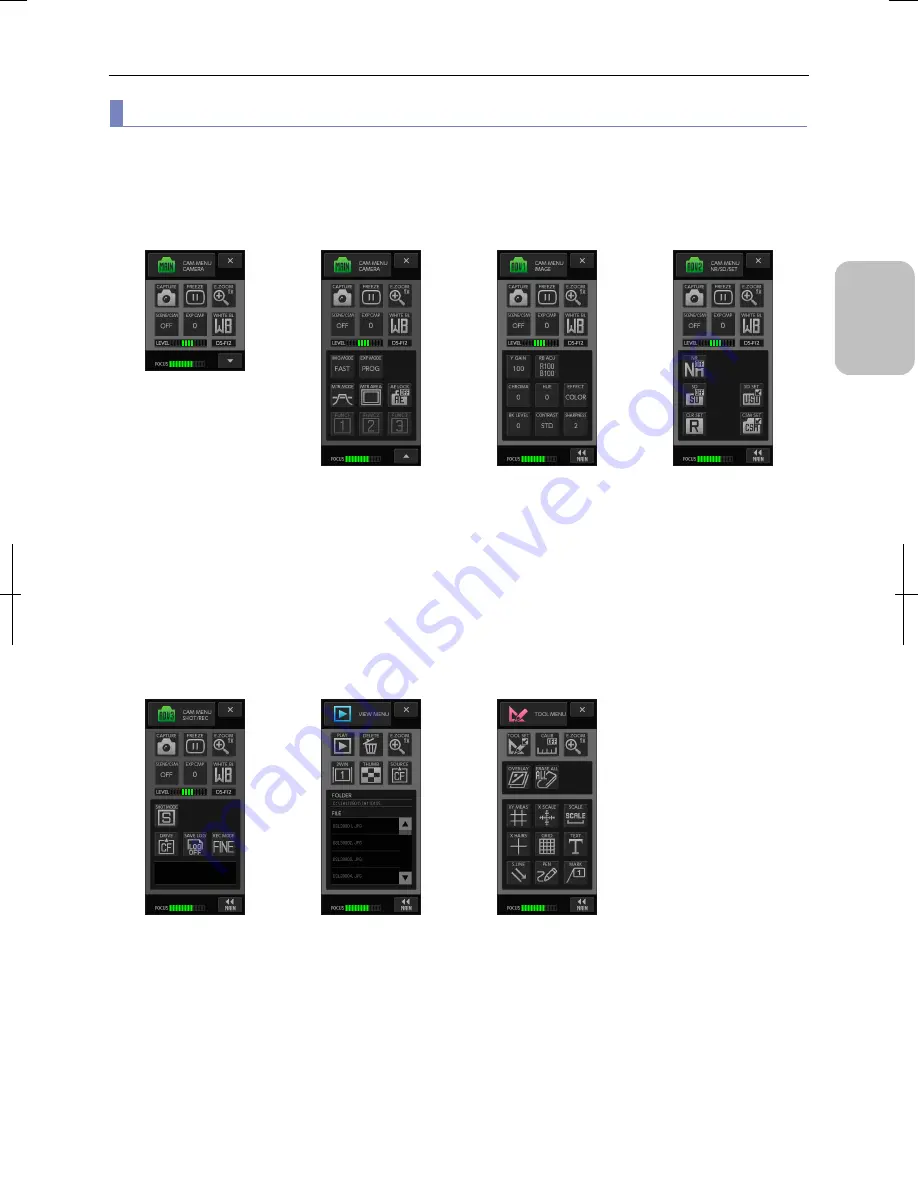
Pressing the [CAM] button on the task bar provides access to [CAMERA MENU], [VIEW MENU], and [TOOL MENU].
The following screens can be displayed by pressing the [CAMERA MENU] button and selecting a button on the pulldown
menu.
[CAMERA MENU: CAMERA]
Short screen
(basic screen)
The menu on this screen
allows you to observe and
capture images with simple
operations.
Operation buttons on this
screen are common and
displayed in any [CAMERA
MENU].
They are also displayed in the
[Camera/microscope control]
menu of the [Microscope
operation] screen.
[CAMERA MENU: CAMERA]
Long screen
(detailed screen)
This screen is displayed when
the [
▼
] button of the short
screen is pressed. The short
screen appears again when
the [
▲
] button is pressed.
This menu is for settings of
image mode, exposure mode,
and photometry mode.
You can place three favorite
buttons at the button of the
screen.
[CAMERA MENU:
IMAGE] screen
This menu is for settings of hue
and contrast of images.
The operation items in the
upper section of the screen are
the same as the [CAMERA]
screen.
[CAMERA MENU:
NR/SD/SET] screen
This menu is for registration of
the noise reduction setting,
shading setting, and custom
setting, as well as for clearing
setting values.
The operation items in the
upper section of the screen are
the same as the [CAMERA]
screen.
[CAMERA MENU:
SHOT/REC] screen
This screen is for the
configuration of the continuous
mode (consecutive capture
with interval timer) and image
recording.
The operation items in the
upper section of the screen are
the same as the [CAMERA]
screen.
[VIEW MENU] screen
Menu screen for playing back
captured images.
You can replay and delete
images, turn the two screen
mode on and off, and display
thumbnails.
[TOOL MENU] screen
Menu screen for simplified
measure on an image or
adding annotations to an
image.
Pressing the [TOOL SET]
button changes the screen to
the [TOOL SET] menu.
Summary of Contents for DS-L3
Page 2: ......


