Chapter 9
Playing Back and Deleting Image
109
Photogr
ap
hin
g and
Playi
ng Image
s
9
Playing Back and Deleting Images
— VIEW MENU —
This chapter describes how to play back shot images saved onto the recording medium and display them on the monitor.
9.1
Operating the VIEW Menu
9.1.1
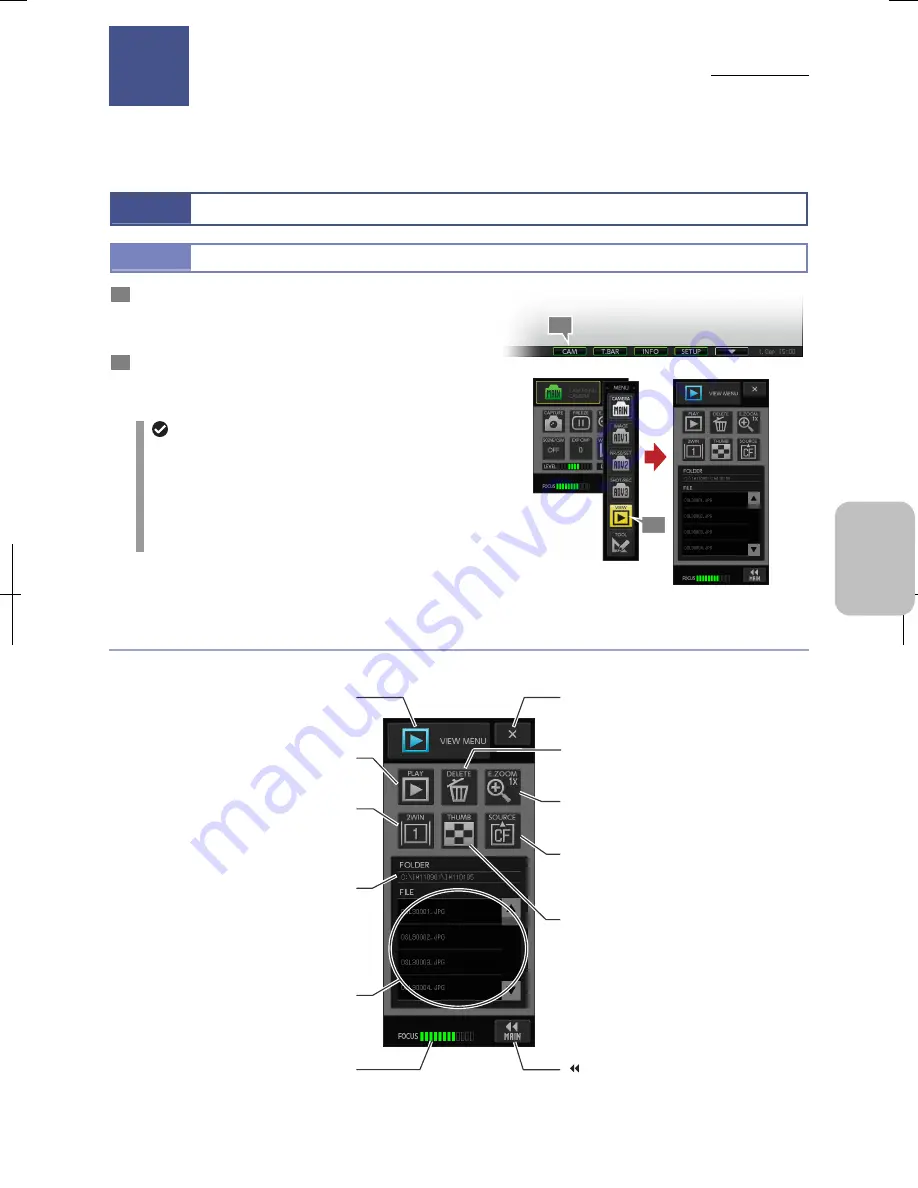
Displaying the [VIEW MENU]
1
Press the [CAM] button on the task bar.
The [CAM MENU: CAMERA] short window appears at the
upper left (or upper right) of the window.
2
Press the [MENU SELECT] button on the [CAM MENU]
and then press the [PLAY] button.
The [VIEW MENU] appears.
Menu displayed when the [CAM] button is
pressed
As you use the DS-L3, [CAMERA MENU], [VIEW
MENU], or [TOOL MENU] may be displayed when
pressing the [CAM] button on the task bar.
If [VIEW MENU] is not displayed, press the menu button
and select [VIEW] from the menu to open [VIEW MENU].
[VIEW
MENU]
Displaying the [VIEW MENU]
Items on the VIEW menu
The [VIEW MENU] includes the following display items.
[VIEW MENU] Items
Playing Back and Deleting Images
9
1
2
[MENU SELECT] button
The name of the current menu is shown. Press
this button to switch windows from the submenu.
[PLAY] button
Display the image selected from the [FILE] list
on the monitor.
[E ZOOM] button
Magnify the image being played back.
[2WIN] button
Divide the screen to right and left windows to
display both the still image and the live image at
the same time.
[X] (close) button
Close the menu.
[FOLDER] area
The path to the playback folder is indicated.
[SOURCE] button
Select a recording medium and a folder of the
image to be played back.
[FOCUS] indicator
Indicates the focus of the live image.
[DELETE] button
Delete an image selected in the [FILE] list.
[ MAIN] button
Return to the MAIN menu.
[THUMB] button
Open the [Thumbnail] window and display
images in the playback source folder. Up to nine
reduced images are displayed in the window at
a time.
[FILE] list
Image files in the playback folder are indicated.
Chapter
Summary of Contents for DS-L3
Page 2: ......


