Chapter 12
On-Screen Measurement
146
Addi
ng Ann
ota
tions
and Me
asuri
ng
12.1
Displaying Toolbar
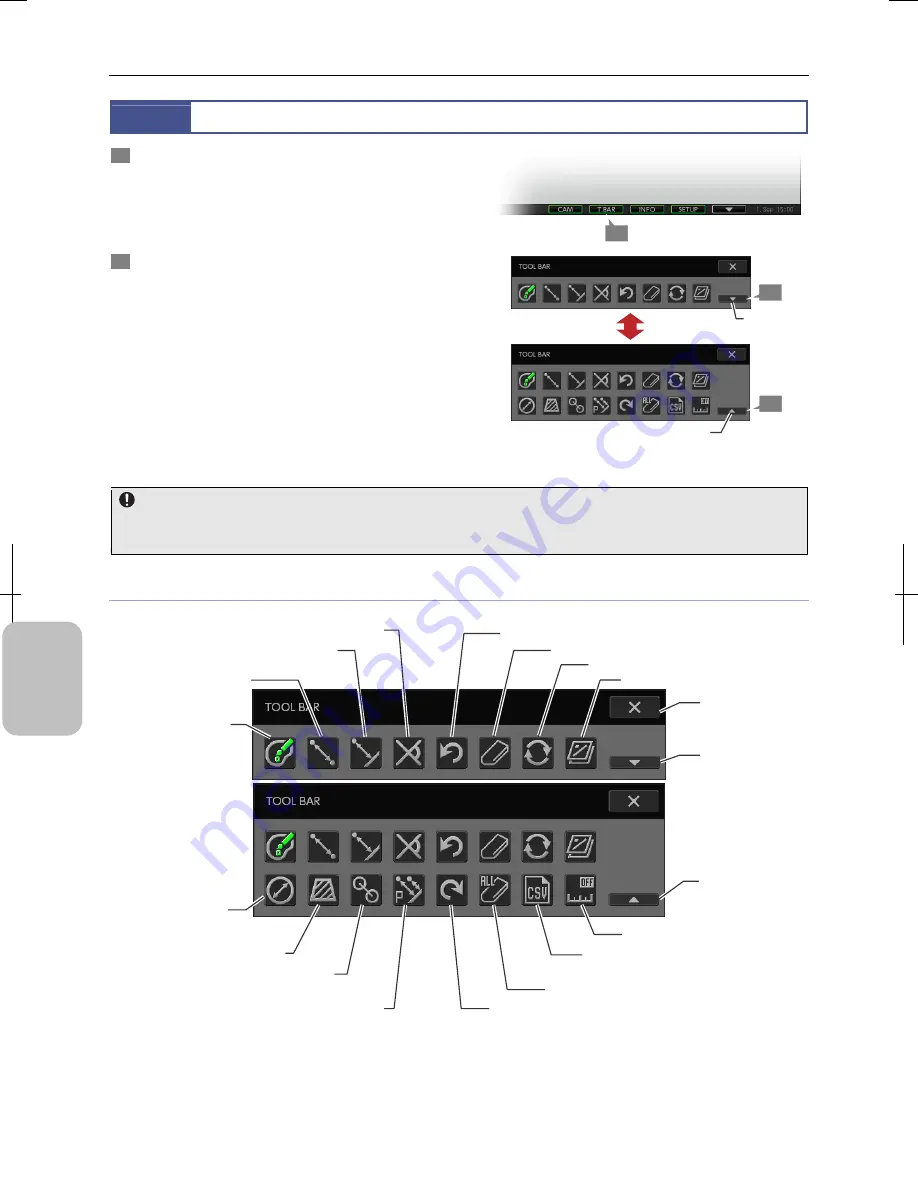
1
Press the [TOOL BAR] button on the task bar.
The toolbar appears.
If you press the [TOOL BAR] button of the task bar while the
toolbar is displayed, the location of the toolbar switches
from top to bottom or vice versa.
2
Select how much of the toolbar is displayed using the
[SHOW ALL] and [HIDE LOWER SECTION OF
TOOLBAR] buttons.
The toolbar has two rows of buttons. The buttons on the
lower row are hidden when the toolbar is opened.
Press [SHOW ALL] on the bottom right of the toolbar to
show all buttons. Pressing the [HIDE LOWER SECTION OF
TOOLBAR] button hides buttons in the lower row.
Toolbar
Image mode when the measurement function is used
When the measurement function is used while the image mode is set to [ROI-L], [ROI-S], or [C.SCAN], the image mode
automatically changes to [FULL].
Items on the Toolbar
Toolbar Items
1
2
[SHOW ALL]
button
2
[COLOR] button
[X] (Close)
button
[HIDE LOWER
SECTION OF
TOOLBAR] button
[SHOW ALL]
button
[ANGULAR MEASUREMENT] button
[CIRCULAR
MEASUREMENT]
button
[AREA MEASUREMENT] button
[DISTANCE BETWEEN
2 CIRCLE CENTERS] button
[PITCH MEASUREMENT] button
[UNDO MEASUREMENT] button
[ERASE MEASUREMENT RESULT] button
[UPDATE DISPLAY] button
[OVERLAY ON/OFF] button
[CALIBRATION] button
[SAVE MEASUREMENT RESULTS
AS CSV] button
[ERASE ALL OVERLAY INFO] button
[REDO MEASUREMENT] button
[PERPENDICULAR
MEASUREMENT] button
[2-POINT DISTANCE
MEASUREMENT]
button
[HIDE LOWER SECTION
OF TOOLBAR] button
Summary of Contents for DS-L3
Page 2: ......


