3.9 Tool Data Setting
3-36
3.9.2
Tool Calibration
"
Tool Calibration
To ensure that the manipulator can perform interpolation operations such as linear and circu-
lar interpolation correctly, accurate dimensional information on tools such as torches, tools,
and guns must be registered and the position of the tool center point must be defined. Tool
calibration is a function that enables this dimensional information to be registered easily and
accurately. When this function is used, the tool center point is automatically calculated and
registered in the tool file. What is registered in tool calibration is the coordinates of the tool
center point in the flange coordinates.
"
Teaching
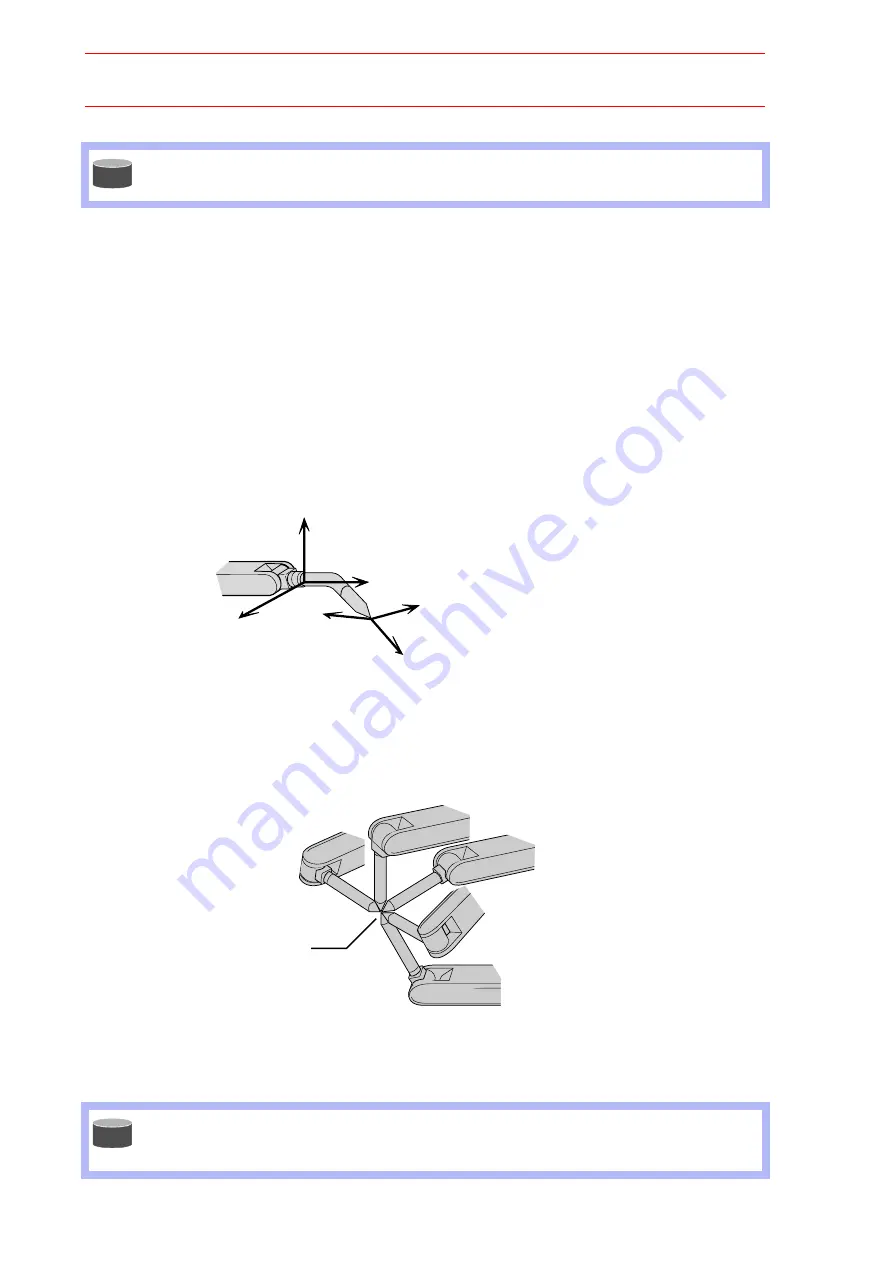
In order to perform tool calibration, five different poses (TC1 to 5) must be taught with the tool
center point as the reference point. The tool dimensions are automatically calculated on the
basis of these five points.
Each pose must be arbitrary. Accuracy may decrease when pose setting is rotated in a con-
stant direction.
For more details on the tool load information, refer to 3.11.3 “Tool Load Information Set-
ting.”
There are 24 tool files numbered 0 to 23. In a basic system with one manipulator and one
tool, the tool file for tool No.0 is used. If there is more than one tool, for example when
using a multihand, use the tool numbers in the order 0, 1, 2, etc.
S U P P L E -
M E N T
Flange
coordinates
XF
YF
ZF
XT
YT
ZT
<Flange coordinates>
XF: Vertically upward direction when the current
position on the T-axis of the manipulator is "0"
YF: Y-axis complementing XF and ZF
ZF: Direction perpendicular to the flange face
Tool
coordinates
Control
point
S U P P L E -
M E N T
Summary of Contents for SK300X
Page 2: ......
Page 4: ...SK300X Manipulator Manual XRC 2001 ii MOTOMAN NOTES...
Page 7: ...INTRODUCTION MOTOMAN 1 3 SK300X Manipulator Manual XRC 2001 NOTES...
Page 21: ...viii...
Page 25: ...xii...
Page 41: ...1 7 Notes on MOTOMAN Disposal 1 16...
Page 59: ...4 3 Connection Methods 4 12...
Page 67: ...6 1 Movement of the Axes 6 4...
Page 73: ...8 2...
Page 74: ......
Page 93: ...3 3 Location 3 6...
Page 99: ...4 2 Cable Connection 4 6...
Page 103: ...5 4 Dimensions and Working Range 5 4 Fig 10 b Dimesions and Working Range YR SK300 J1...
Page 104: ...5 4 Dimensions and Working Range 5 5 Fig 10 c Dimesions and Working Range YR SK300 J2...
Page 109: ...6 2 Wrist Flange 6 4...
Page 133: ...9 2 Notes on Maintenance Procedures 9 18...
Page 136: ...11 1 S Axis Driving Unit 11 1 11 Parts List 11 1 S Axis Driving Unit...
Page 138: ...11 2 L U Axis Driving Unit 1 11 3 11 2 L U Axis Driving Unit 1...
Page 140: ...11 3 L U Axis Driving Unit 2 11 5 11 3 L U Axis Driving Unit 2...
Page 234: ...2 8 General I O Signal Assignment 2 72...
Page 270: ...4 4 Recommended Spare Parts 4 30...
Page 285: ...xiv...
Page 286: ...Setup Diagnosis...
Page 287: ......
Page 289: ...1 2...
Page 297: ...2 1 Protection Through Security Mode Settings 2 8...
Page 395: ...3 17 File Initialize 3 98...
Page 417: ...4 2 Addition of Base and Station Axis 4 22...
Page 435: ...5 6 Position Data When Power is Turned ON OFF 5 18...
Page 436: ...Hardware...
Page 437: ......
Page 447: ...6 4 Equipment Configuration 6 10...
Page 456: ...8 8 Open Phase Check 8 8...
Page 476: ...9 4 Recommended Spare Parts 9 20...
Page 477: ...Alarm Error...
Page 478: ......
Page 523: ......
Page 524: ......
Page 525: ......
Page 526: ......
Page 527: ......
Page 528: ......
Page 529: ......
Page 530: ......
Page 531: ......
Page 532: ......
Page 533: ......
Page 534: ......
Page 535: ......
Page 536: ......
Page 537: ......
Page 538: ......
Page 539: ......
Page 540: ......
Page 541: ......
Page 542: ......
Page 543: ......
Page 544: ......
Page 545: ......
Page 546: ......
Page 547: ......
Page 548: ......
Page 549: ......
Page 550: ......
Page 551: ......
Page 552: ......
Page 553: ......


