ZEISS
Left Tool Area and Hardware Control Tools
LSM 880
134
000000-2071-464
10/2014 V_01
Calibration
The calibration markers consist of one small and a
large L-shape marker. The bigger marker is used
for coarse orientation, whereas the smaller marker
is used for the calibration.
•
Set the microscope for eyepiece observation.
•
Use a dry objective.
•
Move the microscope stage to the marker
position
1
of the specimen holder.
•
Focus on the small marker.
•
Select the
Acquire
tab and open the
Shuttle
and Find
tool in the
Acquisition Parameter
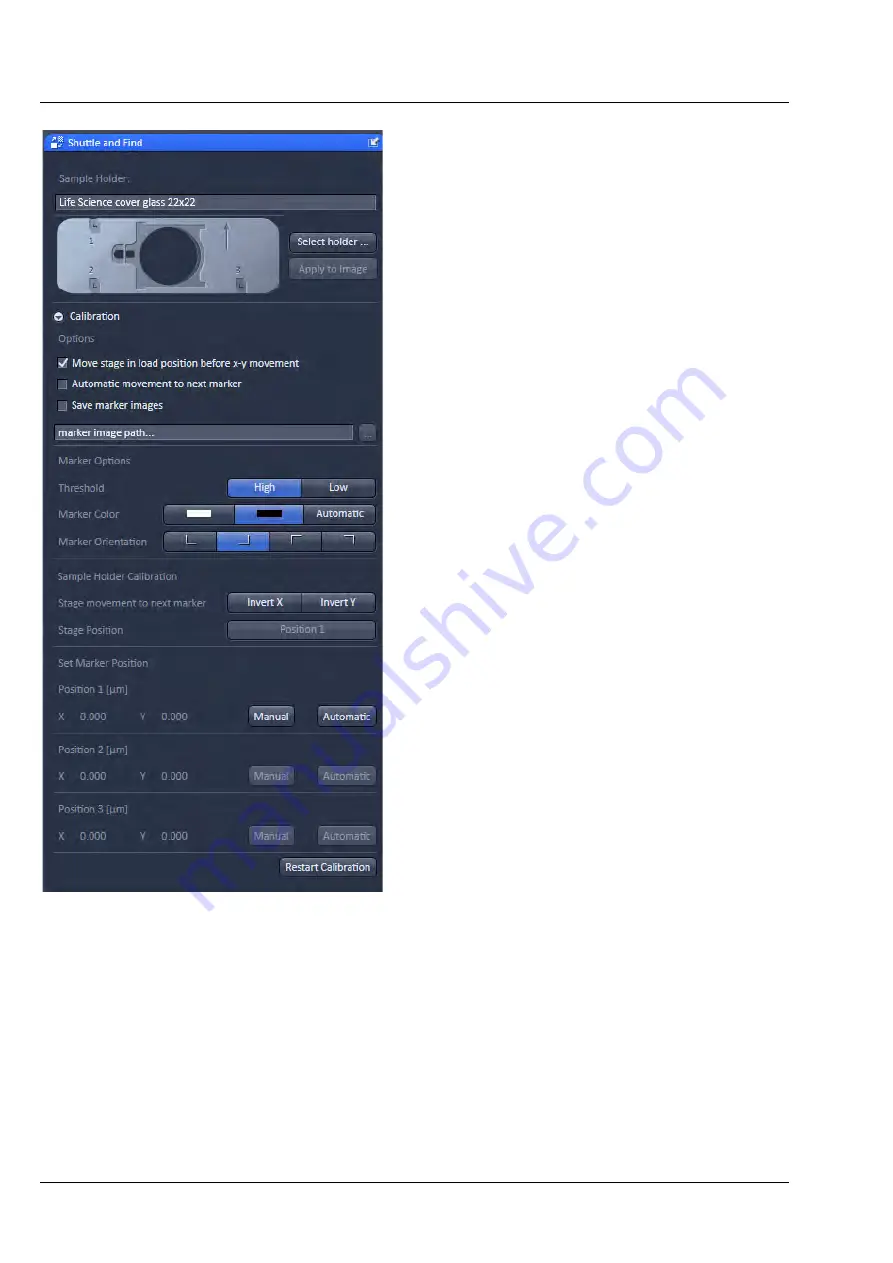
tool group (Fig. 178).
•
Select the appropriate holder type from the list
by clicking the
Select holder …
button, e.g.:
Life Science cover glass 22x22
.
The currently selected holder type is then shown in
the
Sample Holder:
panel.
Apply to Image
applies the current calibration to
an acquired image. Do not remove the sample of
the holder between image acquisition and
calibration. Use this button only, when you forgot
to calibrate the holder before you acquired the
image.
•
Choose general options for the calibration in
the
Marker Options
field:
Move stage in load position before x-y
movement
moves the stage to load position
before moving to the next correlative calibration
marker. In case of using an Axio Observer, the
objective revolver moves to load position.
Automatic movement to next marker
moves
the stage automatically to the next marker during
the calibration procedure if the position of the
correlative marker has been set manually or
confirmed (automatic marker detection). If this
checkbox is not activated, the stage has to be
moved manually to the next marker.
Save marker images
saves the marker images during the calibration. The images can be used to check
the calibration afterwards. Click on the
Select Folder (...)
button to select a storage folder.
•
Configure the beam path manually or select an appropriate configuration from the list (
Load
Acquisition Parameters
).
•
Click on the
Continuous
button to start the continuous scanning.
•
Choose the options for marker recognition within the
Marker Options
field.
Fig. 178
Shuttle and Find tool
Содержание LSM 880
Страница 1: ...LSM 880 LSM 880 NLO Operating Manual October 2014 ZEN 2 black edition...
Страница 650: ......
Страница 651: ...Confocal Laser Scanning Microscopy Stefan Wilhelm Carl Zeiss Microscopy GmbH Carl Zeiss Promenade 10 07745 Jena Germany...
Страница 678: ......
Страница 687: ......
Страница 688: ......


