Chapter 2: Rackmount, Inlet and Outlet Connections
8
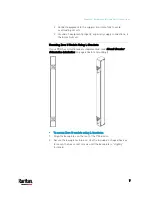
3.
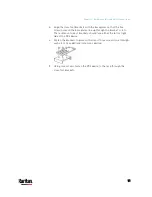
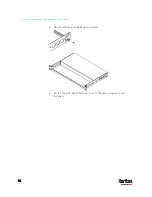
Align the L-brackets with the baseplates so that the five screw-holes
on the baseplates line up through the L-bracket's slots. The
rackmount side of brackets should face either the left or right side of
the PX3 device.
4.
Fasten the brackets in place with at least three screws (one through
each slot). Use additional screws as desired.
5.
Using rack screws, fasten the PX3 device to the rack through the
L-brackets.
Summary of Contents for PX3-3000 series
Page 5: ......
Page 18: ...Contents xviii Index 841...
Page 93: ...Chapter 4 Connecting External Equipment Optional 69...
Page 787: ...Appendix J RADIUS Configuration Illustration 763 Note If your PX3 uses PAP then select PAP...
Page 792: ...Appendix J RADIUS Configuration Illustration 768 14 The new attribute is added Click OK...
Page 793: ...Appendix J RADIUS Configuration Illustration 769 15 Click Next to continue...
Page 823: ...Appendix K Additional PX3 Information 799...


