Installation
UMSITRPDS3-1
November
2010
4-28
4.5.2 Display Orientation
As supplied the display is oriented for viewing with the transmitter installed vertically, as shown below
and by most of the illustrations in this manual. When the transmitter is installed in another orientation,
perform the following steps to reorient the display for ease of reading.
1.
Turn off power to the transmitter.
2.
Remove the enclosure cap that has the sightglass by rotating the cap counterclockwise.
3.
Fasten an anti-static wrist strap on your wrist and ground it to the transmitter ground
screw.
4.
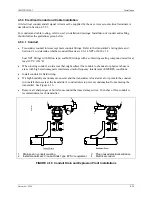
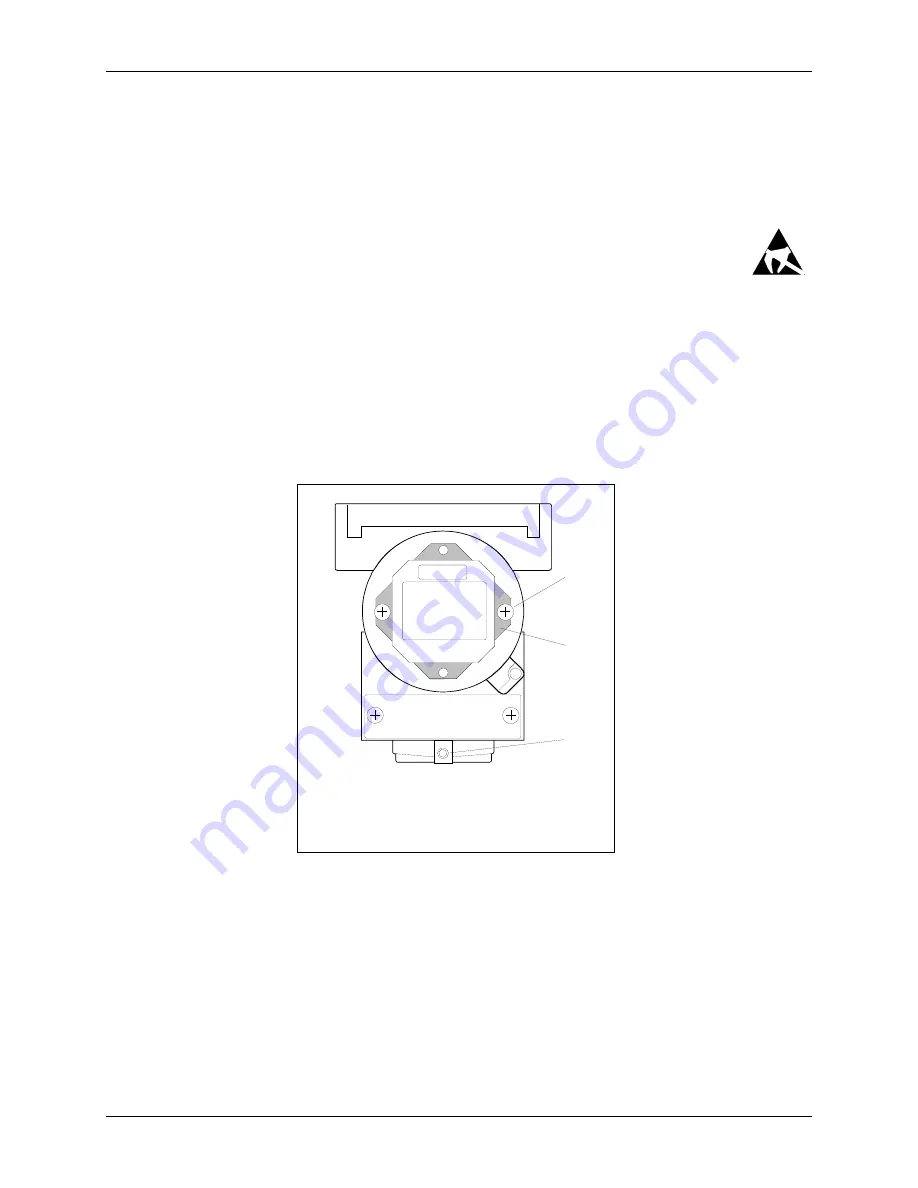
Use a Phillips blade screwdriver to remove the two screws holding the display. The display
is electrically connected to the transmitter electronics by the display cable. Refer to Figure 4-15.
5.
Hold the display just in front of the transmitter enclosure and rotate it in quarter turns to find the
viewing position where reading is easiest. Four positions, 90° apart, are provided. Do not rotate the
display more than 180° in a clockwise or counterclockwise direction.
6.
Align the two holes in the display circuit board with the hex standoffs in the enclosure and install the
two screws removed above.
7.
Install the enclosure cap and remove the anti-static wrist strap.
1
2
MG
00353a
3
1. Display Mounting Screw
2. Display Assembly
3. Enclosure Setscrew
Note: Shown with enclosure cap removed.
FIGURE 4-15 Display Removal and Repositioning
Содержание 7MF4033 series
Страница 48: ...Model 275 Universal Hart Communicator UMSITRPDS3 1 November 2010 2 26 ...
Страница 86: ...Installation UMSITRPDS3 1 November 2010 4 34 ...
Страница 152: ...Calibration and Maintenance UMSITRPSD3 1 November 2010 7 20 ...
Страница 158: ...Circuit Description UMSITRPDS3 1 November 2010 8 6 ...
Страница 197: ......
Страница 198: ......
Страница 200: ...Model Designations and Specifications UMSITRPDS3 1 November 2010 9 42 ...
Страница 204: ...Glossary UMSITRPDS3 1 November 2010 10 4 ...
Страница 208: ...Appendix A Online Configuration Map UMSITRPDS3 1 11 4 November 2010 ...
Страница 210: ...Appendix B Hazardous Area Installation UMSITRPDS3 1 12 2 November 2010 FIGURE 12 1 Control Drawing ...
Страница 211: ...UMSITRPDS3 1 Appendix B Hazardous Area Installation November 2010 12 3 FIGURE 12 2 Control Drawing ...
Страница 212: ...Appendix B Hazardous Area Installation UMSITRPDS3 1 12 4 November 2010 FIGURE 12 3 Control Drawing ...
Страница 216: ...Appendix C Elevation and Suppression Correction UMSITRPDS3 1 13 4 November 2010 ...


