Installation
UMSITRPDS3-1
November
2010
4-22
4.4 MECHANICAL INSTALLATION
This section describes the mechanical installation of a transmitter and the installation of electrical conduit
for wiring. Transmitter dimensions are given in Figures 9-1 through 9-4. Related mounting information
for optional mounting bracket kits is provided in Figures 4-11, 4-12, and 4-13. Table 1-1 correlates
measurement, model number, measuring cell, and figure number.
Mount a transmitter in any position (orientation). The mounting position can cause a zero shift, however,
any zero shift is simply calibrated out with the transmitter installed in its final mounting position. Refer to
Section 7 Calibration and Maintenance for details.
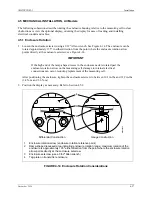
The transmitter enclosure can be rotated relative to the measuring cell to clear an obstruction or to allow
viewing the optional display. The display can then be rotated in 90° increments for ease of reading. Refer
to Section 4.5 for details.
Be sure to allow sufficient clearance for:
•
Connection to impulse piping and installation of conduit
•
Removal of the enclosure end caps
•
Wiring, cleaning, and servicing of the transmitter
•
Viewing of the optional display
•
Access to the configuration pushbuttons
4.4.1 Pipe Mounting, Differential and Gauge Construction
A differential or absolute transmitter can be mounted to a vertical or horizontal 2-inch pipe using an
optional mounting bracket kit; kit part numbers are given in Section 9.2 Accessories.
1.
Refer to the appropriate figure and determine orientation of bracket and transmitter on selected pipe.
2.
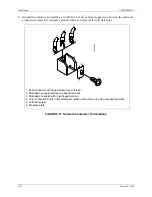
As shown in the appropriate figure, fasten the transmitter to the mounting bracket with the supplied
hardware.
•
See Figure 4-11 for Absolute Pressure Models 7MF4033 and 7MF4233, gauge construction.
•
See Figure 4-12 for Absolute Pressure Model 7MF4333, differential construction.
•
See Figure 4-12 or 4-13 for Differential Pressure Models 7MF4433 and 7MF4533.
3.
Fasten the mounting bracket to the pipe using the supplied hardware.
1.
At the selected location on the pipe and in the desired orientation, place the pipe groove side of
the mounting bracket against the desired part of the pipe surface.
2.
Slip the U-bolt around the pipe and through one of the two pairs of mounting holes in the bracket.
4.
Place a supplied washer and hex nut on each end of the U-bolt and hand tighten the nuts. Rotate the
bracket around the pipe to place the transmitter in the desired position and secure the bracket to the
pipe. Tighten mounting hardware:
•
Models 7MF4033 and 7MF4233 - 275 in/lbs (31.1 Nm)
•
Models 7MF4333, 7MF4433, and 7MF4533 - 400 in/lbs (45.2 Nm)
5.
Rotate the enclosure or reposition the optional display as necessary. Refer to Section 4.5.
Содержание 7MF4033 series
Страница 48: ...Model 275 Universal Hart Communicator UMSITRPDS3 1 November 2010 2 26 ...
Страница 86: ...Installation UMSITRPDS3 1 November 2010 4 34 ...
Страница 152: ...Calibration and Maintenance UMSITRPSD3 1 November 2010 7 20 ...
Страница 158: ...Circuit Description UMSITRPDS3 1 November 2010 8 6 ...
Страница 197: ......
Страница 198: ......
Страница 200: ...Model Designations and Specifications UMSITRPDS3 1 November 2010 9 42 ...
Страница 204: ...Glossary UMSITRPDS3 1 November 2010 10 4 ...
Страница 208: ...Appendix A Online Configuration Map UMSITRPDS3 1 11 4 November 2010 ...
Страница 210: ...Appendix B Hazardous Area Installation UMSITRPDS3 1 12 2 November 2010 FIGURE 12 1 Control Drawing ...
Страница 211: ...UMSITRPDS3 1 Appendix B Hazardous Area Installation November 2010 12 3 FIGURE 12 2 Control Drawing ...
Страница 212: ...Appendix B Hazardous Area Installation UMSITRPDS3 1 12 4 November 2010 FIGURE 12 3 Control Drawing ...
Страница 216: ...Appendix C Elevation and Suppression Correction UMSITRPDS3 1 13 4 November 2010 ...


