P/N 016-0171-493 Rev. I
219
Updating the On-board DGPS Receiver
4.
Disconnect any serial cables currently connected to the GPS out port and route the port to a serial port on a
home or office PC or laptop.
Note:
If the PC or laptop does not have a serial port, a USB to serial port adapter will be required to
proceed with the firmware update procedure.
If the GPS out port will not reach the PC or laptop serial port directly, use a straight through serial
cable to extend the port connector.
5.
From the Envizio Pro II home screen, touch the Tools Menu (blue) button and select the Source icon from
the GPS menu.
6.
On the GPS Source screen, write down the current source setting before selecting the Internal GPS
Receiver option.
7.
Touch the Accept icon to return to the main Tools Menu display.
8.
Select the Output icon from the GPS menu.
9.
On the GPS Output screen, write down the current NMEA message rates before setting all NMEA
messages to zero.
10.
Touch the Accept icon to return to the main Tools Menu display and then touch the Home icon to display the
field computer Home screen.
11.
Touch the Shutdown (red) button on the Home screen. Do not press and hold the power button to shutdown
the field computer at this time.
12.
On the PC or laptop, open the downloaded firmware update folder and locate the WinLoad application.
13.
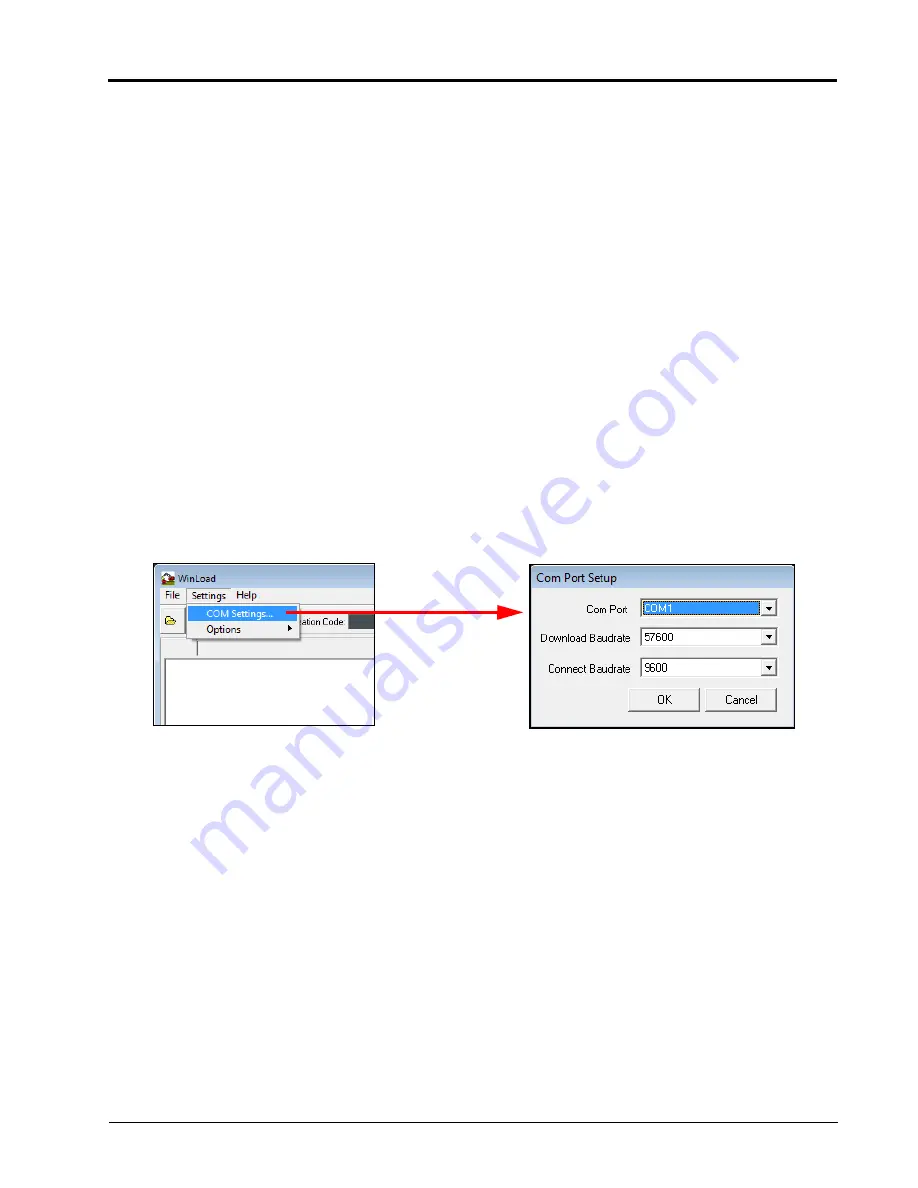
Click on the Settings option in the upper, left corner of the WinLoad window and select the COM Settings...
option.
14.
In the Com Port Setup prompt, select the com port on the PC or laptop connected to the GPS out
connector. Refer to the operating system help for assistance determining which com port is connected to
the field computer cable.
15.
Set the Download Baudrate to 57600.
16.
Set the Connect Baudrate to 9600 and click OK.
17.
Click on the File option in the upper, left corner of the WinLoad window and select the File Open... option.
Use the file browser to locate and select the update .hex file (e.g. “3902. hex”).
18.
The file information should now be displayed in the main WinLoad panel.
19.
Click the Write Flash button to the right side of the main WinLoad panel. Immediately start the next step
when the timer displays.
20.
Press and hold the Envizio Pro II power button until the unit shuts down. Press the power button to turn the
field computer back on.
Содержание Envizio Pro
Страница 3: ......
Страница 13: ...Table of Contents x Envizio Pro and Envizio Pro II Installation and Operation Manual ...
Страница 32: ...3 P N 016 0171 493 Rev I 17 Installation FIGURE 1 Envizio Pro Kit Contents Drawing Number 054 2040 004 ...
Страница 51: ...Chapter 4 36 Envizio Pro and Envizio Pro II Installation and Operation Manual ...
Страница 65: ...Chapter 5 50 Envizio Pro and Envizio Pro II Installation and Operation Manual ...
Страница 193: ...Chapter 9 178 Envizio Pro and Envizio Pro II Installation and Operation Manual ...
Страница 197: ...Chapter 10 182 Envizio Pro and Envizio Pro II Installation and Operation Manual ...
Страница 229: ...Appendix D 214 Envizio Pro and Envizio Pro II Installation and Operation Manual ...
Страница 285: ...Index 270 Envizio Pro and Envizio Pro II Installation and Operation Manual ...


