Exinda Network Orchestrator
4 Settings
|
431
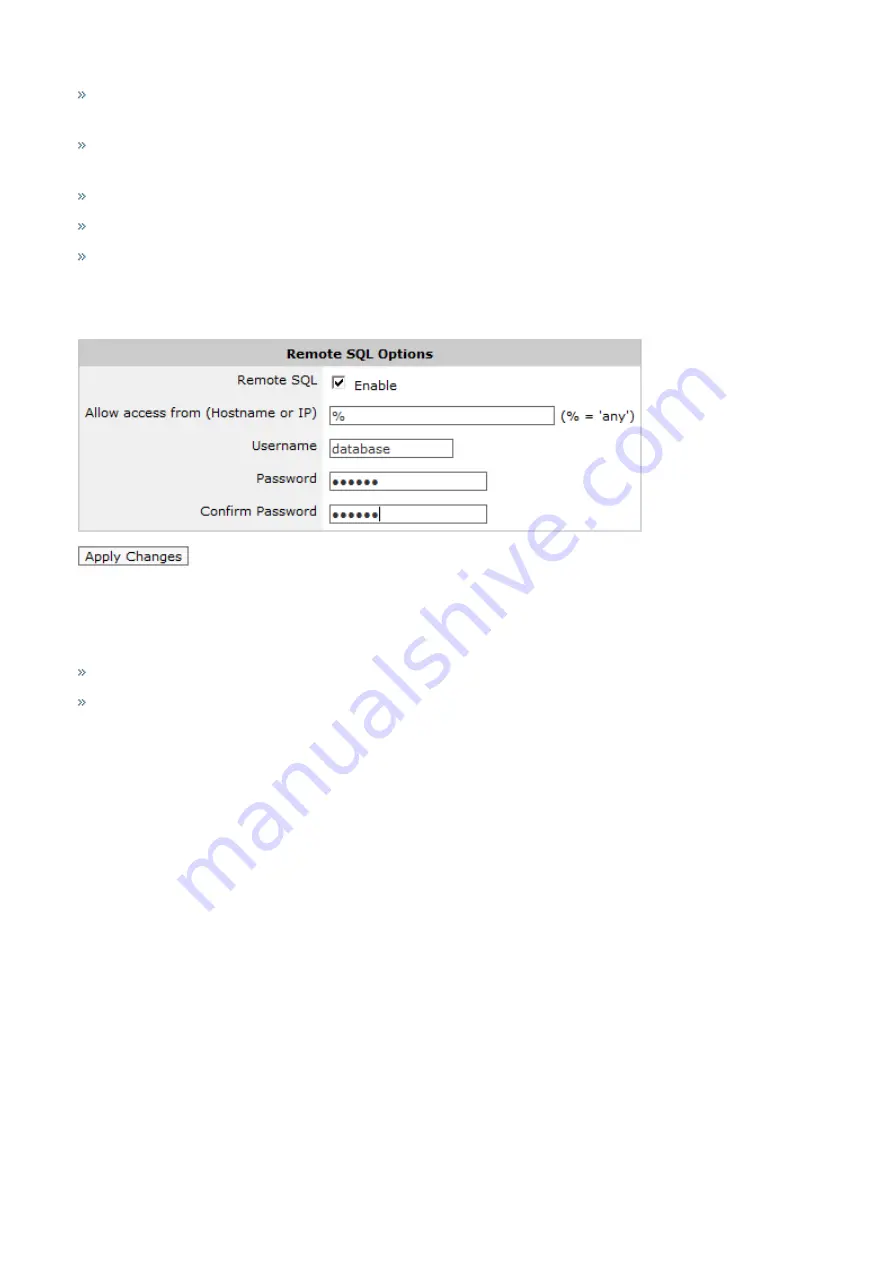
Remote SQL:
Select this option to allow the Exinda appliance to accept remote SQL connections from external
ODBC connectors.
Allow access from (Hostname or IP):
Use this option to restrict the hosts that can connect to the SQL database. Spe-
cify '%' to allow any hosts to connect or type an IP address or Hostname of a specify host to restrict access.
Username:
Specify a username to use for authentication (E.g. 'database').
Password:
Specify a password to use for authentication.
Confirm Password:
Retype the password specified above.
Apply the changes. The SQL access will be made available immediately. A successfully configured appliance would look
something like:
Once remote SQL access has been configured on the Exinda appliance, the next step is to create an ODBC data source
on the client.
See the following for more information on creating ODBC sources:
Create ODBC Data Source on Windows XP
Create ODBC Data Source on Windows 7
Create ODBC Data Source on Windows XP
1.
Open
Administrative Tools
and select
Data Sources (ODBC)
. You should be presented with the following dialog.
Содержание EXNV-10063
Страница 98: ...Exinda Network Orchestrator 2 Getting started 98 6 Click New The New Virtual Hard Disk wizard opens ...
Страница 99: ...Exinda Network Orchestrator 2 Getting started 99 7 Select VHDX as the Disk Format type and click Next ...
Страница 130: ...Exinda Network Orchestrator 2 Getting started 130 Screenshot 35 The life cycle of configuration status ...
Страница 369: ...Exinda Network Orchestrator 4 Settings 369 ...
Страница 411: ...Exinda Network Orchestrator 4 Settings 411 Screenshot 168 P2P OverflowVirtualCircuit ...
Страница 420: ...Exinda Network Orchestrator 4 Settings 420 Screenshot 175 Students OverflowVirtualCircuit ...
Страница 451: ...Exinda Network Orchestrator 4 Settings 451 ...


