


Exinda Network Orchestrator
4 Settings
|
401
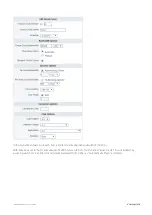
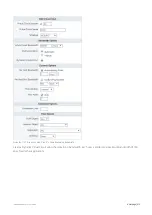
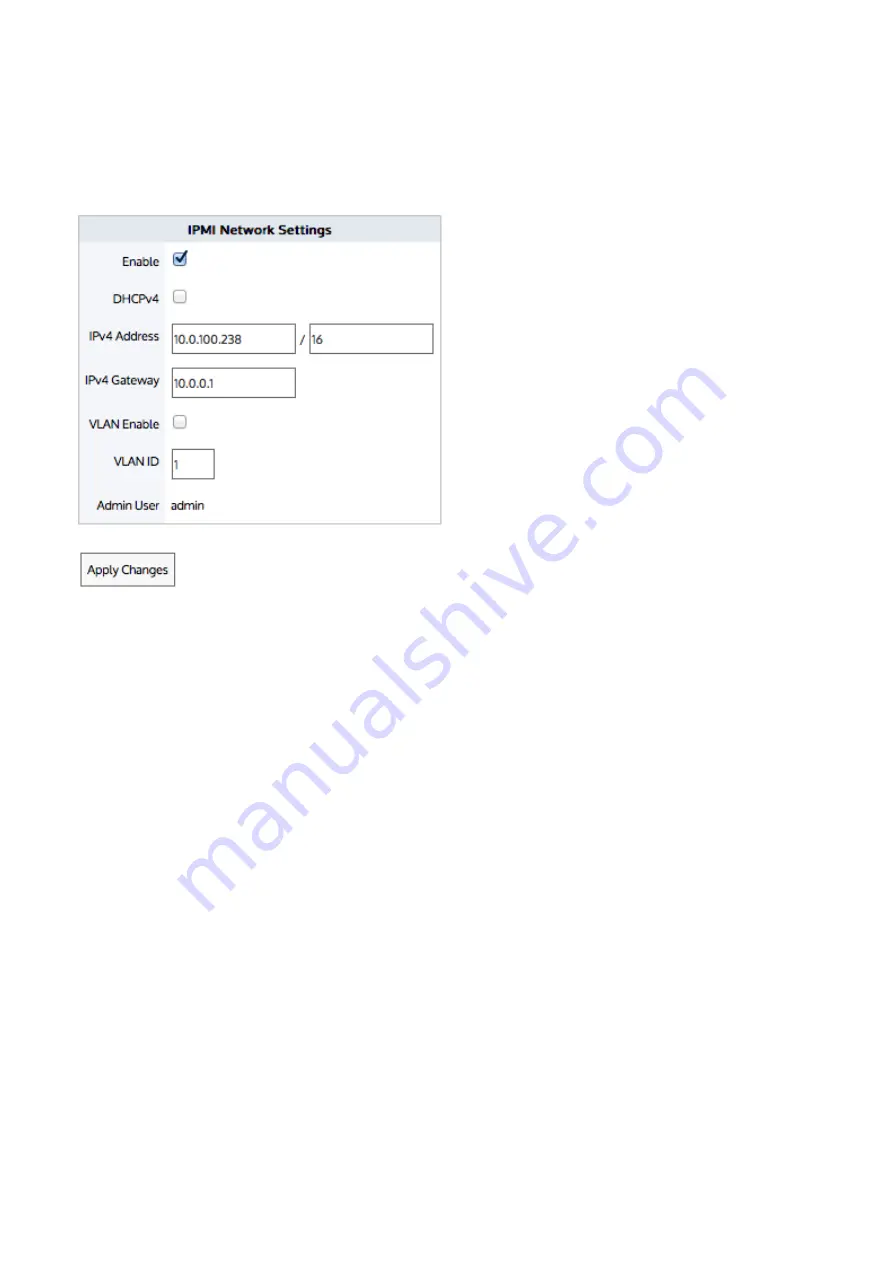
The appliance can be managed on the specified IPv4 address either from another Exinda appliance or by a connection
to the specified IPv4 address (e.g. http://10.0.100.238, assuming a web interface is supported). When a web interface is
not supported, a command line tool such as ipmitool may be used.
If your management network is on a separate VLAN and you want the IPMI interface to also be on that VLAN, you can
enable VLAN support and specify an 802.1Q VLAN ID.
Screenshot 167: Configure the appliance to be managed via IPMI
Where do I find this configuration?
Go to
Configuration > Objects > Adaptive Response > Network Objects
.
To configure IPMI settings
Using a static IP address and gateway:
1.
To enable IPMI management, select the
Enable
checkbox.
2.
Enter the
IPv4 Address
and netmask for the IPMI interface.
3.
Enter the
IPv4 Gateway
.
4.
Enable and type the
VLAN ID
, if desired. The VLAN ID should be an 802.1Q VLAN ID.
5.
Click
Apply Changes
.
Using DHCP:
Содержание EXNV-10063
Страница 98: ...Exinda Network Orchestrator 2 Getting started 98 6 Click New The New Virtual Hard Disk wizard opens ...
Страница 99: ...Exinda Network Orchestrator 2 Getting started 99 7 Select VHDX as the Disk Format type and click Next ...
Страница 130: ...Exinda Network Orchestrator 2 Getting started 130 Screenshot 35 The life cycle of configuration status ...
Страница 369: ...Exinda Network Orchestrator 4 Settings 369 ...
Страница 411: ...Exinda Network Orchestrator 4 Settings 411 Screenshot 168 P2P OverflowVirtualCircuit ...
Страница 420: ...Exinda Network Orchestrator 4 Settings 420 Screenshot 175 Students OverflowVirtualCircuit ...
Страница 451: ...Exinda Network Orchestrator 4 Settings 451 ...