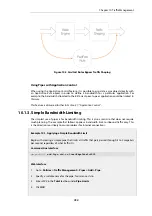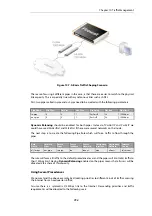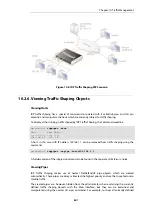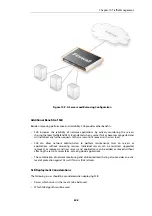
Figure 10.7. A Basic Traffic Shaping Scenario
The reason for using 2 different pipes in this case, is that these are easier to match to the physical
link capacity. This is especially true with asynchronous links such as ADSL.
First, two pipes called
in-pipe
and
out-pipe
need to be created with the following parameters:
Pipe Name
Min Prec
Def Prec
Max Prec
Grouping
Net size
Pipe limit
in-pipe
0
0
7
PerDestIP
24
1000 Kbps
out-pipe
0
0
7
PerSrcIP
24
1000 Kbps
Dynamic Balancing should be enabled for both pipes. Instead of
PerDestIP
and
PerSrcIP
we
could have used
PerDestNet
and
PerSrcNet
if there were several networks on the inside.
The next step is to create the following Pipe Rule which will force traffic to flow through the
pipes.
Rule
Name
Forward
Pipes
Return
Pipes
Source
Interface
Source
Network
Destination
Interface
Destination
Network
Selected
Service
all_1mbps
out-pipe
in-pipe
lan
lannet
wan
all-nets
all_services
The rule will force all traffic to the default precedence level and the pipes will limit total traffic to
their 1 Mbps limit. Having Dynamic Balancing enabled on the pipes means that all users will be
allocated a fair share of this capacity.
Using Several Precedences
We now extend the above example by allocating priorities to different kinds of traffic accessing
the Internet from a headquarters office.
Assume there is a symmetric 2/2 Mbps link to the Internet. Descending priorities and traffic
requirements will be allocated to the following users:
Chapter 10: Traffic Management
794
Содержание NetDefendOS
Страница 30: ...Figure 1 3 Packet Flow Schematic Part III Chapter 1 NetDefendOS Overview 30 ...
Страница 32: ...Chapter 1 NetDefendOS Overview 32 ...
Страница 144: ...Chapter 2 Management and Maintenance 144 ...
Страница 220: ... Enable DHCP passthrough Enable L2 passthrough for non IP protocols 4 Click OK Chapter 3 Fundamentals 220 ...
Страница 267: ... SourceNetwork lannet DestinationInterface any DestinationNetwork all nets 4 Click OK Chapter 3 Fundamentals 267 ...
Страница 284: ...Chapter 3 Fundamentals 284 ...
Страница 360: ...The ospf command options are fully described in the separate NetDefendOS CLI Reference Guide Chapter 4 Routing 360 ...
Страница 392: ...Chapter 4 Routing 392 ...
Страница 396: ...Web Interface 1 Go to Network Ethernet If1 2 Select Enable DHCP 3 Click OK Chapter 5 DHCP Services 396 ...
Страница 419: ... Host 2001 DB8 1 MAC 00 90 12 13 14 15 5 Click OK Chapter 5 DHCP Services 419 ...
Страница 420: ...Chapter 5 DHCP Services 420 ...
Страница 424: ...2 Now enter Name lan_Access Action Expect Interface lan Network lannet 3 Click OK Chapter 6 Security Mechanisms 424 ...
Страница 573: ...Chapter 6 Security Mechanisms 573 ...
Страница 575: ...This section describes and provides examples of configuring NAT and SAT rules Chapter 7 Address Translation 575 ...
Страница 607: ...Chapter 7 Address Translation 607 ...
Страница 666: ...Chapter 8 User Authentication 666 ...
Страница 775: ...Chapter 9 VPN 775 ...
Страница 819: ...Chapter 10 Traffic Management 819 ...
Страница 842: ...Chapter 11 High Availability 842 ...
Страница 866: ...Default Enabled Chapter 13 Advanced Settings 866 ...
Страница 879: ...Chapter 13 Advanced Settings 879 ...

