


The
NATAction
option could be left out since the default value is to use the interface address. The
alternative is to specify
UseSenderAddress
and use the
NATSenderAddress
option to specify the IP
address to use. The sender address will also need to be explicitly ARP published on the interface.
Web Interface
1.
Go to: Policies > Firewalling > Main IP Rules > Add > IP Policy
2.
Specify a suitable name for the rule, for example
NAT_HTTP
3.
Now enter:
•
Action: Allow
•
Source Interface: lan
•
Source Network: lannet
•
Destination Interface: wan
•
Destination Network: all-nets
•
Service: http
4.
Select Address Translation, enable NAT and close the dialog
5.
Click OK
Logging is enabled by default.
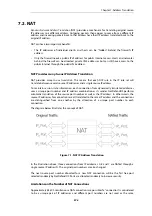
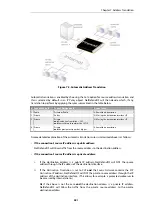
Using Automatic Translation with an IP Policy
An
IP Policy
object provides the option to apply
Automatic Address Translation
. This is designed to
provide a simple way for the administrator to apply the most common types of NAT address
translation based on if the connections are between private and public IP addresses.
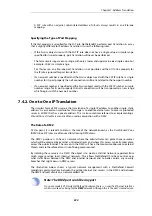
Automatic translation is particularly suitable in one of the most typical scenarios, where external
clients access a protected webserver over the public Internet and internal protected clients need
access to both the public Internet and the protected web server. Normally, external connections
to the webserver are normally translated to a private address using SAT.
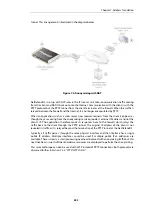
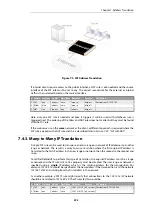
The diagram below illustrates this typical scenario. Here, the webserver in the private IP network
A may be accessed by remote clients over the Internet but also by internal clients on the private
IP network B. Connections from the Internet must have a SAT translation applied from the
NetDefend Firewall's public IP address to the private IP address of the webserver. All these
requirements can be met using a single IP policy with automatic translation enabled.
Chapter 7: Address Translation
580
Содержание NetDefendOS
Страница 30: ...Figure 1 3 Packet Flow Schematic Part III Chapter 1 NetDefendOS Overview 30 ...
Страница 32: ...Chapter 1 NetDefendOS Overview 32 ...
Страница 144: ...Chapter 2 Management and Maintenance 144 ...
Страница 220: ... Enable DHCP passthrough Enable L2 passthrough for non IP protocols 4 Click OK Chapter 3 Fundamentals 220 ...
Страница 267: ... SourceNetwork lannet DestinationInterface any DestinationNetwork all nets 4 Click OK Chapter 3 Fundamentals 267 ...
Страница 284: ...Chapter 3 Fundamentals 284 ...
Страница 360: ...The ospf command options are fully described in the separate NetDefendOS CLI Reference Guide Chapter 4 Routing 360 ...
Страница 392: ...Chapter 4 Routing 392 ...
Страница 396: ...Web Interface 1 Go to Network Ethernet If1 2 Select Enable DHCP 3 Click OK Chapter 5 DHCP Services 396 ...
Страница 419: ... Host 2001 DB8 1 MAC 00 90 12 13 14 15 5 Click OK Chapter 5 DHCP Services 419 ...
Страница 420: ...Chapter 5 DHCP Services 420 ...
Страница 424: ...2 Now enter Name lan_Access Action Expect Interface lan Network lannet 3 Click OK Chapter 6 Security Mechanisms 424 ...
Страница 573: ...Chapter 6 Security Mechanisms 573 ...
Страница 575: ...This section describes and provides examples of configuring NAT and SAT rules Chapter 7 Address Translation 575 ...
Страница 607: ...Chapter 7 Address Translation 607 ...
Страница 666: ...Chapter 8 User Authentication 666 ...
Страница 775: ...Chapter 9 VPN 775 ...
Страница 819: ...Chapter 10 Traffic Management 819 ...
Страница 842: ...Chapter 11 High Availability 842 ...
Страница 866: ...Default Enabled Chapter 13 Advanced Settings 866 ...
Страница 879: ...Chapter 13 Advanced Settings 879 ...