11.3. Setting Up HA
This section provides a step-by-step guide for setting up an HA Cluster. Setup is explained in the
following subsections:
•
Physical setup of the HA cluster and decisions about IP addresses is first discussed in
Section 11.3.1, “Hardware Setup”
.
•
Configuration of NetDefendOS is then discussed and this is divided into:
i.
Using the Web Interface wizard is discussed in
Section 11.3.2, “Wizard HA Setup”
.
ii.
Performing NetDefendOS setup without the wizard is discussed in
Section 11.3.3,
.
•
Lastly, verifying HA operation is discussed in
Section 11.3.4, “Verifying that the Cluster Functions
.
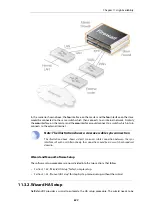
11.3.1. Hardware Setup
The steps for the setup of hardware in an HA cluster are as follows:
1.
Start with two identical NetDefend Firewalls of the same model and with the same set of
available Ethernet interfaces. Both may be newly purchased or an existing hardware unit
may have a new unit added to it to create the cluster.
2.
Both master and slave units must be running the same version of NetDefendOS.
3.
Make the physical connections:
•
Connect the matching interfaces of master and slave through separate switches or
separate broadcast domains. It is important to keep the traffic on each interface pair
separated from other pairs.
•
Select one unique interface on the master and slave which is to be used by the units for
monitoring each other. This will be the
sync
interface. It is recommended that the same
interface is used on both master and slave, assuming they are similar systems.
Caution: The sync interface must be unique
With some hardware, an interface may be part of a switch fabric which joins a
set of interfaces together.
If such an interface is used as the HA
sync
interface then the other interfaces
connected to the same switch fabric cannot be used for other purposes.
Also keep in mind that there should be no NetDefendOS IP rules configured that include
the
sync
interface.
•
Connect together the
sync
interfaces. This can be done directly with a suitable cable or
through a separate switch (or broadcast domain).
4.
Decide on a shared IP address for each interface in the cluster. Some interfaces could have
shared addresses only while others could also have unique, individual IP addresses for each
interface specified in an
IP4 HA Address
object. The shared and individual addresses are used
as follows:
Chapter 11: High Availability
827
Содержание NetDefendOS
Страница 30: ...Figure 1 3 Packet Flow Schematic Part III Chapter 1 NetDefendOS Overview 30 ...
Страница 32: ...Chapter 1 NetDefendOS Overview 32 ...
Страница 144: ...Chapter 2 Management and Maintenance 144 ...
Страница 220: ... Enable DHCP passthrough Enable L2 passthrough for non IP protocols 4 Click OK Chapter 3 Fundamentals 220 ...
Страница 267: ... SourceNetwork lannet DestinationInterface any DestinationNetwork all nets 4 Click OK Chapter 3 Fundamentals 267 ...
Страница 284: ...Chapter 3 Fundamentals 284 ...
Страница 360: ...The ospf command options are fully described in the separate NetDefendOS CLI Reference Guide Chapter 4 Routing 360 ...
Страница 392: ...Chapter 4 Routing 392 ...
Страница 396: ...Web Interface 1 Go to Network Ethernet If1 2 Select Enable DHCP 3 Click OK Chapter 5 DHCP Services 396 ...
Страница 419: ... Host 2001 DB8 1 MAC 00 90 12 13 14 15 5 Click OK Chapter 5 DHCP Services 419 ...
Страница 420: ...Chapter 5 DHCP Services 420 ...
Страница 424: ...2 Now enter Name lan_Access Action Expect Interface lan Network lannet 3 Click OK Chapter 6 Security Mechanisms 424 ...
Страница 573: ...Chapter 6 Security Mechanisms 573 ...
Страница 575: ...This section describes and provides examples of configuring NAT and SAT rules Chapter 7 Address Translation 575 ...
Страница 607: ...Chapter 7 Address Translation 607 ...
Страница 666: ...Chapter 8 User Authentication 666 ...
Страница 775: ...Chapter 9 VPN 775 ...
Страница 819: ...Chapter 10 Traffic Management 819 ...
Страница 842: ...Chapter 11 High Availability 842 ...
Страница 866: ...Default Enabled Chapter 13 Advanced Settings 866 ...
Страница 879: ...Chapter 13 Advanced Settings 879 ...

