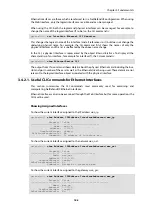
Individual interface details can be displayed, for example for the interface
If1
, with the command:
gw-world:/> show EthernetDevice If1
Property
Value
---------------
----------------------
Name:
If1
EthernetDriver:
E1000EthernetPCIDriver
PCIBus:
0
PCISlot:
17
PCIPort:
0
"
"
The
set
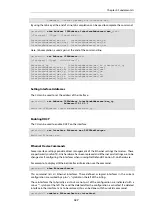
command can be used to control an Ethernet interface. For example, to disable an
interface lan, the following command can be used:
gw-world:/> set EthernetDevice lan -disable
To enable the interface lan:
gw-world:/> set EthernetDevice lan -enable
To set the driver on an Ethernet interface card the command is:
gw-world:/> set EthernetDevice lan EthernetDriver=<driver>
PCIBus=<X> PCISlot=<Y> PCIPort=<Z>
For example, if the driver name is
IXP4NPEEthernetDriver
for the bus, slot, port combination
0, 0, 2
on the
wan
interface, the
set
command would be:
gw-world:/> set EthernetDevice lan
EthernetDriver=IXP4NPEEthernetDriver
PCIBus=0
PCISlot=0
PCIPort=2
This command is useful when a restored configuration contains interface names that do not
match the interface names of new hardware. By assigning the values for
bus
,
slot
,
port
and
driver
of a physical interface to a logical interface in the configuration, the logical interface is mapped
to the physical interface. However, this mapping must be done before the configuration is
activated.
For a complete list of all CLI options see the
CLI Reference Guide
.
3.4.2.2. Advanced Ethernet Interface Settings
This section details the advanced settings available for NetDefendOS Ethernet interfaces. The
settings are global and affect all physical interfaces.
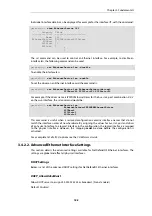
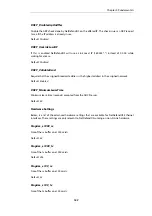
DHCP Settings
Below, is a list of the advanced DHCP settings for NetDefendOS Ethernet interfaces.
DHCP_AllowGlobalBcast
Allow DHCP server to assign 255.255.255.255 as broadcast. (Non-standard.)
Default:
Disabled
Chapter 3: Fundamentals
188
Содержание NetDefendOS
Страница 30: ...Figure 1 3 Packet Flow Schematic Part III Chapter 1 NetDefendOS Overview 30 ...
Страница 32: ...Chapter 1 NetDefendOS Overview 32 ...
Страница 144: ...Chapter 2 Management and Maintenance 144 ...
Страница 220: ... Enable DHCP passthrough Enable L2 passthrough for non IP protocols 4 Click OK Chapter 3 Fundamentals 220 ...
Страница 267: ... SourceNetwork lannet DestinationInterface any DestinationNetwork all nets 4 Click OK Chapter 3 Fundamentals 267 ...
Страница 284: ...Chapter 3 Fundamentals 284 ...
Страница 360: ...The ospf command options are fully described in the separate NetDefendOS CLI Reference Guide Chapter 4 Routing 360 ...
Страница 392: ...Chapter 4 Routing 392 ...
Страница 396: ...Web Interface 1 Go to Network Ethernet If1 2 Select Enable DHCP 3 Click OK Chapter 5 DHCP Services 396 ...
Страница 419: ... Host 2001 DB8 1 MAC 00 90 12 13 14 15 5 Click OK Chapter 5 DHCP Services 419 ...
Страница 420: ...Chapter 5 DHCP Services 420 ...
Страница 424: ...2 Now enter Name lan_Access Action Expect Interface lan Network lannet 3 Click OK Chapter 6 Security Mechanisms 424 ...
Страница 573: ...Chapter 6 Security Mechanisms 573 ...
Страница 575: ...This section describes and provides examples of configuring NAT and SAT rules Chapter 7 Address Translation 575 ...
Страница 607: ...Chapter 7 Address Translation 607 ...
Страница 666: ...Chapter 8 User Authentication 666 ...
Страница 775: ...Chapter 9 VPN 775 ...
Страница 819: ...Chapter 10 Traffic Management 819 ...
Страница 842: ...Chapter 11 High Availability 842 ...
Страница 866: ...Default Enabled Chapter 13 Advanced Settings 866 ...
Страница 879: ...Chapter 13 Advanced Settings 879 ...

