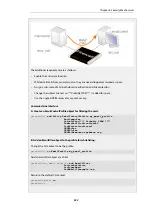
option is the Fail Mode property, which is always set to
Deny
when using anti-virus scanning
with an
IP Policy
object.
IP Policy
objects are discussed further in
As mentioned before, anti-virus scanning of email attachments in IMAP traffic can only be done
using IP policies.
Configuring anti-virus scanning with either an IP rule or an IP policy is described further in
Section 6.5.4, “Activating Anti-Virus Scanning”
.
6.5.2. Implementation
Streaming
As a data transfer is streamed through the NetDefend Firewall, NetDefendOS will scan the data
for the presence of viruses if the anti-virus module is enabled. Since data is being streamed and
not being read completely into memory, a minimum amount of memory is required and there is
minimal effect on overall throughput.
Pattern Matching
The inspection process is based on
pattern matching
against a database of known virus patterns
and can determine, with a high degree of certainty, if a virus is in the process of being
downloaded to a user behind the NetDefend Firewall. Once a virus is recognized in the contents
of a file, the download can be terminated before it completes.
Types of Data Scanned
As described above, anti-virus scanning is enabled on a per ALG basis and can scan data
downloads associated with the HTTP, FTP, SMTP and POP3 ALGs. More specifically:
•
Any uncompressed file type transferred through these ALGs can be scanned.
•
If the data file transferred has been compressed, ZIP and GZIP files can be scanned as well as
nested compressed files within them (up to 10 levels of nesting).
•
For the HTTP ALG, webpage scripts and URLs are scanned.
Messages displayed by the HTTP ALG
If enabled through the HTTP ALG, webpage scripts and URLs as well as files can be scanned for
malicious code. If a threat is encountered, the connection is dropped and NetDefendOS will
generate a log message for the event. HTTPS traffic cannot be scanned so this does not apply for
that protocol.
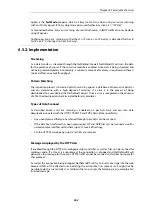
As well as the connection being dropped, NetDefendOS will try to insert a message into the web
browser HTML of the affected user indicating the action taken (in some cases it might not be
possible to do this successfully). For malicious files and scripts, the following is an example of an
inserted message:
Chapter 6: Security Mechanisms
542
Содержание NetDefendOS
Страница 30: ...Figure 1 3 Packet Flow Schematic Part III Chapter 1 NetDefendOS Overview 30 ...
Страница 32: ...Chapter 1 NetDefendOS Overview 32 ...
Страница 144: ...Chapter 2 Management and Maintenance 144 ...
Страница 220: ... Enable DHCP passthrough Enable L2 passthrough for non IP protocols 4 Click OK Chapter 3 Fundamentals 220 ...
Страница 267: ... SourceNetwork lannet DestinationInterface any DestinationNetwork all nets 4 Click OK Chapter 3 Fundamentals 267 ...
Страница 284: ...Chapter 3 Fundamentals 284 ...
Страница 360: ...The ospf command options are fully described in the separate NetDefendOS CLI Reference Guide Chapter 4 Routing 360 ...
Страница 392: ...Chapter 4 Routing 392 ...
Страница 396: ...Web Interface 1 Go to Network Ethernet If1 2 Select Enable DHCP 3 Click OK Chapter 5 DHCP Services 396 ...
Страница 419: ... Host 2001 DB8 1 MAC 00 90 12 13 14 15 5 Click OK Chapter 5 DHCP Services 419 ...
Страница 420: ...Chapter 5 DHCP Services 420 ...
Страница 424: ...2 Now enter Name lan_Access Action Expect Interface lan Network lannet 3 Click OK Chapter 6 Security Mechanisms 424 ...
Страница 573: ...Chapter 6 Security Mechanisms 573 ...
Страница 575: ...This section describes and provides examples of configuring NAT and SAT rules Chapter 7 Address Translation 575 ...
Страница 607: ...Chapter 7 Address Translation 607 ...
Страница 666: ...Chapter 8 User Authentication 666 ...
Страница 775: ...Chapter 9 VPN 775 ...
Страница 819: ...Chapter 10 Traffic Management 819 ...
Страница 842: ...Chapter 11 High Availability 842 ...
Страница 866: ...Default Enabled Chapter 13 Advanced Settings 866 ...
Страница 879: ...Chapter 13 Advanced Settings 879 ...

