


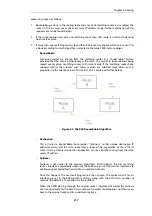

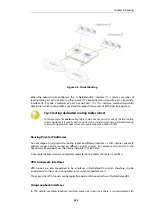

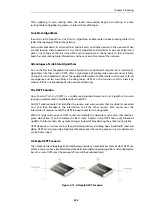
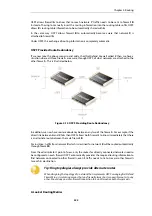

Figure 4.6. The RLB Spillover Algorithm
Spillover Limits
are set separately for ingoing and outgoing traffic with only one of these
typically being specified. If both are specified then only one of them needs to be
exceeded continuously for
Hold Timer
seconds for the next matching route to be chosen.
The units of the limits, such as Mbps, can be selected to simplify specification of the
values.
Using Route Metrics with Round Robin
An individual route has a
metric
associated with it, with the default metric value being zero.
With the
Round Robin
and the associated
Destination
algorithms, the
metric
value can be set
differently on matching routes to create a bias towards the routes with lower metrics. Routes
with lower metrics will be chosen more frequently than those with higher metrics and the
proportion of usage will be based on the relative differences between the metrics of matching
routes.
In a scenario with two ISPs, if the requirement is that the bulk of traffic passes through one of the
ISPs then this can be achieved by enabling RLB and setting a low metric on the route to the
favoured ISP. A relatively higher metric is then set on the route to the other ISP.
Using Route Metrics with Spillover
When using the
Spillover
algorithm, a number of points should be noted regarding metrics and
the way alternative routes are chosen:
•
Route metrics should always be set.
With spillover, NetDefendOS always chooses the route in the matching routes list that has the
lowest metric. The algorithm is not intended to be used with routes having the same metric
so the administrator should set different metrics for all the routes to which spillover applies.
Metrics determine a clear ordering for which route should be chosen next after the interface
traffic limits for the chosen route have been exceeded.
•
There can be many alternative routes.
Several alternative routes can be set up, each with their own interface limits and each with a
Chapter 4: Routing
318
Содержание NetDefendOS
Страница 30: ...Figure 1 3 Packet Flow Schematic Part III Chapter 1 NetDefendOS Overview 30 ...
Страница 32: ...Chapter 1 NetDefendOS Overview 32 ...
Страница 144: ...Chapter 2 Management and Maintenance 144 ...
Страница 220: ... Enable DHCP passthrough Enable L2 passthrough for non IP protocols 4 Click OK Chapter 3 Fundamentals 220 ...
Страница 267: ... SourceNetwork lannet DestinationInterface any DestinationNetwork all nets 4 Click OK Chapter 3 Fundamentals 267 ...
Страница 284: ...Chapter 3 Fundamentals 284 ...
Страница 360: ...The ospf command options are fully described in the separate NetDefendOS CLI Reference Guide Chapter 4 Routing 360 ...
Страница 392: ...Chapter 4 Routing 392 ...
Страница 396: ...Web Interface 1 Go to Network Ethernet If1 2 Select Enable DHCP 3 Click OK Chapter 5 DHCP Services 396 ...
Страница 419: ... Host 2001 DB8 1 MAC 00 90 12 13 14 15 5 Click OK Chapter 5 DHCP Services 419 ...
Страница 420: ...Chapter 5 DHCP Services 420 ...
Страница 424: ...2 Now enter Name lan_Access Action Expect Interface lan Network lannet 3 Click OK Chapter 6 Security Mechanisms 424 ...
Страница 573: ...Chapter 6 Security Mechanisms 573 ...
Страница 575: ...This section describes and provides examples of configuring NAT and SAT rules Chapter 7 Address Translation 575 ...
Страница 607: ...Chapter 7 Address Translation 607 ...
Страница 666: ...Chapter 8 User Authentication 666 ...
Страница 775: ...Chapter 9 VPN 775 ...
Страница 819: ...Chapter 10 Traffic Management 819 ...
Страница 842: ...Chapter 11 High Availability 842 ...
Страница 866: ...Default Enabled Chapter 13 Advanced Settings 866 ...
Страница 879: ...Chapter 13 Advanced Settings 879 ...