


Example 2.5. Adding Remote Management via HTTPS
This example assumes that a new
RemoteMgmtHTTP
object is to be added called
https_access
.
This will allow HTTPS access on the
If2
interface from any network and use the local database
AdminUsers
to authenticate the administrator's login credentials.
Command-Line Interface
gw-world:/> add RemoteManagement RemoteMgmtHTTP https_access
Network=all-nets
Interface=If2
LocalUserDatabase=AdminUsers
HTTPS=Yes
Web Interface
1.
Go to: System > Device > Remote Management > Add > HTTP/HTTPS Management
2.
Enter a Name for the HTTP/HTTPS remote management rule, in this case
https_access
3.
Enable the HTTPS option
4.
Select the following:
•
User Database: AdminUsers
•
Interface: If2
•
Network: all-nets
5.
Click OK
2.1.3. Administrator Account
By default, NetDefendOS has a local user database,
AdminUsers
, that contains one predefined
administrator
account. This account has the username admin with password admin. This
account has full administrative read/write privileges for NetDefendOS.
Important
For security reasons, it is recommended to change the default password of the default
account as soon as possible after connecting with the NetDefend Firewall.
Creating Additional Accounts
Extra user accounts can be created as required. Accounts can either belong to the Administrator
user group, in which case they have complete read/write administrative access. Alternatively,
they can belong to the Auditor user group, in which case they have read-only access.
Only One Administrator Account Can Be Logged In
Chapter 2: Management and Maintenance
40
Содержание NetDefendOS
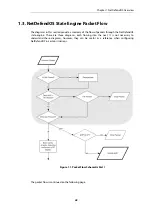
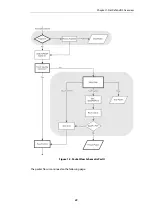
Страница 30: ...Figure 1 3 Packet Flow Schematic Part III Chapter 1 NetDefendOS Overview 30 ...
Страница 32: ...Chapter 1 NetDefendOS Overview 32 ...
Страница 144: ...Chapter 2 Management and Maintenance 144 ...
Страница 220: ... Enable DHCP passthrough Enable L2 passthrough for non IP protocols 4 Click OK Chapter 3 Fundamentals 220 ...
Страница 267: ... SourceNetwork lannet DestinationInterface any DestinationNetwork all nets 4 Click OK Chapter 3 Fundamentals 267 ...
Страница 284: ...Chapter 3 Fundamentals 284 ...
Страница 360: ...The ospf command options are fully described in the separate NetDefendOS CLI Reference Guide Chapter 4 Routing 360 ...
Страница 392: ...Chapter 4 Routing 392 ...
Страница 396: ...Web Interface 1 Go to Network Ethernet If1 2 Select Enable DHCP 3 Click OK Chapter 5 DHCP Services 396 ...
Страница 419: ... Host 2001 DB8 1 MAC 00 90 12 13 14 15 5 Click OK Chapter 5 DHCP Services 419 ...
Страница 420: ...Chapter 5 DHCP Services 420 ...
Страница 424: ...2 Now enter Name lan_Access Action Expect Interface lan Network lannet 3 Click OK Chapter 6 Security Mechanisms 424 ...
Страница 573: ...Chapter 6 Security Mechanisms 573 ...
Страница 575: ...This section describes and provides examples of configuring NAT and SAT rules Chapter 7 Address Translation 575 ...
Страница 607: ...Chapter 7 Address Translation 607 ...
Страница 666: ...Chapter 8 User Authentication 666 ...
Страница 775: ...Chapter 9 VPN 775 ...
Страница 819: ...Chapter 10 Traffic Management 819 ...
Страница 842: ...Chapter 11 High Availability 842 ...
Страница 866: ...Default Enabled Chapter 13 Advanced Settings 866 ...
Страница 879: ...Chapter 13 Advanced Settings 879 ...