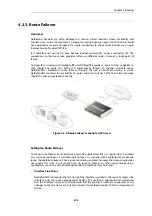
•
A separate route does not need to be defined that includes the gateway IP address.
•
It does not matter even if there is a separate route which includes the gateway IP address and
that routes traffic to a different interface.
Composite Subnets can be Specified
Another advantage with the NetDefendOS approach to route definition is that it allows the
administrator to specify routes for destinations that are not aligned with traditional subnet
masks.
For example, it is perfectly legal to define one route for the destination IP address range
192.168.0.5
to
192.168.0.17
and another route for IP addresses
192.168.0.18
to
192.168.0.254
. This
is a feature that makes NetDefendOS highly suitable for routing in highly complex network
topologies.
Displaying Routing Tables
It is important to note that routing tables that are initially configured by the administrator can
have routes added, deleted and changed automatically during live operation and these changes
will appear when the routing table contents are displayed.
These routing table changes can take place for different reasons. For example, if dynamic routing
with OSPF has been enabled then routing tables will become populated with new routes learned
from communicating with other OSPF routers in an OSPF network. Other events such as route
failover can also cause routing table contents to change over time.
Example 4.1. Displaying the main Routing Table
This example illustrates how to display the contents of the default
main
routing table.
Command-Line Interface
To see the routing table contents:
gw-world:/> cc RoutingTable main
gw-world:/main> show
Route
#
Interface
Network
Gateway
Local IP
-
---------
--------
-------------
--------
1
wan
all-nets
213.124.165.1
<empty>
2
lan
lannet
<empty>
<empty>
3
wan
wannet
<empty>
<empty>
To return the default CLI context:
gw-world:/main> cc
gw-world:/>
To see the active routing table enter:
gw-world:/> routes
Flags Network
Iface
Gateway
Local IP Metric
----- ------------------ ------- --------------- -------- ------
Chapter 4: Routing
292
Содержание NetDefendOS
Страница 30: ...Figure 1 3 Packet Flow Schematic Part III Chapter 1 NetDefendOS Overview 30 ...
Страница 32: ...Chapter 1 NetDefendOS Overview 32 ...
Страница 144: ...Chapter 2 Management and Maintenance 144 ...
Страница 220: ... Enable DHCP passthrough Enable L2 passthrough for non IP protocols 4 Click OK Chapter 3 Fundamentals 220 ...
Страница 267: ... SourceNetwork lannet DestinationInterface any DestinationNetwork all nets 4 Click OK Chapter 3 Fundamentals 267 ...
Страница 284: ...Chapter 3 Fundamentals 284 ...
Страница 360: ...The ospf command options are fully described in the separate NetDefendOS CLI Reference Guide Chapter 4 Routing 360 ...
Страница 392: ...Chapter 4 Routing 392 ...
Страница 396: ...Web Interface 1 Go to Network Ethernet If1 2 Select Enable DHCP 3 Click OK Chapter 5 DHCP Services 396 ...
Страница 419: ... Host 2001 DB8 1 MAC 00 90 12 13 14 15 5 Click OK Chapter 5 DHCP Services 419 ...
Страница 420: ...Chapter 5 DHCP Services 420 ...
Страница 424: ...2 Now enter Name lan_Access Action Expect Interface lan Network lannet 3 Click OK Chapter 6 Security Mechanisms 424 ...
Страница 573: ...Chapter 6 Security Mechanisms 573 ...
Страница 575: ...This section describes and provides examples of configuring NAT and SAT rules Chapter 7 Address Translation 575 ...
Страница 607: ...Chapter 7 Address Translation 607 ...
Страница 666: ...Chapter 8 User Authentication 666 ...
Страница 775: ...Chapter 9 VPN 775 ...
Страница 819: ...Chapter 10 Traffic Management 819 ...
Страница 842: ...Chapter 11 High Availability 842 ...
Страница 866: ...Default Enabled Chapter 13 Advanced Settings 866 ...
Страница 879: ...Chapter 13 Advanced Settings 879 ...

