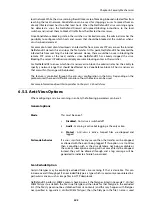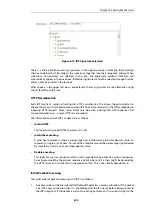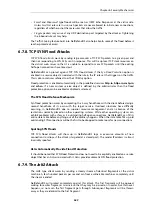
Figure 6.14. IDP Signature Selection
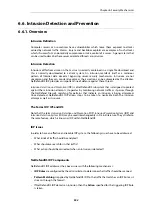
There is a choice of either entering signatures in the upper text box or selecting them through
the tree underneath which collects the signatures together into their respective groups. When
collections of signatures are selected in the tree, the equivalent wildcard definition will
automatically appear in the box above. Individual signatures cannot be selected through the tree
and can only be entered in the text box.
What appears in the upper text box is equivalent to the way signatures are specified when using
the CLI to define an IDP rule.
HTTP Normalization
Each IDP rule has a section of settings for
HTTP normalization
. This allows the administrator to
choose the actions that should be taken when IDP finds inconsistencies in the URIs embedded in
incoming HTTP requests. Some server attacks are based on creating URIs with sequences that
can exploit weaknesses in some HTTP server products.
The URI conditions which IDP can detect are as follows:
•
Invalid UTF8
This looks for any invalid UTF8 characters in a URI.
•
Invalid hex encoding
A valid hex sequence is where a percentage sign is followed by two hexadecimal values to
represent a single byte of data. An invalid hex sequence would be percentage sign followed
by something which is not a valid hexadecimal value.
•
Double encoding
This looks for any hex sequence which itself is encoded using other hex escape sequences.
An example would be the original sequence
%2526
where
%25
is then might be decoded by
the HTTP server to '
%
' and results in the sequence '
%26
'. This is then finally decoded to '
&
'.
Initial Packet Processing
The initial order of packet processing with IDP is as follows:
1.
A packet arrives at the firewall and NetDefendOS performs normal verification. If the packet
is part of a new connection then it is checked against the IP rule set before being passed to
the IDP subsystem. If the packet is part of an existing connection it is passed straight to the
Chapter 6: Security Mechanisms
555
Содержание NetDefendOS
Страница 30: ...Figure 1 3 Packet Flow Schematic Part III Chapter 1 NetDefendOS Overview 30 ...
Страница 32: ...Chapter 1 NetDefendOS Overview 32 ...
Страница 144: ...Chapter 2 Management and Maintenance 144 ...
Страница 220: ... Enable DHCP passthrough Enable L2 passthrough for non IP protocols 4 Click OK Chapter 3 Fundamentals 220 ...
Страница 267: ... SourceNetwork lannet DestinationInterface any DestinationNetwork all nets 4 Click OK Chapter 3 Fundamentals 267 ...
Страница 284: ...Chapter 3 Fundamentals 284 ...
Страница 360: ...The ospf command options are fully described in the separate NetDefendOS CLI Reference Guide Chapter 4 Routing 360 ...
Страница 392: ...Chapter 4 Routing 392 ...
Страница 396: ...Web Interface 1 Go to Network Ethernet If1 2 Select Enable DHCP 3 Click OK Chapter 5 DHCP Services 396 ...
Страница 419: ... Host 2001 DB8 1 MAC 00 90 12 13 14 15 5 Click OK Chapter 5 DHCP Services 419 ...
Страница 420: ...Chapter 5 DHCP Services 420 ...
Страница 424: ...2 Now enter Name lan_Access Action Expect Interface lan Network lannet 3 Click OK Chapter 6 Security Mechanisms 424 ...
Страница 573: ...Chapter 6 Security Mechanisms 573 ...
Страница 575: ...This section describes and provides examples of configuring NAT and SAT rules Chapter 7 Address Translation 575 ...
Страница 607: ...Chapter 7 Address Translation 607 ...
Страница 666: ...Chapter 8 User Authentication 666 ...
Страница 775: ...Chapter 9 VPN 775 ...
Страница 819: ...Chapter 10 Traffic Management 819 ...
Страница 842: ...Chapter 11 High Availability 842 ...
Страница 866: ...Default Enabled Chapter 13 Advanced Settings 866 ...
Страница 879: ...Chapter 13 Advanced Settings 879 ...

