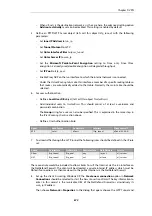
Note that the
Gateway Certificate
is sometimes referred to as the
Host Certificate
.
3.
Set up the IPsec Tunnel object as for pre-shared keys, but specify the certificates to use
under Authentication. Do this with the following steps:
a.
Enable the X.509 Certificate option.
b.
Select the Root Certificate to use. If there is a certificate chain to the gateway
certificate, all the intermediate certificates must also be added as root certificates.
c.
Select the Gateway Certificate.
4.
Open the management Web Interface for the NetDefend Firewall at the other side of the
tunnel and repeat the above steps with a different set of certificates.
Note: The system time and date should be correct
The NetDefendOS date and time should be set correctly since certificates have an expiry
date and time.
Also review
Section 3.9.4, “CA Server Access”
below, which describes important considerations for
certificate validation.
Self-signed certificates
instead of CA signed can be used for LAN-to-LAN tunnels but the Web
Interface and other interfaces do not have a feature to generate them. Instead, they must be
generated by another utility and imported into NetDefendOS. This means that they are not truly
self-signed since they are generated outside of NetDefendOS control and it should be
remembered that there is no guarantee that their private key is unique. However, the security
provided can still be considered adequate for some scenarios.
Two self-signed certificates are required and the same two are used at either end of the tunnel
but their usage is reversed. In other words: one certificate is used as the
root certificate
at one
end, call it Side A, and as the
host certificate
at the other end, call it Side B. The second certificate
is used in the opposite way: as the
host certificate
at Side A and the
root certificate
at Side B.
No CA server considerations are needed with self-signed certificates since CRL lookup does not
occur.
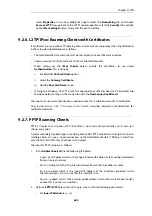
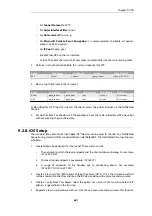
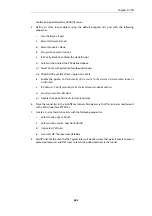
9.2.3. IPsec Roaming Clients with Pre-shared Keys
Chapter 9: VPN
674
Содержание NetDefendOS
Страница 30: ...Figure 1 3 Packet Flow Schematic Part III Chapter 1 NetDefendOS Overview 30 ...
Страница 32: ...Chapter 1 NetDefendOS Overview 32 ...
Страница 144: ...Chapter 2 Management and Maintenance 144 ...
Страница 220: ... Enable DHCP passthrough Enable L2 passthrough for non IP protocols 4 Click OK Chapter 3 Fundamentals 220 ...
Страница 267: ... SourceNetwork lannet DestinationInterface any DestinationNetwork all nets 4 Click OK Chapter 3 Fundamentals 267 ...
Страница 284: ...Chapter 3 Fundamentals 284 ...
Страница 360: ...The ospf command options are fully described in the separate NetDefendOS CLI Reference Guide Chapter 4 Routing 360 ...
Страница 392: ...Chapter 4 Routing 392 ...
Страница 396: ...Web Interface 1 Go to Network Ethernet If1 2 Select Enable DHCP 3 Click OK Chapter 5 DHCP Services 396 ...
Страница 419: ... Host 2001 DB8 1 MAC 00 90 12 13 14 15 5 Click OK Chapter 5 DHCP Services 419 ...
Страница 420: ...Chapter 5 DHCP Services 420 ...
Страница 424: ...2 Now enter Name lan_Access Action Expect Interface lan Network lannet 3 Click OK Chapter 6 Security Mechanisms 424 ...
Страница 573: ...Chapter 6 Security Mechanisms 573 ...
Страница 575: ...This section describes and provides examples of configuring NAT and SAT rules Chapter 7 Address Translation 575 ...
Страница 607: ...Chapter 7 Address Translation 607 ...
Страница 666: ...Chapter 8 User Authentication 666 ...
Страница 775: ...Chapter 9 VPN 775 ...
Страница 819: ...Chapter 10 Traffic Management 819 ...
Страница 842: ...Chapter 11 High Availability 842 ...
Страница 866: ...Default Enabled Chapter 13 Advanced Settings 866 ...
Страница 879: ...Chapter 13 Advanced Settings 879 ...


