Setting Up Proxy ARP
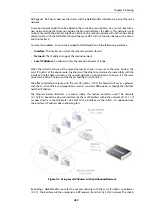
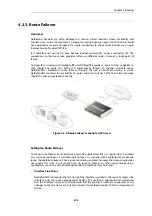
Setting up proxy ARP is done by specifying the option for a route in a routing table. Suppose
there is a network that is divided into two parts called
net_1
and
net_2
.
The network
net_1
is connected to the interface
if1
and the network
net_2
is connected to the
interface
if2
. In NetDefendOS there will be a route configured that says
net_1
can be found on
if1
.
This might be called
route_1
.
For
route_1
it is possible to specify the option that this network should be proxy ARPed on
interface
if2
. Now any ARP request issued by a
net_2
host connected to
if2
looking for an IP
address in
net_1
will get a positive response from NetDefendOS. In other words, NetDefendOS
will pretend that the
net_1
address is found on
if2
and will forward data traffic to
net_1
.
In the same way,
net_2
could be published on the interface
if1
so that there is a mirroring of
routes and ARP proxy publishing.
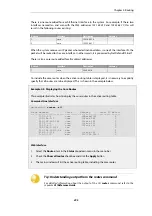
Route #
Network
Interface
Proxy ARP Published
1
net_1
if1
if2
2
net_2
if2
if1
In this way there is complete separation of the sub-networks but the hosts are unaware of this.
The routes are a pair which are a mirror image of each other but there is no requirement that
proxy ARP is used in a pairing like this.
Keep in mind that if the host has an ARP request for an IP address outside of the local network
then this will be sent to the gateway configured for that host. The entire example is illustrated
below.
Figure 4.4. A Proxy ARP Example
Transparent Mode as an Alternative
Transparent Mode
is an alternative and preferred way of splitting Ethernet networks. Setup is
simpler than using proxy ARP since only the appropriate
switch routes
need to be defined. Using
switch routes is fully explained in
Section 4.8, “Transparent Mode”
.
Proxy ARP depends on static routing where the location of networks on interfaces are known
and usually fixed. Transparent mode is more suited to networks whose interface location can
change.
Chapter 4: Routing
303
Содержание NetDefendOS
Страница 30: ...Figure 1 3 Packet Flow Schematic Part III Chapter 1 NetDefendOS Overview 30 ...
Страница 32: ...Chapter 1 NetDefendOS Overview 32 ...
Страница 144: ...Chapter 2 Management and Maintenance 144 ...
Страница 220: ... Enable DHCP passthrough Enable L2 passthrough for non IP protocols 4 Click OK Chapter 3 Fundamentals 220 ...
Страница 267: ... SourceNetwork lannet DestinationInterface any DestinationNetwork all nets 4 Click OK Chapter 3 Fundamentals 267 ...
Страница 284: ...Chapter 3 Fundamentals 284 ...
Страница 360: ...The ospf command options are fully described in the separate NetDefendOS CLI Reference Guide Chapter 4 Routing 360 ...
Страница 392: ...Chapter 4 Routing 392 ...
Страница 396: ...Web Interface 1 Go to Network Ethernet If1 2 Select Enable DHCP 3 Click OK Chapter 5 DHCP Services 396 ...
Страница 419: ... Host 2001 DB8 1 MAC 00 90 12 13 14 15 5 Click OK Chapter 5 DHCP Services 419 ...
Страница 420: ...Chapter 5 DHCP Services 420 ...
Страница 424: ...2 Now enter Name lan_Access Action Expect Interface lan Network lannet 3 Click OK Chapter 6 Security Mechanisms 424 ...
Страница 573: ...Chapter 6 Security Mechanisms 573 ...
Страница 575: ...This section describes and provides examples of configuring NAT and SAT rules Chapter 7 Address Translation 575 ...
Страница 607: ...Chapter 7 Address Translation 607 ...
Страница 666: ...Chapter 8 User Authentication 666 ...
Страница 775: ...Chapter 9 VPN 775 ...
Страница 819: ...Chapter 10 Traffic Management 819 ...
Страница 842: ...Chapter 11 High Availability 842 ...
Страница 866: ...Default Enabled Chapter 13 Advanced Settings 866 ...
Страница 879: ...Chapter 13 Advanced Settings 879 ...

