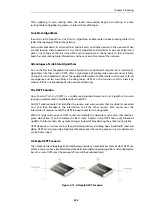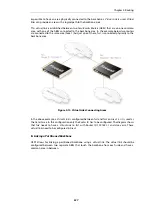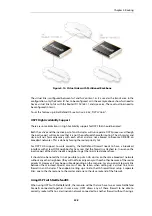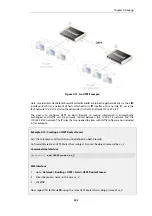
Figure 4.14. Virtual Links with Partitioned Backbone
The virtual link is configured between
fw1
and
fw2
on
Area 1
as it is used as the transit area. In the
configuration, only the
Router ID
has to be configured, as in the example above show
fw2
need to
have a virtual link to
fw1
with the Router ID
192.168.1.1
and vice versa. These virtual links need to
be configured in
Area 1
.
To set this feature up in NetDefendOS, see
Section 4.6.3.6, “OSPF VLinks”
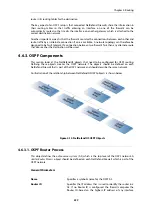
OSPF High Availability Support
There are some limitations in High Availability support for OSPF that should be noted:
Both the active and the inactive part of an HA cluster will run separate OSPF processes, although
the inactive part will make sure that it is not the preferred choice for routing. The HA master and
slave will not form adjacency with each other and are not allowed to become DR/BDR on
broadcast networks. This is done by forcing the router priority to 0.
For OSPF HA support to work correctly, the NetDefend Firewall needs to have a broadcast
interface with at least ONE neighbor for ALL areas that the firewall is attached to. In essence, the
inactive part of the cluster needs a neighbor to get the link state database from.
It should also be noted that is not possible to put an HA cluster on the same broadcast network
without any other neighbors (they will not form adjacency with each other because of the router
priority 0). However, it may be possible, depending on the scenario, to set up a point to point link
between them instead. Special care must also be taken when setting up a virtual link to an
firewall in an HA cluster. The endpoint setting up a link to the HA firewall must setup 3 separate
links: one to the shared, one to the master and one to the slave router id of the firewall.
Using OSPF with NetDefendOS
When using OSPF with NetDefendOS, the scenario will be that we have two or more NetDefend
Firewalls connected together in some way. OSPF allows any of these firewall to be able to
correctly route traffic to a destination network connected to another firewall without having a
Chapter 4: Routing
338
Содержание NetDefendOS
Страница 30: ...Figure 1 3 Packet Flow Schematic Part III Chapter 1 NetDefendOS Overview 30 ...
Страница 32: ...Chapter 1 NetDefendOS Overview 32 ...
Страница 144: ...Chapter 2 Management and Maintenance 144 ...
Страница 220: ... Enable DHCP passthrough Enable L2 passthrough for non IP protocols 4 Click OK Chapter 3 Fundamentals 220 ...
Страница 267: ... SourceNetwork lannet DestinationInterface any DestinationNetwork all nets 4 Click OK Chapter 3 Fundamentals 267 ...
Страница 284: ...Chapter 3 Fundamentals 284 ...
Страница 360: ...The ospf command options are fully described in the separate NetDefendOS CLI Reference Guide Chapter 4 Routing 360 ...
Страница 392: ...Chapter 4 Routing 392 ...
Страница 396: ...Web Interface 1 Go to Network Ethernet If1 2 Select Enable DHCP 3 Click OK Chapter 5 DHCP Services 396 ...
Страница 419: ... Host 2001 DB8 1 MAC 00 90 12 13 14 15 5 Click OK Chapter 5 DHCP Services 419 ...
Страница 420: ...Chapter 5 DHCP Services 420 ...
Страница 424: ...2 Now enter Name lan_Access Action Expect Interface lan Network lannet 3 Click OK Chapter 6 Security Mechanisms 424 ...
Страница 573: ...Chapter 6 Security Mechanisms 573 ...
Страница 575: ...This section describes and provides examples of configuring NAT and SAT rules Chapter 7 Address Translation 575 ...
Страница 607: ...Chapter 7 Address Translation 607 ...
Страница 666: ...Chapter 8 User Authentication 666 ...
Страница 775: ...Chapter 9 VPN 775 ...
Страница 819: ...Chapter 10 Traffic Management 819 ...
Страница 842: ...Chapter 11 High Availability 842 ...
Страница 866: ...Default Enabled Chapter 13 Advanced Settings 866 ...
Страница 879: ...Chapter 13 Advanced Settings 879 ...

