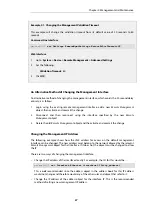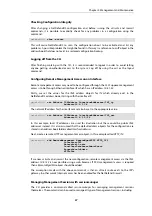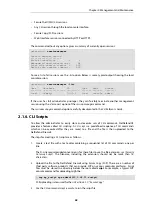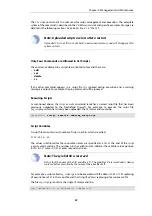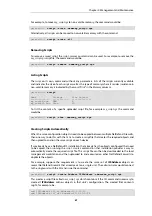
configuration. The CLI is available either locally through the local console port (connection to this
is described below), or remotely via an Ethernet interface using the
Secure Shell
(SSH) protocol
from an SSH client.
The CLI provides a comprehensive set of commands that allow the display and modification of
configuration data as well as allowing runtime data to be displayed and system maintenance
tasks to be performed.
The CLI is case-sensitive. However, the tab-completion feature of the CLI does not require the
correct case to perform completion and will alter the typed case if it is required.
This section only provides a summary for using the CLI. For a complete reference for all CLI
commands, see the separate
D-Link
CLI Reference Guide.
The most often used CLI commands are:
•
add
- Adds an object such as an IP address or a rule to a NetDefendOS configuration.
•
set
- Sets some property of an object to a value. For example, this might be used to set the
source interface on an IP rule.
•
show
- Displays the current categories or display the values of a particular object.
•
delete
- Deletes a specific object.
CLI Command Structure
CLI commands normally have the structure:
<command> <object_category> <object_type> <object_name>
For example, to display an IP address object called
my_address
, the command would be:
gw-world:/> show Address IP4Address my_address
The
object category
in this case is
Address
and the
type
within this category is
IPAddress
.
When typing commands, the object category can be left out where the command's meaning is
unambiguous. For example, the
show
command above could have been entered as:
gw-world:/> show IPAddress my_address
However, tab completion will always assume the category is included. For example, tab
completion would not be able to help complete the above command if the tab is pressed during
or after the
IPAddress
object type.
The same object name could be used within two different categories or types although this is
best avoided in order to avoid ambiguity when reading configurations.
Note: The terms Category and Context
When describing the CLI, the terms
object category
and
object context
are used
interchangeably.
A command like
add
can also include
object properties
. To add a new IP4Address object with an IP
address of
10.49.02.01
, the command would be:
gw-world:/> add IP4Address my_address Address=10.49.02.01
Chapter 2: Management and Maintenance
47
Содержание NetDefendOS
Страница 30: ...Figure 1 3 Packet Flow Schematic Part III Chapter 1 NetDefendOS Overview 30 ...
Страница 32: ...Chapter 1 NetDefendOS Overview 32 ...
Страница 144: ...Chapter 2 Management and Maintenance 144 ...
Страница 220: ... Enable DHCP passthrough Enable L2 passthrough for non IP protocols 4 Click OK Chapter 3 Fundamentals 220 ...
Страница 267: ... SourceNetwork lannet DestinationInterface any DestinationNetwork all nets 4 Click OK Chapter 3 Fundamentals 267 ...
Страница 284: ...Chapter 3 Fundamentals 284 ...
Страница 360: ...The ospf command options are fully described in the separate NetDefendOS CLI Reference Guide Chapter 4 Routing 360 ...
Страница 392: ...Chapter 4 Routing 392 ...
Страница 396: ...Web Interface 1 Go to Network Ethernet If1 2 Select Enable DHCP 3 Click OK Chapter 5 DHCP Services 396 ...
Страница 419: ... Host 2001 DB8 1 MAC 00 90 12 13 14 15 5 Click OK Chapter 5 DHCP Services 419 ...
Страница 420: ...Chapter 5 DHCP Services 420 ...
Страница 424: ...2 Now enter Name lan_Access Action Expect Interface lan Network lannet 3 Click OK Chapter 6 Security Mechanisms 424 ...
Страница 573: ...Chapter 6 Security Mechanisms 573 ...
Страница 575: ...This section describes and provides examples of configuring NAT and SAT rules Chapter 7 Address Translation 575 ...
Страница 607: ...Chapter 7 Address Translation 607 ...
Страница 666: ...Chapter 8 User Authentication 666 ...
Страница 775: ...Chapter 9 VPN 775 ...
Страница 819: ...Chapter 10 Traffic Management 819 ...
Страница 842: ...Chapter 11 High Availability 842 ...
Страница 866: ...Default Enabled Chapter 13 Advanced Settings 866 ...
Страница 879: ...Chapter 13 Advanced Settings 879 ...

