Non-Overhaul Removal and Replacement
Teledyne Continental Motors, Inc.
TM
10-102
IOF-550 Permold Series Engine Maintenance Manual
1 April 2007
10-9.4.1. Crankshaft Nose Oil Seal Removal
Procedure
1.
Disconnect engine electrical power; turn the Master Power and Ignition Switches to
the OFF position.
WARNING
If the power is not turned OFF, a loose or broken wire could
cause the engine to start and the propeller to rotate. Do not
stand or place equipment within the arc of the propeller.
2.
Disconnect all spark plug leads.
3.
Set the brakes and block the aircraft wheels.
4.
Install aircraft tie-downs and verify the cabin door latch is open.
5.
Remove the propeller in accordance with propeller manufacturer’s instructions and
airframe manufacturer’s instructions.
6.
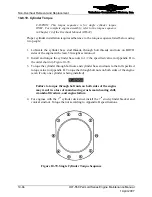
Remove the retainer plate screws (Figure 10-78) from the retainer plates on the front
of the crankcase.
CAUTION: Do not scratch, mar, or damage the crankshaft or
crankcase while remove the crankshaft nose oil seal.
7.
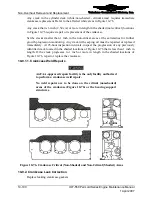
Remove the crankshaft nose oil seal, (which is made up of three components, a seal, a
reinforcing ring, and spring as shown in Figure 10-79). The seal was installed using
Gasket Maker, gentle prying may be required to extract the seal parts from the
counterbore.
8.
Clean the Gasket Maker residue out of the counterbore recess using Loctite Chisel
®
chlorinated solvent or methylene chloride
followed by a naptha solvent such as
Loctite ODC-Free Cleaner and Degreaser. Remove all debris to render the bore clean
and without any trace debris.


