Teledyne Continental Motors, Inc.
TM
Non-Overhaul Removal and Replacement
IOF-550 Permold Series Engine Maintenance Manual
10-31
1 April 2007
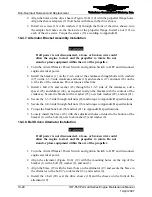
resistance is greater than 500 ohms, closer inspection of the harness segments may
reveal additional damage. If there is no continuity between the referenced pins, verify
connector pin references are correct and repeat the measurement. Repairing a single
segment if the circuit remains open will not resolve a wiring malfunction.
CAUTION: If the shield splice is not placed over the wires before
Step 20, the splice repair cannot be correctly completed without
removing the sealing sleeves and splicing barrels.
17.
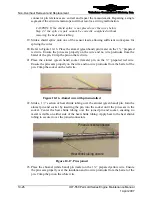
Place a shield splice (small end first) onto one of the cables (low voltage harness or
sensor lead).
18.
Splice the new non-EGT Sensor by placing one sealing sleeve small end first on each
of the longer of the sensor wires on each cable end. The red-banded end of the sealing
sleeve should be oriented toward the wire’s stripped end.
19.
When installing CHT Sensors, label and tag the CHT sensor wires for the appropriate
cylinder.
WARNING
Failure to install the CHT Sensor on the correct cylinder will
result in abnormal engine operation.
20.
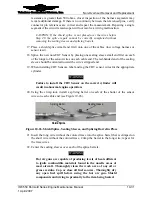
Using the crimp tool, install a splicing barrel on each of the shorter of the sensor
wires on each cable end (see Figure 10-26).
Splicing Barrel
Sealing Sleeve
Shield Splice
Splicing Barrel
Sealing Sleeve
Shield Splice
Figure 10-26.
Shield Splice, Sealing Sleeves, and Splicing Barrel in Place
21.
Insert the long wire without the colored trace into the splice barrel that is crimped on
the short wire without the colored trace. Crimp the barrel to the long wire; repeat for
the trace wires.
22.
Center the sealing sleeves over each of the splice barrels.
WARNING
Hot air guns are capable of producing levels of heat sufficient
to ignite combustible materials found in the nacelle areas of
most aircraft. Thoroughly clean the work area of any oil or
grease residue. Cap or close all fuel sources. Thoroughly dry
any open fuel spill before using the hot air gun. Shield
components and wiring in proximity to the item being heated.


