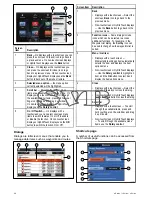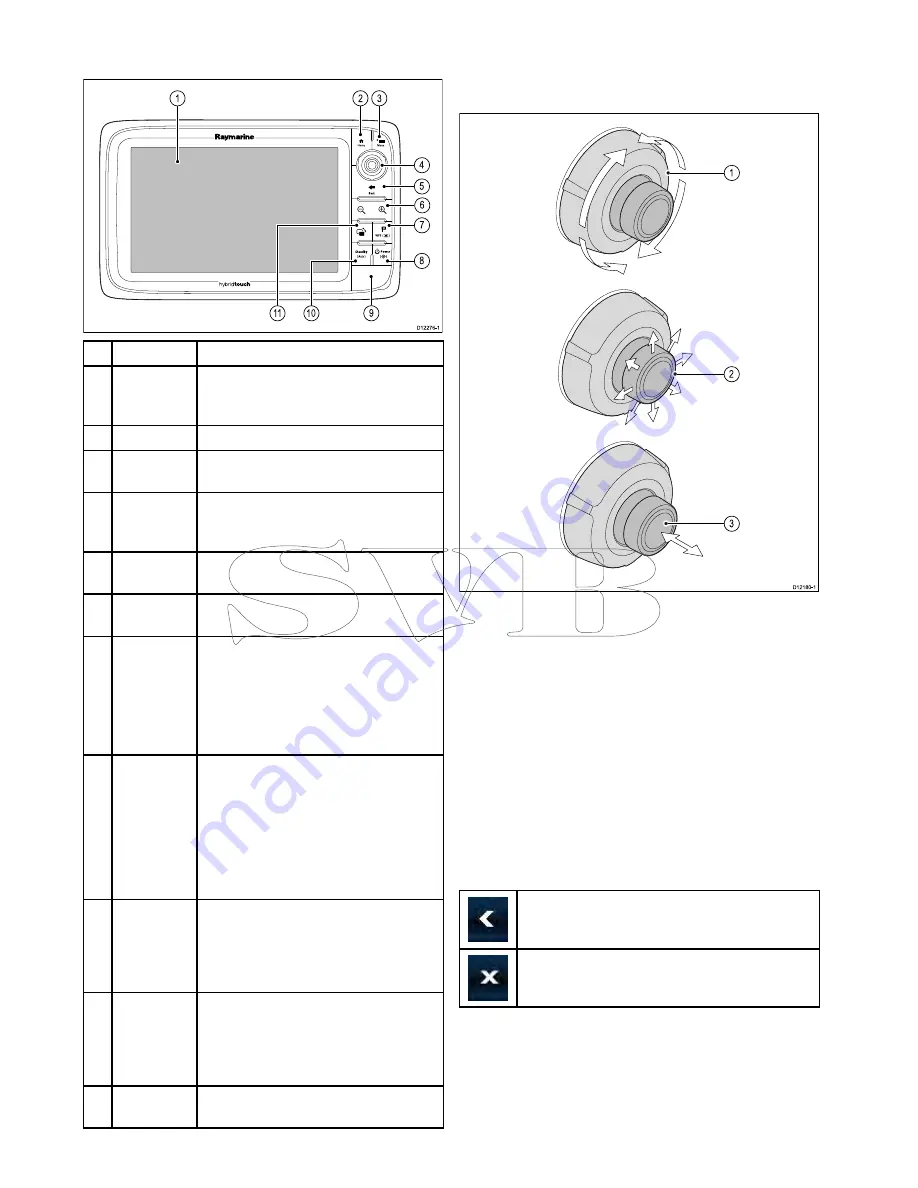
6.4 c95 / c97 / c125 / c127 / e95 / e97 /
e125 / e127 / e165 Controls
D12276-1
1
2
3
4
5
6
7
1
1
1
0
8
9
Description
Functions
1
Touch-
screen
you can touch the screen to operate
many common functions, including all
menu operations.
2
Home
Press to return to the homescreen.
3
Menu
Accesses menus. Press again to close
menus.
4
UniControl
Provides a joystick, rotary control and
an OK push button for using menus and
applications.
5
Back
Press to return to a previous menu or
dialog level.
6
Range
In/Out
Press minus (-) to range out and plus (+)
to range in
7
WPT / MOB
• Press and release to access the
waypoint options. Press again to place
a waypoint.
• Press and hold to place a Man
Overboard (MOB) marker at your
current position.
8
Power
• Press once to switch the unit ON.
• Once powered on, press the Power
button again to adjust the brightness,
perform a screen capture, access
Powersave mode or access the power
controls for external devices.
• Press and hold to switch the unit OFF.
9
Card reader
slot
Open the card door to insert or remove
a MicroSD card. There are 2 card slots
(labelled 1 and 2), used for electronic
charts and archiving waypoint, route,
track and settings data.
10
Pilot
• Press to disengage integrated
autopilot.
• Press and hold to activate Auto mode
on integrated autopilot.
11
Switch
Active Pane
Press to switch the active pane (in
splitscreen pages).
UniControl
Non-touch, HybridTouch and the remote keypad
include a UniControl which consists of Rotary,
Joystick and a push button control.
D12180-1
1
2
3
1.
Rotary
— use this to select menu items, move
the on-screen cursor, and adjust the range in the
chart and radar applications.
2.
Joystick
— use this to move the cursor position
in applications, pan up, down, left and right in the
chart, weather and fishfinder applications or to
cycle through datapages in the data application.
3.
OK
button — push the end of the joystick to
confirm a selection or entry.
Touch icons
Touchscreen multifunction displays can use
the
BACK
and
CLOSE
icons to move between
the different levels of menus available in each
application.
Back
— go back one level (same effect as pressing
the
BACK
button).
Close
— close all open menus (same effect as
pressing the
MENU
button).
90
a Series / c Series / e Series
Summary of Contents for c125
Page 2: ......
Page 14: ...14 a Series c Series e Series ...
Page 41: ...13 GPS receiver 14 Thermal camera 15 Wireless connection Planning the installation 41 ...
Page 48: ...48 a Series c Series e Series ...
Page 80: ...80 a Series c Series e Series ...
Page 118: ...118 a Series c Series e Series ...
Page 184: ...184 a Series c Series e Series ...
Page 188: ...188 a Series c Series e Series ...
Page 206: ...206 a Series c Series e Series ...
Page 228: ...228 a Series c Series e Series ...
Page 290: ...290 a Series c Series e Series ...
Page 310: ...310 a Series c Series e Series ...
Page 340: ...340 a Series c Series e Series ...
Page 374: ...374 a Series c Series e Series ...
Page 422: ...422 a Series c Series e Series ...
Page 436: ...436 a Series c Series e Series ...
Page 462: ...462 a Series c Series e Series ...
Page 463: ......
Page 464: ...www raymarine com ...


