


Detailed Directions
365
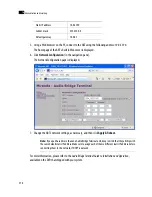
5. Type an IP address in the same range as the default IP address of the Kaleido-X multi-viewer. For
example, if the IP address of the Kaleido-X multi-viewer is “10.0.3.70”, then the IP address of your client
PC could be “10.0.3.123”. If you are unsure, contact your network administrator.
6. Type a subnet mask in the same range as that of the Kaleido-X.
7. Click
OK
.
8. In
Local Area Connection Properties
, click
OK
.
Changing an IP Address on Windows 7
To change the IP address of a client PC that has Windows 7:
1. Click the
Start
button, and then click
Control Panel
. In the search box, type “adapter”, and then, under
Network and Sharing Center
, click
View network connections
.
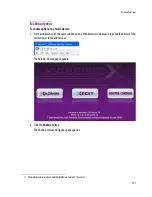
2. In
Network Connections
, right-click
Local Area Connection
, and then click
Properties
. If the system
prompts you for an administrator password or confirmation, type the password or provide
confirmation.
The
Local Area Connection Properties
window opens.
3. On the
Networking
tab, under
This connection uses the following items
, click
Internet Protocol
Version 4 (TCP/IPv4)
, and then click
Properties
.
The
Internet Protocol Version 4 (TCP/IPv4) Properties
window opens.
4. On the
General
tab, click
Use the following IP address
.
5. Type an IP address in the same range as the default IP address of the multi-viewer. For example, if the
IP address of the multi-viewer is “10.0.3.70”, then the IP address of your client PC could be “10.0.3.123”.
If you are unsure, contact your network administrator.
6. Type a subnet mask in the same range as that of the multi-viewer.
7. Click
OK
.
8. In
Local Area Connection Properties
, click
OK
.
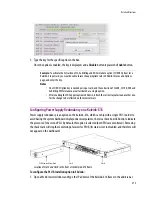
Configuring the Kaleido-RCP2
The Kaleido-RCP2 is a multi-function remote control panel designed for use with Miranda’s Kaleido-X.
Ethernet connectivity allows multiple RCP2 users to access multiple Kaleido-X systems, allowing
convenient access to the real-time operating features of the Kaleido-X. When logged on to a Kaleido-X via
its Ethernet connection, the RCP2 user can control various operating features of the Kaleido-X.
Summary of Contents for Kaleido-X
Page 1: ...Kaleido X User s Manual Part Number M770 2800 111 1 June 2011 ...
Page 8: ...viii toc ...
Page 33: ...Loading a Layout 25 Kaleido X16 ...
Page 34: ...26 Getting Started 2 Kaleido X 4RU ...
Page 152: ...144 Creating Logical Sources 7 ...
Page 178: ...170 Setting Up Rooms 8 ...
Page 244: ...236 Creating Layouts 9 ...
Page 253: ...Detailed Directions 245 3 Under Properties General type a Friendly name for the Action ...
Page 256: ...248 Creating Actions 10 ...
Page 272: ...264 Managing Kaleido RCP2 Users 11 ...
Page 348: ...340 Tally Interface Devices 13 ...
Page 350: ......
Page 352: ...344 Using the Serial to TCP IP Dispatcher 15 ...
Page 406: ...398 Index ...