


134
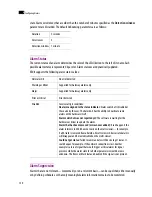
Configuring Alarms
6
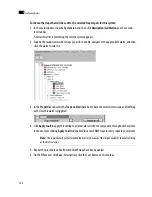
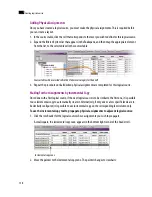
To choose the traps that will be sent to the selected trap targets for this system:
1. In the main window, click the
System
tab, and then click
Description/Calibrations
on the second-
level tab bar.
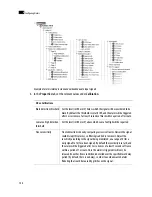
A hierarchical list representing the current system appears.
2. Expand the multi-viewer whose traps you wish to enable, navigate to the appropriate alarm, and then
click the alarm to select it.
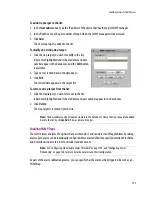
3. In the
Properties
tab, select the
Trap enabled
check box to have the multi-viewer issue an SNMP trap
each time this alarm is triggered:
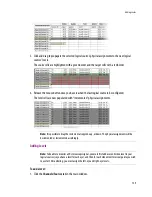
4. Click
Apply to all
to apply this setting to
all other alarms with the same name
, throughout the system.
In the example, clicking
Apply to all
will enable Video Loss SNMP traps for every input in your system.
5. Repeat the procedure until all desired SNMP traps have been enabled.
6. On the
File
menu, click
Save
. Alternatively, click the Save button on the toolbar.
Note:
This is particularly useful for audio input errors, because of the large number of channels arriving
at the multi-viewer.
Summary of Contents for Kaleido-X
Page 1: ...Kaleido X User s Manual Part Number M770 2800 111 1 June 2011 ...
Page 8: ...viii toc ...
Page 33: ...Loading a Layout 25 Kaleido X16 ...
Page 34: ...26 Getting Started 2 Kaleido X 4RU ...
Page 152: ...144 Creating Logical Sources 7 ...
Page 178: ...170 Setting Up Rooms 8 ...
Page 244: ...236 Creating Layouts 9 ...
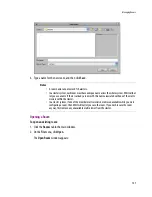
Page 253: ...Detailed Directions 245 3 Under Properties General type a Friendly name for the Action ...
Page 256: ...248 Creating Actions 10 ...
Page 272: ...264 Managing Kaleido RCP2 Users 11 ...
Page 348: ...340 Tally Interface Devices 13 ...
Page 350: ......
Page 352: ...344 Using the Serial to TCP IP Dispatcher 15 ...
Page 406: ...398 Index ...