


332
Tally Interface Devices
13
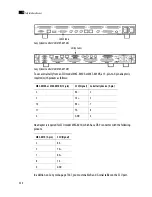
The Kayak switcher’s 8 control ports have DE-9 female connectors
with the following pinouts:
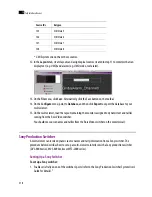
3. Install the Sidepanel software (available on the Kayak Software CD) on a PC or laptop, if you have not
already done so. (Refer to your switcher’s Release Notes for installation instructions.)
4. Launch the Sidepanel software, and navigate to the
Install
>
E-Box
menu.
5. Click the
Router
tab.
6. Under
Automation Control 1
, select the appropriate serial port (i.e. the one to which the multi-viewer
is connected) and the protocol type (only “acos_vxxx” should be available).
This completes the configuration required on the switcher. The ACOS protocol is now enabled on the
serial port used for the connection between the switcher and the multi-viewer. The multi-viewer
system will be able to send commands to the switcher, and the switcher will respond accordingly.
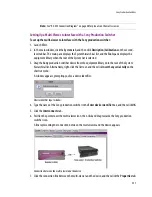
Configuring the Multi-Viewer
For your multi-viewer to receive tally status, input names and output names from a Kayak switcher, and to
display the switcher’s contribution on the monitor wall as visual tally and dynamic text information, you
need to configure your multi-viewer’s Kayak serial tally service, by performing the following tasks in XEdit:
• set up the communication parameters for the serial connection;
• configure logical sources by assigning input names, output names, and tally status from the switcher
to the logical sources’ text or alarm levels;
• assign alarm and text levels from logical sources to layout elements such as UMDs or alarm monitors.
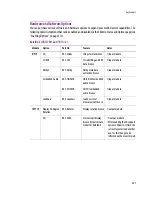
Pin
Signal
1 and 9
Chassis Ground
2
RX-
3
TX+
7
RX+
8
TX-
4 and 6
Signal Ground
Note:
See “RS-422 Connection Diagram” on page 28 for pinouts on the multi-viewer.
Summary of Contents for Kaleido-X
Page 1: ...Kaleido X User s Manual Part Number M770 2800 111 1 June 2011 ...
Page 8: ...viii toc ...
Page 33: ...Loading a Layout 25 Kaleido X16 ...
Page 34: ...26 Getting Started 2 Kaleido X 4RU ...
Page 152: ...144 Creating Logical Sources 7 ...
Page 178: ...170 Setting Up Rooms 8 ...
Page 244: ...236 Creating Layouts 9 ...
Page 253: ...Detailed Directions 245 3 Under Properties General type a Friendly name for the Action ...
Page 256: ...248 Creating Actions 10 ...
Page 272: ...264 Managing Kaleido RCP2 Users 11 ...
Page 348: ...340 Tally Interface Devices 13 ...
Page 350: ......
Page 352: ...344 Using the Serial to TCP IP Dispatcher 15 ...
Page 406: ...398 Index ...