Chapter 17 Troubleshooting
17-108
Replacing MEC Board (V1.02 or Later)
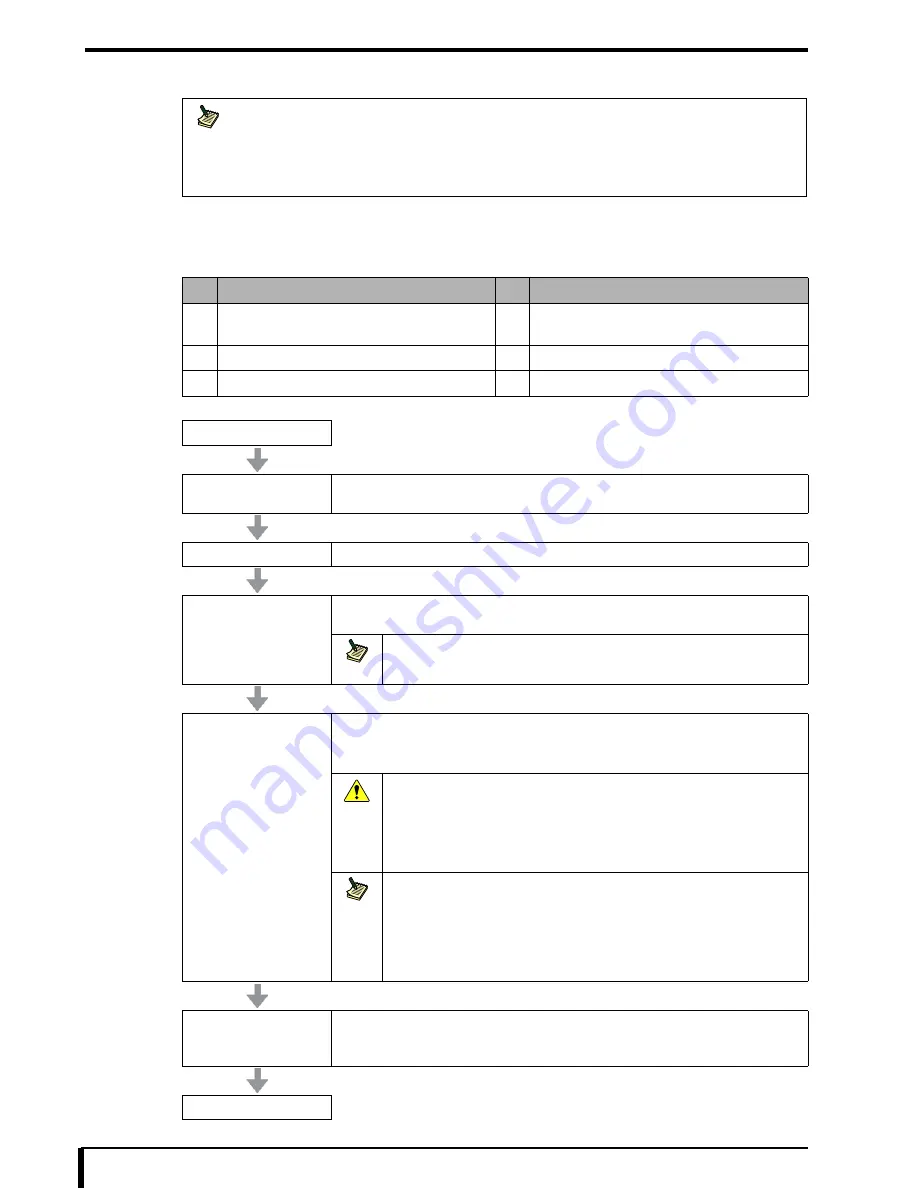
Follow the procedure below to replace the MEC board.
Requirements
Prepare following when replacing MEC board.
Note
This procedure is the replacing method when the software version of the DRYPRO 382 is V1.02 or later.
Refer to
“
Replacing MEC Board (Up to V1.01) (Page 17-106)”
if the software version is up to
V1.01.
For information about the software version of the DRYPRO 832, refer to
“15.11 System Setup (Page 15-
25)”
.
No.
Requirements
No.
Requirements
1
Replacement MEC board (V1.02 or later)
2
Upgrading file
(V1.02 or later)
3
Backup file (DRYPRO 832)
4
DRYPRO 832 Operation Manual
5
DRYPRO 832 Installation Manual
6
DRYPRO 832 Repair Manual
START
Exit the DRYPRO 832
main unit
Refer to
“3.2.1 How to Exit” in the operation manual
to exit the DRYPRO 832 and switch the
power source breaker OFF.
Replace the MEC board
Refer to
“11.3 Replacing Main Board (Page 11-7)”
, and replace the MEC board.
Start the DRYPRO 832
Refer to
“3.1.1 How to Start” in the operation manual
, and check whether the DRYPRO 832
starts normally.
Note
If the MEC upgrade is performed at startup, the startup time may take a few minutes
longer than normal.
Selecting replaced unit
Following message is displayed in the operation panel of DRYPRO 832 when the DRYPRO 832
is started, then press the [Reset/Cancel] button.
•
“Which was changed? CF:enter MEC:reset”
Caution
If the [Open/Enter] button is pressed by mistake (selecting CF), or the “Which
was changed? CF: enter MEC: reset” message is not displayed, the actual film
count and set film count will differ, and a pickup malfunction will occur when
the film tray is empty.
Refer to
“
When mistake was made selecting replaced unit (Page 17-109)”
and recover the previous status.
Note
•
Pressing the [Reset/Cancel] button may cause MEC to start initialization. In that
case, above message is displayed after completion.
•
Following message is displayed 3 minutes after above message is displayed.
•
“Turn OFF the power”
If the message is displayed, restart the DRYPRO 832 by pressing the operation
switch.
Check the serial number
1. Check the serial number in the label on DRYPRO 832.
2. Refer to
“15.17 Product Setup (Page 15-37)”
, and check that the serial number of
DRYPRO 832 is same.
END
Summary of Contents for Drypro 832
Page 2: ......
Page 12: ......
Page 22: ......
Page 28: ......
Page 74: ......
Page 118: ......
Page 228: ......
Page 242: ......
Page 388: ......
Page 498: ......
Page 521: ...18 23 18 5 Block Diagram ...
Page 527: ...18 29 18 7 Printing Operation Load Timing Chart Standard 1 ch ...
Page 529: ......


