SECTION
4
- BOO
M
& PLATFOR
M
3121160
4-23
4.9
ARTICULATING JIB BOOM
Removal
1.
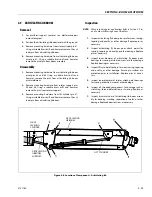
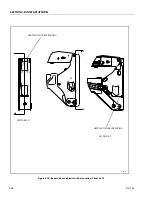
For platform/support removal see platform/support
removal diagram.
2.
Position the articulating jib boom level with the ground.
3.
Remove mounting hardware from slave cylinder pin #1.
Using a suitable brass drift and hammer, remove the cyl-
inder pin from articulating jib boom.
4.
Remove mounting hardware from articulating jib boom
pivot pin #2. Using a suitable brass drift and hammer,
remove the pivot pin from boom assembly.
Disassembly
1.
Remove mounting hardware from articulating jib boom
pivot pins #3 and #4. Using a suitable brass drift and
hammer, remove the pins from articulating jib boom
pivot weldment.
2.
Remove mounting hardware from rotator support pins
#5 and #6. Using a suitable brass drift and hammer,
remove the pins from rotator support.
3.
Remove mounting hardware from lift cylinder pin #7.
Using a suitable brass drift and hammer, remove the cyl-
inder pin from articulating jib boom.
Inspection
NOTE:
When inspecting pins and bearings Refer to Section 2 -
Pins
and Composite Bearing Repair Guidelines.
1.
Inspect articulating fly boom pivot pin for wear, scoring,
tapering and ovality, or other damage. Replace pins as
necessary.
2.
Inspect articulating fly boom pivot attach points for
scoring, tapering and ovality, or other damage. Replace
pins as necessary.
3.
Inspect inner diameter of articulating fly boom pivot
bearings for scoring, distortion, wear, or other damage.
Replace bearings as necessary.
4.
Inspect lift cylinder attach pin for wear, scoring, tapering
and ovality, or other damage. Ensure pin surfaces are
protected prior to installation. Replace pins as neces-
sary.
5.
Inspect inner diameter of rotator attach point bearings
for scoring, distortion, wear, or other damage.
6.
Inspect all threaded components for damage such as
stretching, thread deformation, or twisting. Replace as
necessary.
7.
Inspect structural units of articulating jib boom assem-
bly for bending, cracking, separation of welds, or other
damage. Replace boom sections as necessary.
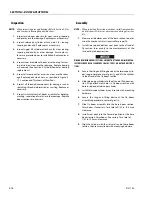
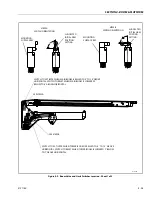
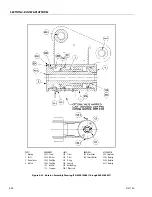
Figure 4-8. Location of Components - Articulating Jib
SLAVE
LEVELING
CYLINDER
ARTICULATING
JIB BOOM
SUPPORT
ARTICULATING
JIB BOOM
LIFT CYLINDER
Summary of Contents for 740AJ
Page 2: ......
Page 55: ...SECTION 3 CHASSIS TURNTABLE 3121160 3 3 This page left blank intentionally...
Page 116: ...SECTION 3 CHASSIS TURNTABLE 3 64 3121160 Figure 3 44 Swing Hub Prior to SN 0300074383...
Page 203: ...SECTION 3 CHASSIS TURNTABLE 3121160 3 151 Figure 3 77 EFI Component Location...
Page 206: ...SECTION 3 CHASSIS TURNTABLE 3 154 3121160 Figure 3 78 ECM EPM Identification ECM EPM...
Page 224: ...SECTION 3 CHASSIS TURNTABLE 3 172 3121160 Figure 3 83 Deutz EMR 2 Troubleshooting Flow Chart...
Page 228: ...SECTION 3 CHASSIS TURNTABLE 3 176 3121160 Figure 3 87 EMR 2 Engine Plug Pin Identification...
Page 229: ...SECTION 3 CHASSIS TURNTABLE 3121160 3 177 Figure 3 88 EMR 2 Vehicle Plug Pin Identification...
Page 230: ...SECTION 3 CHASSIS TURNTABLE 3 178 3121160 Figure 3 89 EMR2 Fault Codes Sheet 1 of 5...
Page 231: ...SECTION 3 CHASSIS TURNTABLE 3121160 3 179 Figure 3 90 EMR2 Fault Codes Sheet 2 of 5...
Page 232: ...SECTION 3 CHASSIS TURNTABLE 3 180 3121160 Figure 3 91 EMR2 Fault Codes Sheet 3 of 5...
Page 233: ...SECTION 3 CHASSIS TURNTABLE 3121160 3 181 Figure 3 92 EMR2 Fault Codes Sheet 4 of 5...
Page 234: ...SECTION 3 CHASSIS TURNTABLE 3 182 3121160 Figure 3 93 EMR2 Fault Codes Sheet 5 of 5...
Page 303: ...SECTION 4 BOOM PLATFORM 3121160 4 31 Figure 4 20 Rotator Assembly HELAC...
Page 460: ...SECTION 5 BASIC HYDRAULIC INFORMATION AND SCHEMATICS 5 116 3121160 NOTES...
Page 467: ...SECTION 6 JLG CONTROL SYSTEM 3121160 6 7 Figure 6 2 ADE Block Diagram...
Page 534: ...SECTION 6 JLG CONTROL SYSTEM 6 74 3121160 NOTES...
Page 580: ...SECTION 7 BASIC ELECTRICAL INFORMATION SCHEMATICS 7 46 3121160 NOTES...
Page 581: ......

