USB Disable
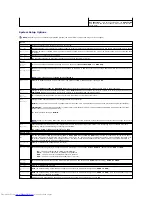
Enables or disables the front-panel USB connectors. The default setting is
On
. To disable the front-panel connectors, select
Off
.
USB
Controller
Enables and disables the integrated USB controller
Off
—
The USB controller is disabled
On
—
The USB controller is enabled
No Boot
—
The USB controller is enabled; however, the BIOS will not recognize USB storage devices.
The factory default setting is
On
.
Front USB
Ports
Enables and disables the front-panel USB ports.
Off
—
Disabled
On
—
Enabled
The factory default setting is
On
.
LPT Port Mode
Selects the mode of operation for the integrated parallel port.
Off
—
Port is disabled
AT
—
Port is configured for IBM AT compatibility
PS/2
—
Port is configured for IBM PS/2 compatibility
EPP
—
Enhanced parallel port protocol
ECP
—
Extended Capability port protocol
The factory default setting is
PS/2.
LPT Port
Address
Selects the base IO address for the integrated parallel port. The factory default setting is
378h
.
Video
Primary Video
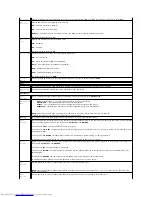
This setting specifies which video controller is primary when two video controllers are present on the computer.
Video Memory
Size
This setting specifies the amount of memory available to video controllers.
Performance
Hyper-
Threading
If your computer's processor supports Hyper-Threading, this option appears in the
Options List
.
HDD Acoustic
Mode
l
Quiet
(default setting)
—
The hard drive operates at its most quiet setting.
l
Performance
—
The hard drive operates at its maximum speed.
l
Bypass
—
Your computer does not test or change the current acoustics mode setting.
l
Suggested
—
The hard drive operates at the level suggested by the drive manufacturer.
NOTE:
Switching to performance mode may cause the drive to be noisier, but its performance is not affected.
Changing the acoustics setting does not alter your hard-drive image.
Security
This section displays available system security options. See "
Security
" for more information.
Admin
Password
This option provides restricted access to the computer's System Setup program in the same way that access to the system can be restricted
with the System Password option. The settings are
Set
,
Not Set
, and
Disabled
.
If the option is to
Set
, an administrator password is assigned.
If the option is to
Not Set
, no administrator password is assigned and the password jumper on the system board is in the enabled position
(the default setting).
If the option is to
Disabled
, the administrator password is disabled by a jumper setting on the system board.
To disable the administrator password, enter the password at the prompt and hit <Ctrl><Enter>.
System
Password
Displays the current status of the system's password security feature and allows a new system password to be assigned and verified. The
settings are
Set
,
Not Set
, and
Disabled
.
If the option is
Set
, a system password is assigned.
If the option is
Not Set
, no system password is assigned and the password jumper on the system board is in the enabled position (the
default setting).
If the option is
Disabled
, the system password is disabled by a jumper setting on the system board.
To disable the system password, enter the password at the prompt and hit <Ctrl><Enter>.
Drive
Password
Set this password to prevent unauthorized users from accessing the hard drive.
NOTE:
The option appears for each installed hard drive that supports hard-drive passwords. If no drives support a drive password, this
option will not display.
ModBay
Password
Set this password to prevent unauthorized users from accessing a hard drive installed in the module bay.
Summary of Contents for OptiPlex GX520
Page 22: ...4 Press Alt b to restart the computer and implement your changes Back to Contents Page ...
Page 29: ......
Page 97: ...Back to Contents Page ...
Page 108: ......
Page 145: ......
Page 149: ...10 Replace the computer cover Back to Contents Page 3 captive screw housing 2 ...
Page 157: ...Back to Contents Page ...
Page 166: ...Back to Contents Page ...
Page 181: ...10 Replace the computer cover Back to Contents Page 3 captive screw in housing 2 ...
Page 222: ...Back to Contents Page Dell OptiPlex GX520 User s Guide Back to Contents Page ...


