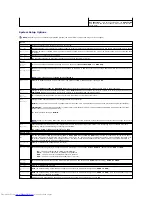
System Setup Options
Key Functions
—
This field appears below the
Option Field
and lists keys and their functions within the active system
setup field.
NOTE:
Depending on your computer and installed devices, the items listed in this section may or may not appear.
System
System Info
Lists the computer name, BIOS version, and service tag.
CPU Info
Identifies whether the computer's processor supports Hyper-Threading and identifies the CPU speed, bus speed, clock speed, and L2 cache.
Memory Info
Indicates amount of installed memory, computer memory speed, amount of video memory, size of the display cache, and channel mode (dual
or single).
Date/Time
Displays current date and time settings.
Boot Sequence
The computer attempts to boot from the sequence of devices specified in this list.
Drives
Diskette
Drive
This option enables or disables the floppy drive. The options are
Off
,
Internal
,
USB
, and
Read Only
.
Drive 0
through Drive
n
Identifies and enables and disables the drives attached to the SATA or IDE connectors on the system board and lists the capacities for the
hard drives.
NOTE:
These options appear as
Drive 0
through
Drive 3
.
Module Bay
Enables or disables devices in the module bay. The options are
On
or
Off
. The default setting is
On
.
NOTE:
The
USB Controller
and
Diskette Drive
setup option affect operation of the optional floppy drive in the module bay.
Drive
Controller
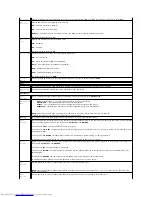
Configures the serial ATA controller's operating mode.
Normal
enables the serial ATA controller to operate in its serial ATA native mode only.
Compatible
enables the serial ATA controller to operate in serial/parallel ATA combination mode.
Error
Reporting
This setting determines whether hard drive errors are reported or not during system setup.
SATA
Operation
Configures the operation mode of the integrated hard-drive controller.
Normal
—
The hard-drive controller is configured for native mode. This mode provides the highest drive performance and most flexibility.
Combination
—
The hard-drive controller is configured for combination mode. This mode enables compatibility with some older operating
systems that do not support SATA drives.
The factory default setting is
Normal
.
NOTE:
Changing this setting affects the order in which drives are listed. However, system setup does not reflect these changes until after a
reboot.
SATA
Reporting
Controls whether hard drive errors for integrated drives are reported during system status. This technology is part of the SMART (Self-
Monitoring Analysis and Reporting Technology) specification.
The options are
On
or
Off
. The default setting is
Off
.
Onboard Devices
Integrated
NIC
You can set the NIC to
On
(default setting),
Off
, or
On w/ PXE
. When the
On w/ PXE
setting is active (available only for the future boot
process), the computer prompts the user to press <Ctrl><Alt><b>. Pressing this key combination causes a menu to display that allows you
to select a method for booting from a network server. If a boot routine is not available from the network server, the system attempts to
boot from the next device in the boot sequence list.
Integrated
Audio
Enables or disables the onboard audio controller
LPT Port Mode
This option sets the operating mode for the built-in parallel port. The settings are
Off
,
AT
,
PS/2
(default setting),
EPP
, and
ECP
.
l
AT
—
The port is configured for IBM
®
AT compatibility.
l
PS/2
—
The port is configured for IBM PS/2 compatibility.
l
EPP
—
The port is set for enhanced parallel port protocol.
l
ECP
—
The port is set for extended capability port protocol.
LPT Port
Address
This option sets the address that the built-in parallel port uses. The settings are
378h
(default setting),
278h
, and
3BCh
.
PCI Slots
Enables or disables the PCI slots.
Serial Port
#1
Auto
, the default setting, automatically configures a connector to a particular designation (
COM1
or
COM3
).
Serial Port
#2
Auto
, the default setting, automatically configures a connector to a particular designation (
COM1
or
COM3
). (This setting appears only if an
optional serial port adapter is installed.)
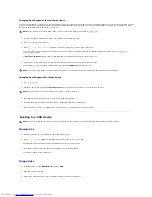
USB
USB devices are detected and supported in the operating system when this option is set to
On
.
Summary of Contents for OptiPlex GX520
Page 22: ...4 Press Alt b to restart the computer and implement your changes Back to Contents Page ...
Page 29: ......
Page 97: ...Back to Contents Page ...
Page 108: ......
Page 145: ......
Page 149: ...10 Replace the computer cover Back to Contents Page 3 captive screw housing 2 ...
Page 157: ...Back to Contents Page ...
Page 166: ...Back to Contents Page ...
Page 181: ...10 Replace the computer cover Back to Contents Page 3 captive screw in housing 2 ...
Page 222: ...Back to Contents Page Dell OptiPlex GX520 User s Guide Back to Contents Page ...


